10.7 Inspection and Palpation of the Lymph Nodes
This assessment is often performed with the client sitting upright on the exam table to assess the lymph nodes in the head and neck, the upper arm, and the axillae, and then with the client repositioned into a supine position to assess the lymph nodes in the groin.
- NOTE: Lymph nodes are located in many areas of the body, some of which are not physically accessible. Although some of the axilla lymph nodes are associated with the breast, other lymph nodes associated with the breast will be explored in another chapter.
Use the following techniques to palpate the lymph nodes:
- Prior to palpation, say to the client, “Let me know if you have any pain or tenderness when I touch you.”
- Use the finger pads of two to three fingers and move them in a circular motion.
- Use a light touch with gentle pressure so that you don’t forcefully push the node inwards.
- After you palpate in one spot, shift your fingers to a new spot within the same area, because there are strands of lymph nodes in each area. This should be done about two to three times in each area.
- Typically, you palpate bilaterally at the same time and compare the right side to the left side.
- Conclude by asking the client if they had any pain or tenderness.
See Table 10.2 for what to note when assessing lymph nodes and abnormal characteristics.
|
Lymph Nodes of Head and Neck
Steps for assessing lymph nodes of the head and neck are as follows:
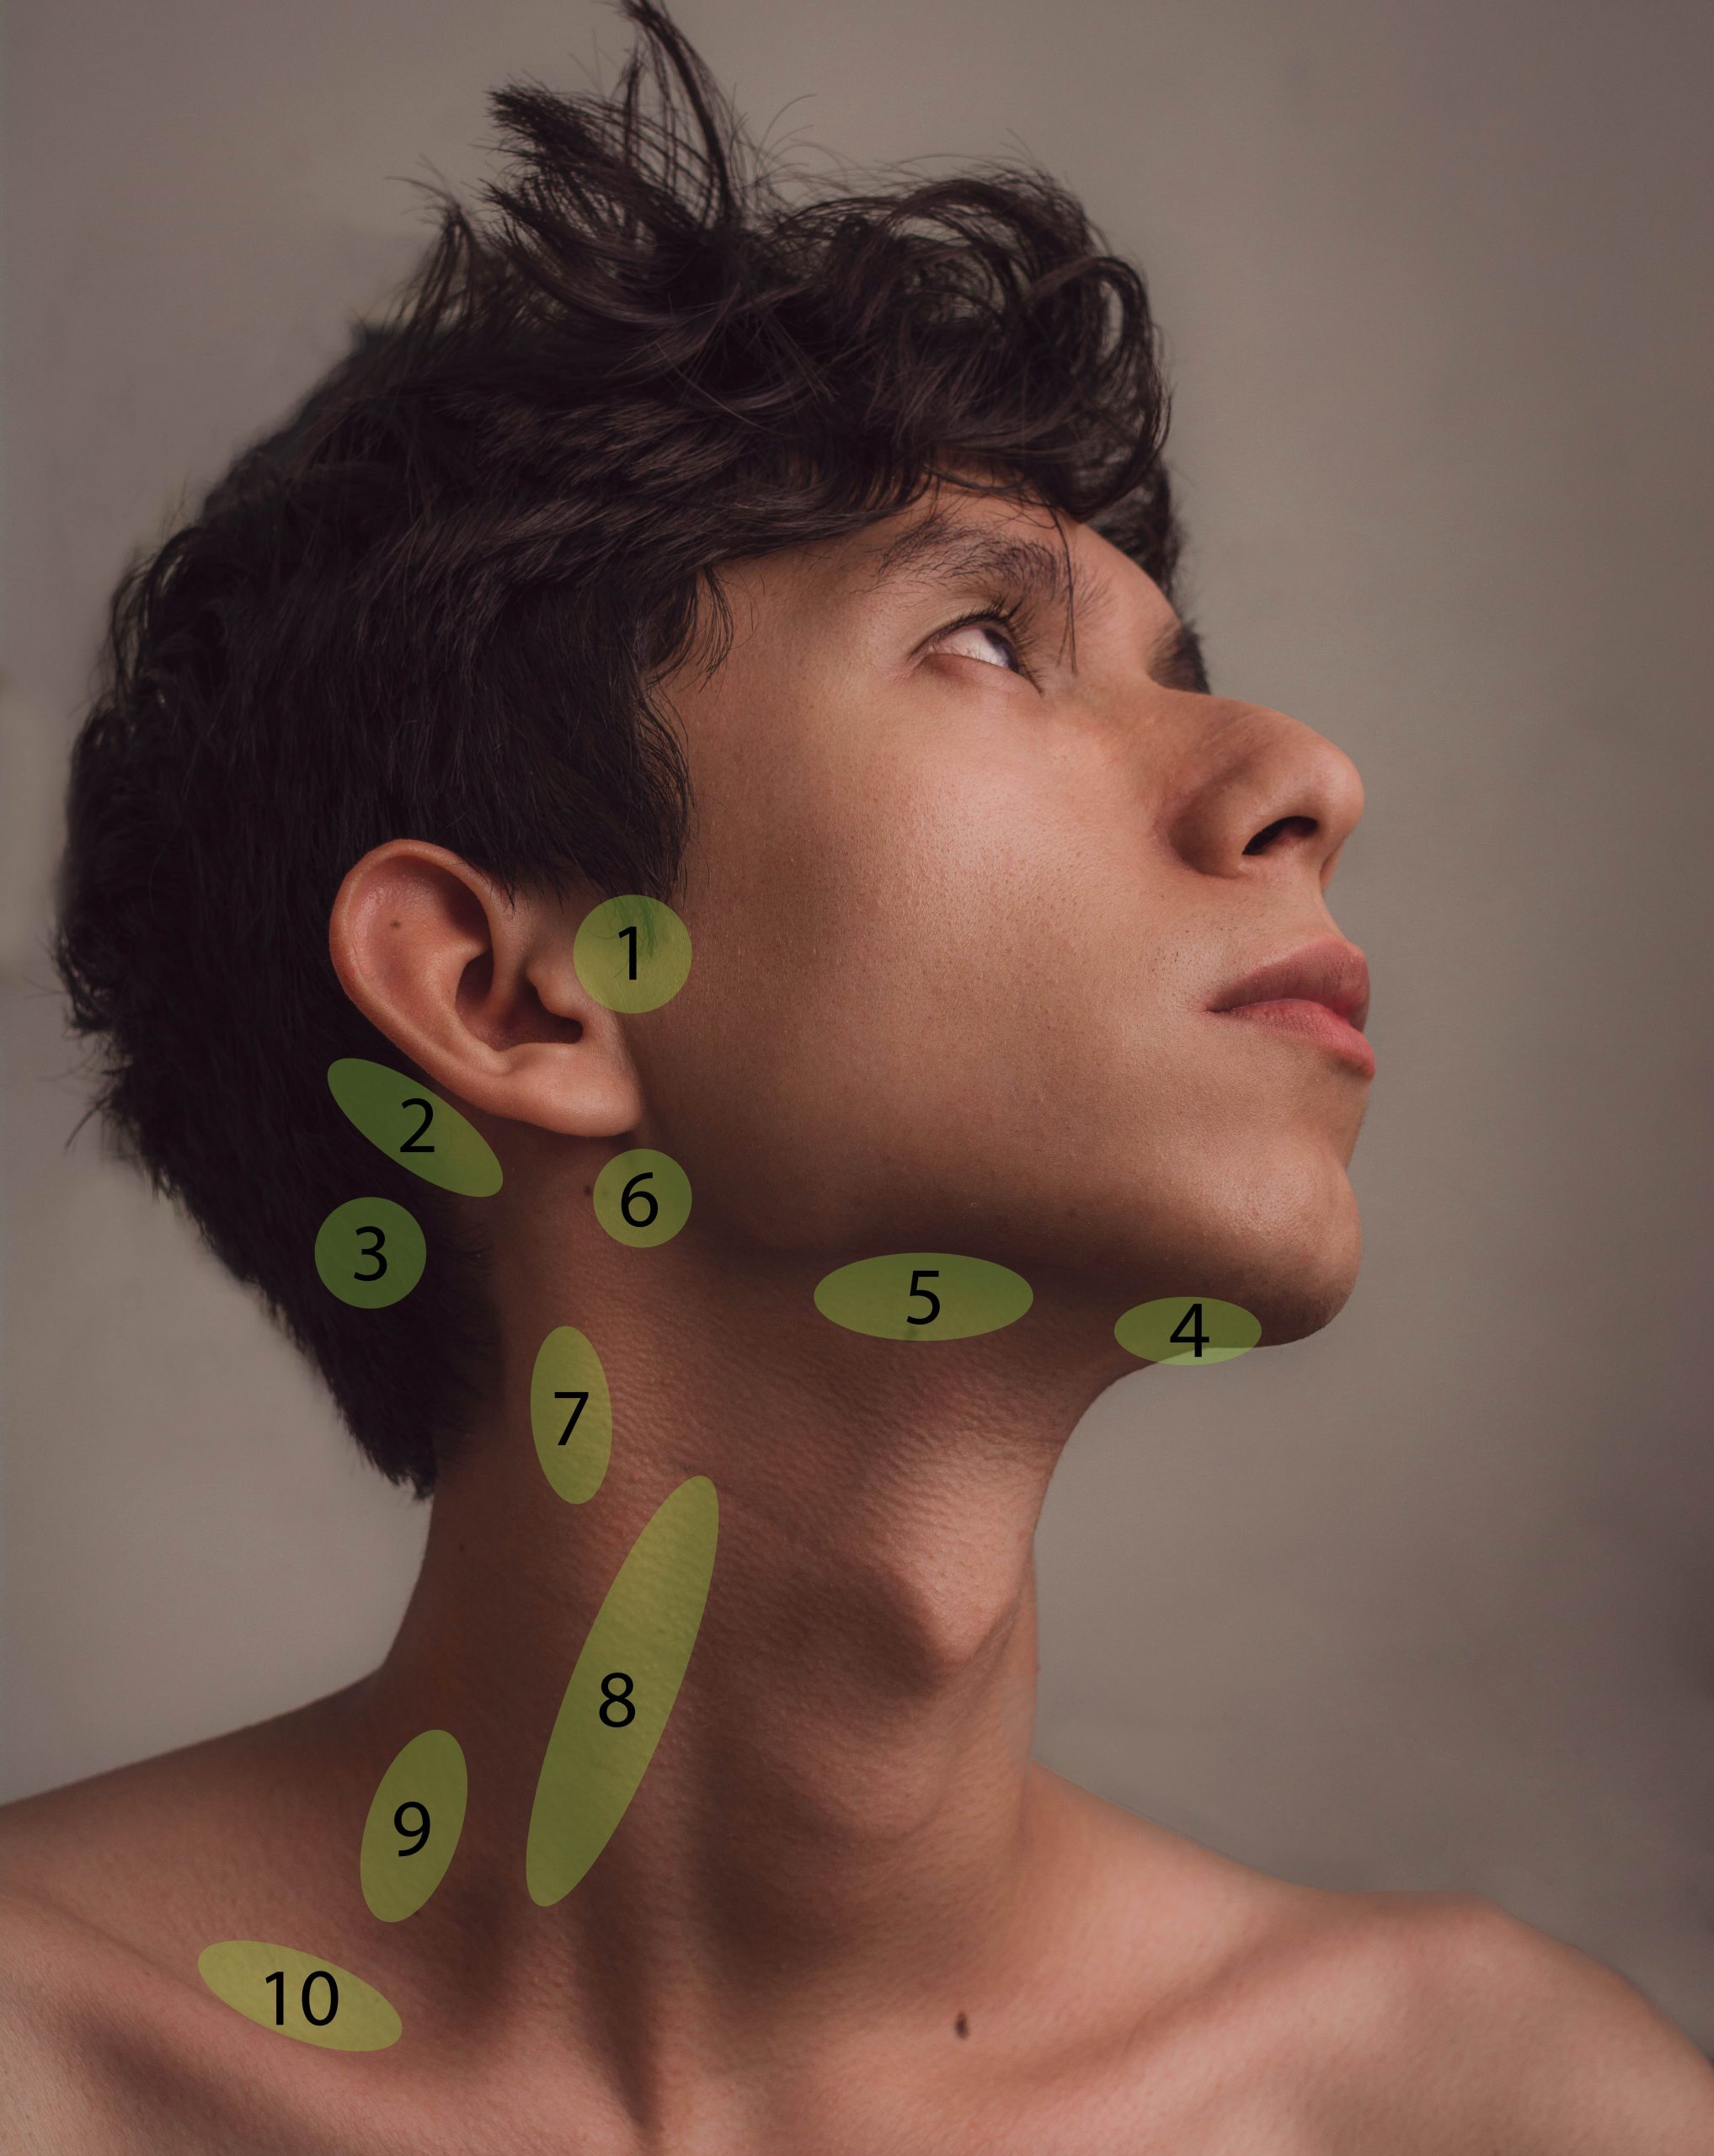
Step 1: Inspect the lymph node areas on the head and neck (see Figure 10.8) for swelling, asymmetry, and erythema.
- Normally, the lymphatic areas are symmetrical between sides with no discoloration, swelling, or visible nodes.
- Abnormal findings may include asymmetry and visible nodes due to swelling with erythema overlying the skin.
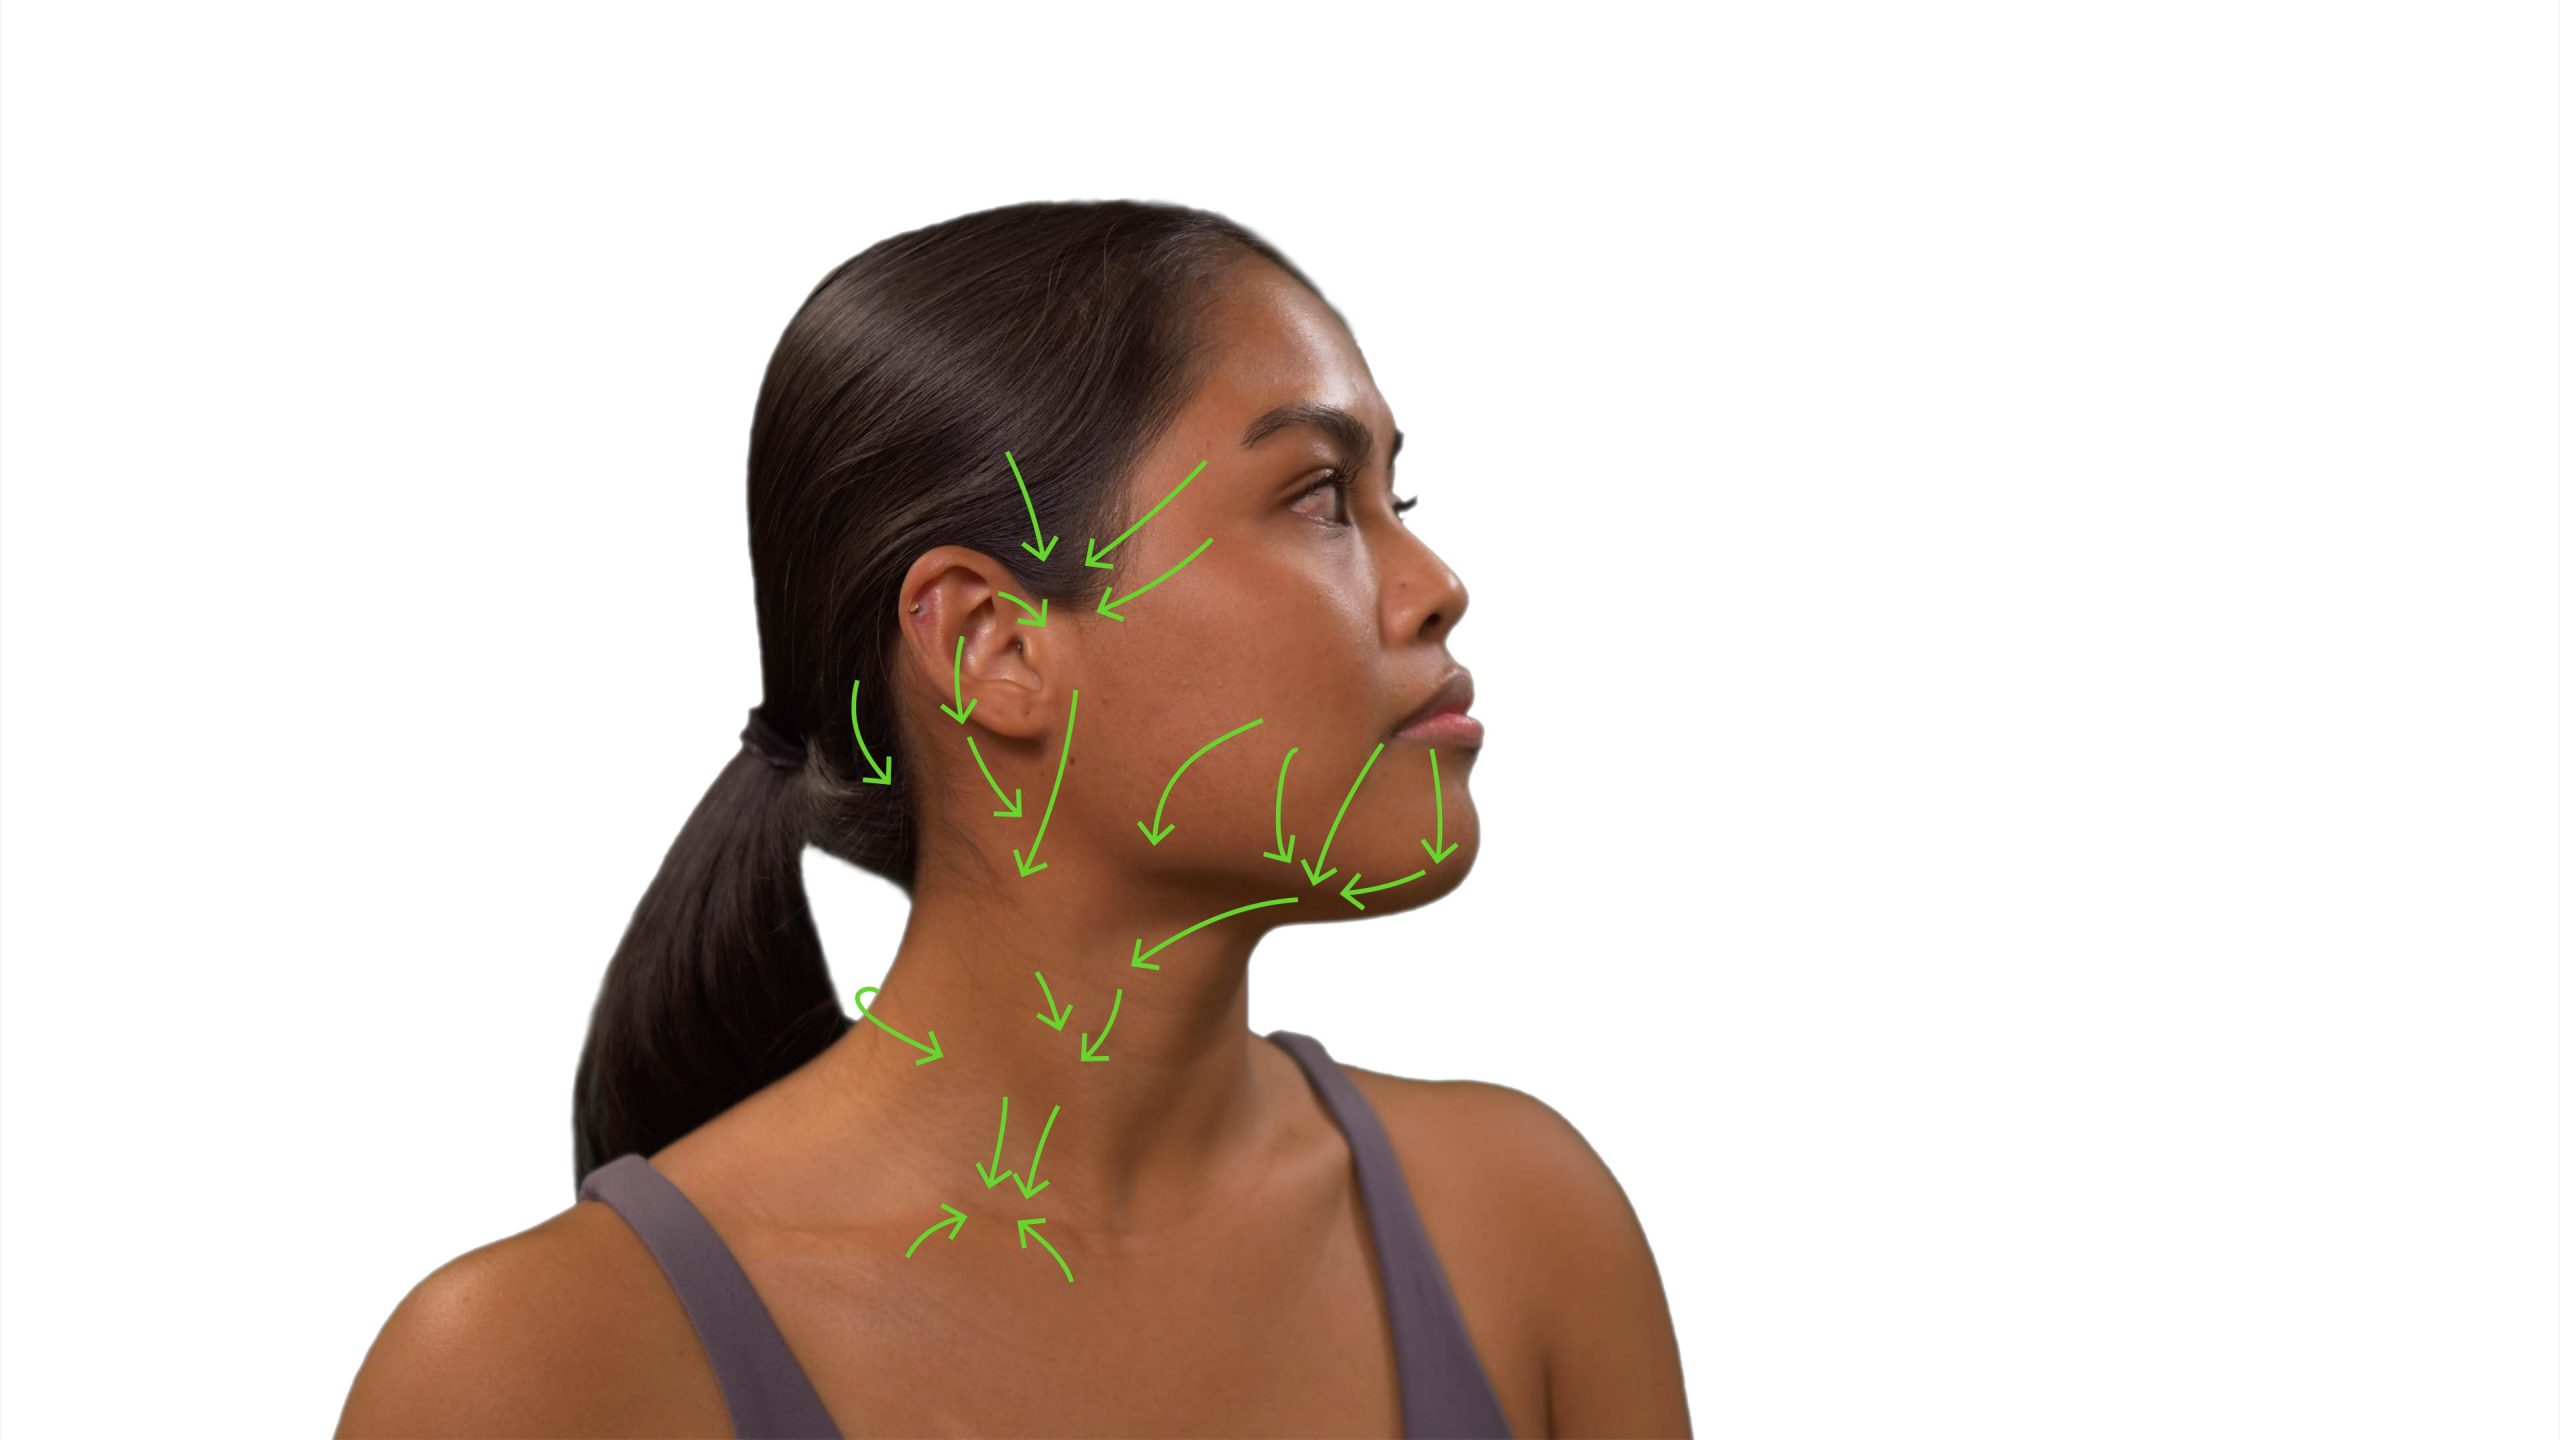
Step 2: Palpate for lymph nodes using a systematic approach moving from proximal to distal, thus moving from preauricular to supraclavicular area (see Figure 10.8, Table 10.3, and Video 1). Consider lymphatic drainage patterns (see Figure 10.9); this approach allows you to reflect on the origins of the cause when there is an abnormality. Recall to palpate nodes bilaterally at the same time: for example, assess the preauricular nodes on the left and right side at same time. However, for the submental lymph nodes, you should use the fingers of your dominant hand to palpate just under the chin behind the bony prominence. When assessing the deep cervical chain on clients with a muscular neck, you may ask the client to tip their head toward the side you are assessing to relax the sternomastoid muscle; thus, you will need to do one side at a time. For the supraclavicular nodes, you can ask the client to gently raise their shoulders.
- Normally, lymph nodes are not palpable, but remember that normal lymph nodes can sometimes be palpable in young children.
- If a lymph node is palpable, assess them as per Table 10.2 noted above.
- If lymph nodes are visible or palpable, palpate the temperature over the lymph node areas of the head and neck using the dorsa of your hands, comparing bilaterally.
Step 3: Note the findings:
-
- Normal findings might be documented as: “No lymph nodes palpable in the head and neck, no swelling, no asymmetry, no discoloration or increased temperature over lymph node locations, and no pain.”
- Abnormal findings might be documented as: “Visible lymph nodes in the neck, hard, matted, and palpable cervical and supraclavicular lymph nodes on the right side, 3 cm. Client indicates they are tender.”
|
Name |
Location |
|
1 Preauricular |
Anterior to the tragus of the ear. |
|
2 Posterior auricular |
Along the mastoid process. |
|
3 Occipital |
Inferior to the occipital bone and on the lateral side of the occipital bone. |
|
4 Submental |
Under the chin behind the bony prominence. |
|
5 Submandibular |
Halfway between the submental nodes and the angle of the jaw. |
|
6 Tonsillar |
Inferior to the angle of the jaw. |
|
7 Superficial cervical chain |
Along the sternomastoid muscle at the top, just below the mastoid process. |
|
8 Deep cervical chain |
Further down the sternomastoid muscle. |
|
9 Posterior cervical chain |
Behind the sternomastoid muscle. |
|
10 Supraclavicular |
Superior to the clavicles. |
Video 1: Palpation of head and neck lymph nodes [1:16]
Lymph Nodes of Upper Arm and Axillary Area
Steps for assessing lymph nodes of the upper arm and axillary area:
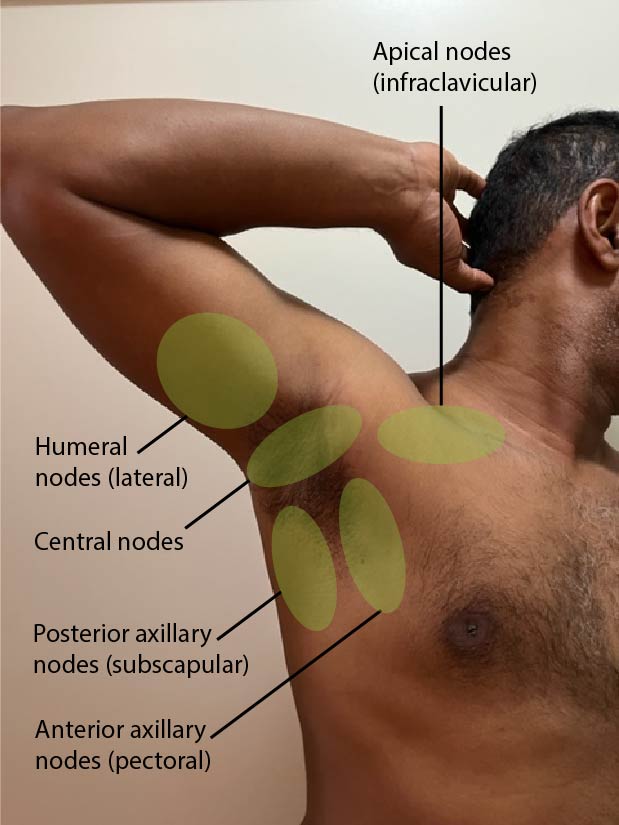
Step 1: Inspect the area surrounding the upper arm where the epitrochlear lymph nodes are located (see Figure 10.10—the area under the fingertips is where you should inspect, which is superior to and behind the medial epicondyle of the humerus) and inspect the axillae where the axillary lymph nodes are located (see Figure 10.11).
- Normally, the lymphatic areas are symmetrical on each side with no discoloration, swelling, or visible nodes.
- Abnormal findings may include asymmetry and visible nodes due to swelling with erythema overlying the skin. If a lymph node is palpable, assess it for abnormal characteristics (Table 10.2).

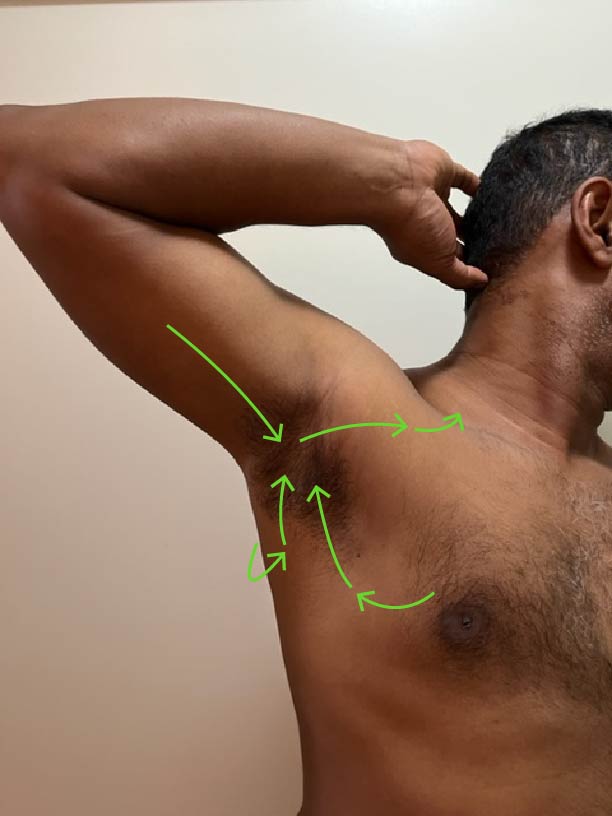
Step 2: Palpate the epitrochlear (Video 2) and axillary lymph nodes (Video 3). Prior to palpation, say to the client, “Let me know if you have any pain or tenderness when I touch you.” For the epitrochlear lymph nodes: Ask the client to place their forearm on the bedside table with the palm facing up and palpate in a gentle circular motion in about two to three locations just superior to and behind the medial epicondyle of the humerus (about 1–2 cm). For the axillary lymph nodes: Ask the client to raise their arm and rest their hand on the back of their head. Use a gentle circular motion to palpate. Begin in the axilla: palpate in one row high in the axilla, then palpate in three rows away from the axillae along the upper arm, then three rows away from the axillae down the chest wall, and then in one row medially (see Figure 10.12 for pattern). For each row, palpate about three to four locations.
- Normally, there are no palpable lymph nodes.
- If a lymph node is palpable, assess it as per Table 10.2 and pay attention to the drainage patterns noted in Figure 10.13. It is important to recognize that a large amount of the lymph from the breast drains into the anterior axillary nodes, lymph from the back drains into the posterior axillary nodes, and lymph from the arm drains into the lateral nodes. Additionally, this lymph drains into the central nodes to the apical nodes to the supraclavicular, and then often returns to the vascular system through the subclavian vein via the thoracic duct.

Step 3: If lymph nodes are visible or palpable, palpate the temperature over the lymph node areas of the axillary and epitrochlear areas using the dorsa of your hands comparing side to side.
- Normally, there is no increase in temperature.
- Some abnormal lymph nodes will have increased localized skin temperature overlying the node.
Step 4: Note the findings.
- Normal findings might be documented as: “No lymph nodes palpable in the upper arm or axillae, no swelling, no asymmetry, no discoloration and no increased temperature over lymph node locations, and no pain reported by the client.”
- Abnormal findings might be documented as: “Hard, matted and palpable lymph nodes on the left axillary side. Tenderness reported by the client.”
Video 2: Palpation of the epitrochlear lymph nodes (showing technique on right arm) [0:25]
Video 2: Palpation of the axillary lymph nodes (showing technique on right side) [1:05]
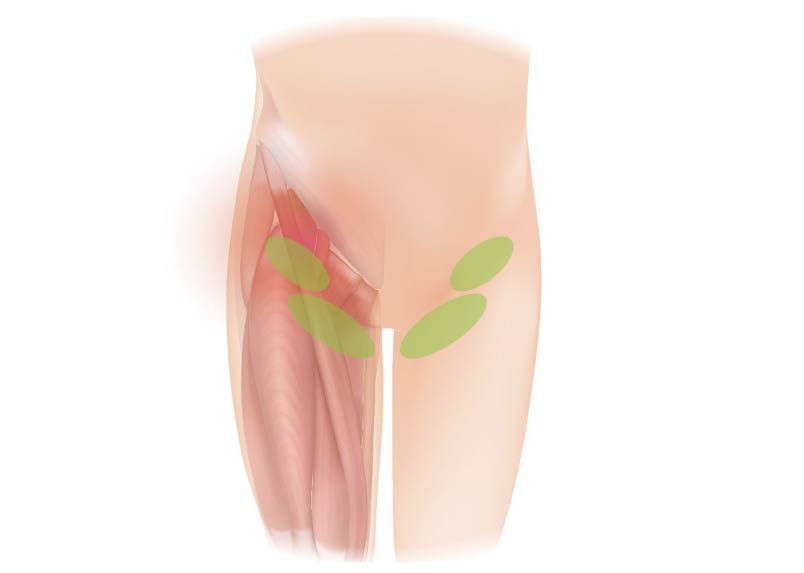
Lymph Nodes of the Groin
Steps for assessing lymph nodes in the groin area:
Step 1: Inspect the groin area for the inguinal lymph nodes. Assist the client into supine position and provide a drape. Briefly expose one side to inspect and then repeat on the other side. Normally, the lymphatic areas are symmetrical on each side with no discoloration, swelling, or visible or palpable nodes.
- Abnormal findings may include asymmetry and visible nodes due to swelling with erythema overlying the skin.
Step 2: Palpate the groin area for the inguinal lymph nodes. Assist the client into supine position and provide a drape. Briefly expose one side and palpate, and then repeat on the other side. Prior to palpation, say to the client, “Let me know if you have any pain or tenderness when I touch you.” Palpate about four to five times in the groin area (Figure 10.14). If nodes are palpable, assess for temperature (comparing bilaterally).
- Normally, the lymphatic areas are symmetrical on each side with no visible or palpable nodes.
- Abnormal findings may include visible nodes due to swelling with erythema overlying the skin. If a lymph node is palpable, assess it for abnormal characteristics (Table 10.2).
Step 3: Note the findings.
- Normal findings might be documented as: “No lymph nodes palpable in the groin, no swelling, asymmetry, discoloration or increased temperature over lymph node locations, and no pain reported.”
- Abnormal findings might be documented as: “Palpable, soft right-sided inguinal lymph node. Tenderness reported by the client.”
Priorities of Care
Lymph nodes with abnormal characteristics require further investigation and should be reported to the physician or nurse practitioner. Depending on the client, you may ask about whether they have been recently unwell or have noted any other concerns in the affected area (pain, itching, rashes). You might also ask whether they shave or have had a recent cat scratch or bite. Lymph node swelling can be associated with certain infections such as skin and yeast infections; sexually transmitted infections; and eye, ear, and throat infections. In rare situations, it can also be associated with cancer, particularly when accompanied by other symptoms such as fatigue, unexplained weight loss, persistent fever, fainting, or breathing issues, and if the lymph nodes have continued to enlarge with no obvious signs of infection.
Contextualizing Inclusivity
The lymphatic system undergoes changes as a person ages; the lymphatic vessels become thinner and the lymph nodes atrophy. As a result, older people may have more difficulty fighting infection and are more prone to lymphedema.
Always use a trauma-informed approach, particularly when assessing the inguinal lymph nodes due to their location. Explain what you are doing and why, ask permission to touch, provide a drape, and ask if the client would like someone present (a friend, family member, or another health care provider).
