9.7 Nose, Sinuses, and Trachea
Inspection and palpation of the nose should be performed standing directly in front of the client while they are sitting upright on the examination table or a chair. It is important to don gloves as you may be in contact with bodily fluids such as nasal discharge.
Inspection
Step 1: Inspect the external surface of the nose for symmetry and color.
- Normally, the nose is symmetrically aligned on the face and the same color as the rest of the face with no discolorations such as redness. Describe the appearance and location of any discolorations noted.
Step 2: Inspect the contour and external surface of the nose for symmetry, swelling, and malformations such as masses and lesions.
- Normally, the nose is symmetrical with no swelling or malformations. Describe the appearance and location of any abnormalities (the bridge can be straight, curved, or have a hump).
Step 3: Inspect the nasal cavity and mucosa of the nose for color, discharge/bleeding, swelling, foreign bodies, and malformations. See Figure 9.8a and Video 4.
- Ask the client to tilt their head gently backwards while you use your finger to elevate the tip of their nose.
- Use a penlight or the light source from a otoscope to illuminate the nasal cavity. If using an otoscope, obtain proper training, use a large/wide cover for the otoscope probe, and ensure that you do not touch any part of the nose with it as the mucosa is sensitive and highly vascular. Discard the probe cover in the garbage when done.
- The nasal mucosa is normally pinkish, red in color, moist with no discharge or bleeding. Describe any discoloration of the mucosa or the color and amount of any discharge/bleeding.
- Normally, there is no swelling or foreign bodies. If present, describe the appearance and location of swelling and foreign bodies. In children, common foreign bodies include little toys and beads.
- Common malformations may include lesions, masses, polyps, and deviated or perforated septum. If any are present, describe the appearance and location. Polyps appear as a tear-drop formation. A deviated septum is when the septum is off center and bulges laterally. A perforated septum is when there is a hole/opening in the septum; it is typically observed when you illuminate one side of the nasal cavity and you observe the light on the other side.
- Inspect nasal turbinates for color (normal pink, pale in allergies, red in infection), swelling (from allergies or infection), exudate (clear in allergies, yellow/green in infection), and polyps (indicating chronic inflammation).
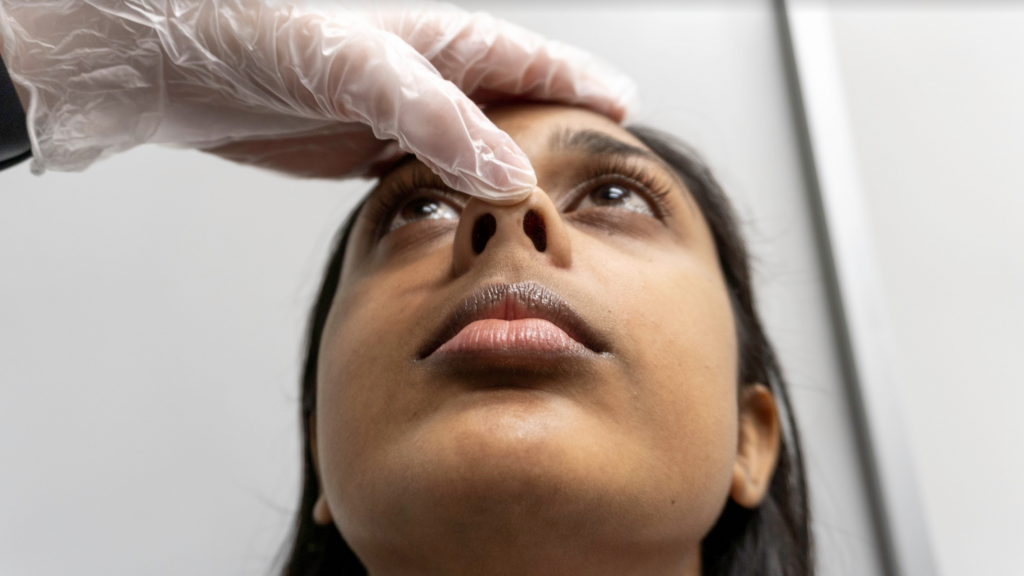
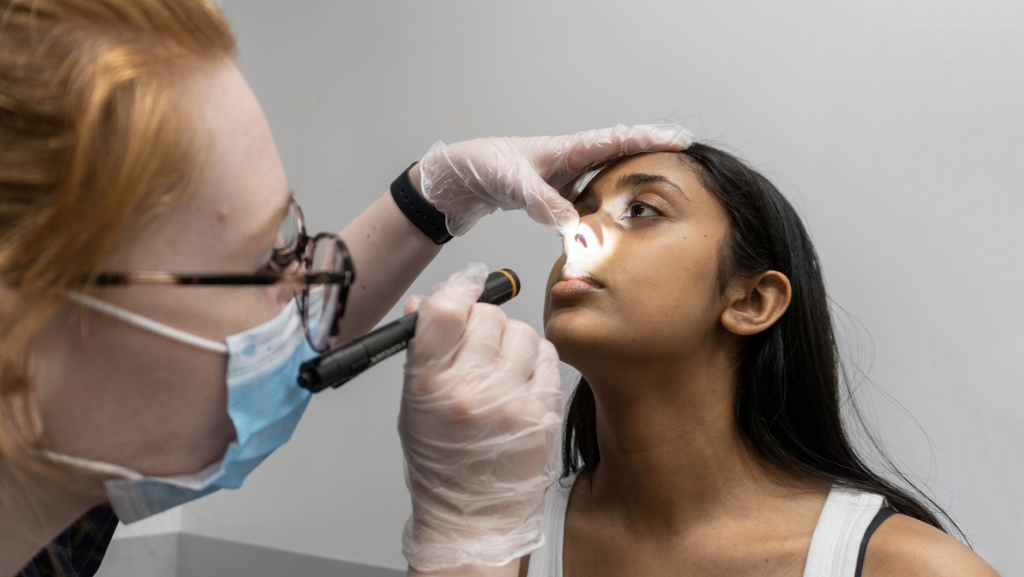
Figure 9.8a: Inspecting the nasal cavity and mucosa. Screenshots from the video Inspection of the Nose and Nasal Cavity by opennursing, licensed under Creative Commons Attribution.
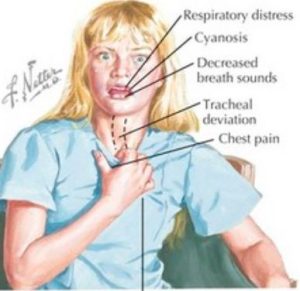
Step 4: Inspect the trachea in the neck region for alignment.
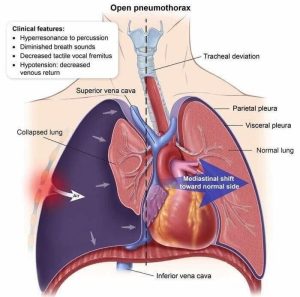
- Normally the position of the trachea is midline without deviation. Deviation of the trachea from its midline position in the neck (See Figure 9.8b) is a CRITICAL CLINICAL SIGN may indicate pneumothorax (See Figure 9.8c), lung collapse, or other pathologies requiring immediate interventions.
Step 5: Note findings.
- Normal findings might be documented as: “External nose is symmetrical with no discoloration, swelling, or malformations. Nasal mucosa is pinkish red with no discharge/bleeding, swelling, malformations, or foreign bodies. Trachea is midline.”
- Abnormal findings might be documented as: “Bright red nasal mucosa with purulent discharge.”
Video 4: Inspecting the nasal cavity and mucosa
Palpation
Steps to palpate the nose include:
Step 1: Gently palpate the external nose if trauma/injury or lesions are present.
- Use the thumb and the index finger to palpate the contour.
- Lesions can be palpated with the index finger. Note the consistency of lesions (e.g., are they soft or firm?).
Step 2: Palpate the nose for airflow/patency.
- Occlude one naris at a time while placing your index finger over the outside of the nose/nasal wing.
- Ask the client to take a deep and quick inhalation in through the nose (like a sniff in which they draw air inwards as if trying to smell something).
- Note the client’s capacity to breathe inwards. The client should be able to breathe inwards with no obstructions.
Steps to palpate the sinuses include:
Step 1: With your thumb, gently palpate one sinus at a time.
- Use a circular motion to palpate.
- Begin with the frontal sinuses (see Figure 9.8d) inferior to the eyebrows over the bony ridge. Avoid the eye socket.
- Then, palpate the maxillary sinuses (see Figure 9.8d) inferior to the zygomatic bone slightly lateral to the nose.
- Inquire if the client had any pain/tenderness upon palpation. A slight pressure is normal. If pain/tenderness is present, assess further subjectively.

Step 4: Note the findings.
- Normal findings might be documented as: “No sinus pain noted. Nose is patent with good airflow. Trachea is midline without deviation.”
- Abnormal findings might be documented as: “Left frontal sinus pain 6/10. Tracheal deviation to one side.”
Priorities of Care
You should call for assistance while monitoring breathing and vital signs and performing a focused assessment if the client is experiencing signs of respiratory distress associated with any malformations, trauma/injury to the nose, or nasal obstructions. It can be helpful to sit the client upright to assist with breathing.
Deviated septum is quite common. Unless it affects a client’s breathing, typically no action is required. Similarly, if a client has a nasal obstruction or an absence of sniff, you should attempt to determine the cause. Is it mucus or a foreign body (like a toy)? Does it just affect one side? If an obstruction is noted, assess for the presence of any findings of respiratory distress. Usually absence of sniff in one naris isn’t an urgent finding as a person can breathe through the other side and the mouth, but you should evaluate the cause.
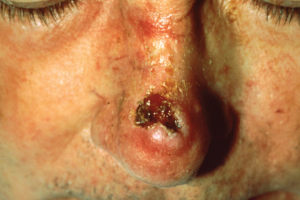
Other abnormal findings that require action are lesions and sinus pain. A focused assessment should be performed and findings reported to the physician/nurse practitioner. Depending on the cause, sinus pain may require treatment such as decongestants, antibiotics, or antihistamines. Cutaneous lesions on the nose should be closely examined. There are many causes of lesions such as herpes simplex virus or a melanoma. For example, the lesion in Figure 9.9 is a carcinoma, which is a serious finding. These sorts of lesions are often brought to the attention of health care providers when clients share that they have noticed an open sore that has developed with no physical trauma and has not healed. In addition to no physical trauma, a sore that doesn’t heal should be of concern; although it really depends on the type and severity of a sore, the typical timeframe to heal is 4 to 6 weeks. These lesions are not a critical finding, but they are life-threatening; they require prompt intervention because they are curable if diagnosed and treated early.