6.7 Skin: Inspection
Inspection of the skin can be performed with the client sitting upright on the exam table or lying in a supine position. If you are doing a focused assessment, position the client so that you have the best visibility of the affected area. Use a bright light or a pen light if needed. Shadows and dark lighting may alter your visualization of the affected area and provide information about the elevation of a lump.
If you are doing a complete assessment, use a systematic approach and proceed cephalocaudally (head-to-toe) to ensure comprehensiveness. If the client has identified a specific concern, inspect that area first. If you are doing a complete assessment when the client has no specific concerns, inspect the face, arms/hands, back, abdomen, chest, and legs/feet. Always inspect the anterior and posterior side; for example, for the arms, ask the client to raise their hands/arms in front of them with their palms facing down and then turn palms up so that you can inspect both sides. Similarly, for the legs, inspect the anterior and then have the client roll over so that you can inspect the posterior. You may need to seek assistance to reposition a client that is immobile or has difficulty moving.
Keep in mind that the best control for comparison is the client’s own body, so always compare bilaterally.
Clinical Tip
Commonly overlooked areas for skin inspection include behind the knees, in skin folds, and between digits (fingers and toes). Other important areas to check are bony prominences (e.g., hips, spine, ankles), especially if the client has mobility issues. If the client is unable to reach these areas, encouraging family members to assist with checks can be helpful.
Skin inspection involves the following steps:
1. Inspect the skin for symmetry and color using both a generalized and localized approach. To visualize general color, step back and take note of their general appearance; for a localized approach, inspect specific regions. Mucous membranes, palms, sclera, and regions around the mouth can all be telltale signs for centralized color variations. Pay special attention to skin folds such as under the breasts, groin, and in between fingers and toes. Always examine distal extremities for discoloration. Table 6.4 lists common color variations. Skin color varies widely from dark to light shades including black, brown, yellow, and white shades. These colors are affected by many factors. The biggest factor is how much melanin is produced by the body’s melanocytes; this also affects hair and eye color. Additionally, the circulating hemoglobin affects skin color and the underlying connective tissue.
-
- Normally, skin color is evenly distributed with no variations; clients with darker skin tones will have lighter colored palms and soles of feet. You may observe birthmarks, which are visible upon birth and include a wide array of sizes and colors (brown, black, blue, red, pink and purple). Most are flat and some fade over time. You should document them, describing their location and description particularly, since some can look like bruising.
- If you notice variation in skin color, note the location, color, and other characteristics of the discoloration.
| Color Variation | Skin Tone Variations and Clinical Tip |
|
Pallor is a lightening of the skin compared to the client’s typical complexion. It is commonly due to a lack of oxygen-rich blood near the surface of the skin. |
Among clients with darker skin tones, pallor may present as ashen (gray) coloring. Pallor may also present as a yellowish color among persons with browner skin tones. Among clients with lighter skin tones, the skin appears paler and less pink. To check for pallor, look at mucus membranes, nail beds, conjunctiva, and/or palms of hands. These are all highly vascularized regions that tend to be a pink color. With pallor, they look pale. |
|
Cyanosis is a bluish/whitish/grayish discoloration of the skin, usually due to a lack of oxygen in the blood. Peripheral cyanosis occurs in the distal extremities, while central cyanosis is generalized in the trunk and head of the body. |
With darker skin tones, cyanosis may present as a whitish/grayish color. For clients with yellow undertones to their skin, cyanosis may be a greenish/grayish color. For persons with lighter skin tones, cyanosis is generally a bluish/purple hue. Centralized cyanosis is generally most pronounced around the mouth (tongue, lips, oral cavity) and mucous membranes. Cheeks, nose, and ears are also good landmarks to check for centralized cyanosis as these are highly vascular regions with thin skin. |
|
Erythema is a reddening/darkening of the skin, typically due to increased blood flow to the capillaries. |
With darker skin tones, erythema may appear reddish/purple in color. With very dark skin tones, it may be difficult to visualize. With lighter skin tones, erythema is typically dark pink to red. As you check for erythema, look for other signs like inflammation and warmth. |
|
Brawny is a brown-reddish discoloration, typically associated with venous insufficiency. Red blood cells accumulate in the interstitial spaces and can cause hemosiderin staining from the blood leaking out of capillaries. |
With darker skin tones, brawny may appear even darker than the rest of the skin, with a brown-reddish hue. With lighter skin tones, the skin is a dark brown-reddish color. Brawny generally appears in lower extremities and regions of the body that have pooling due to venous insufficiency. |
|
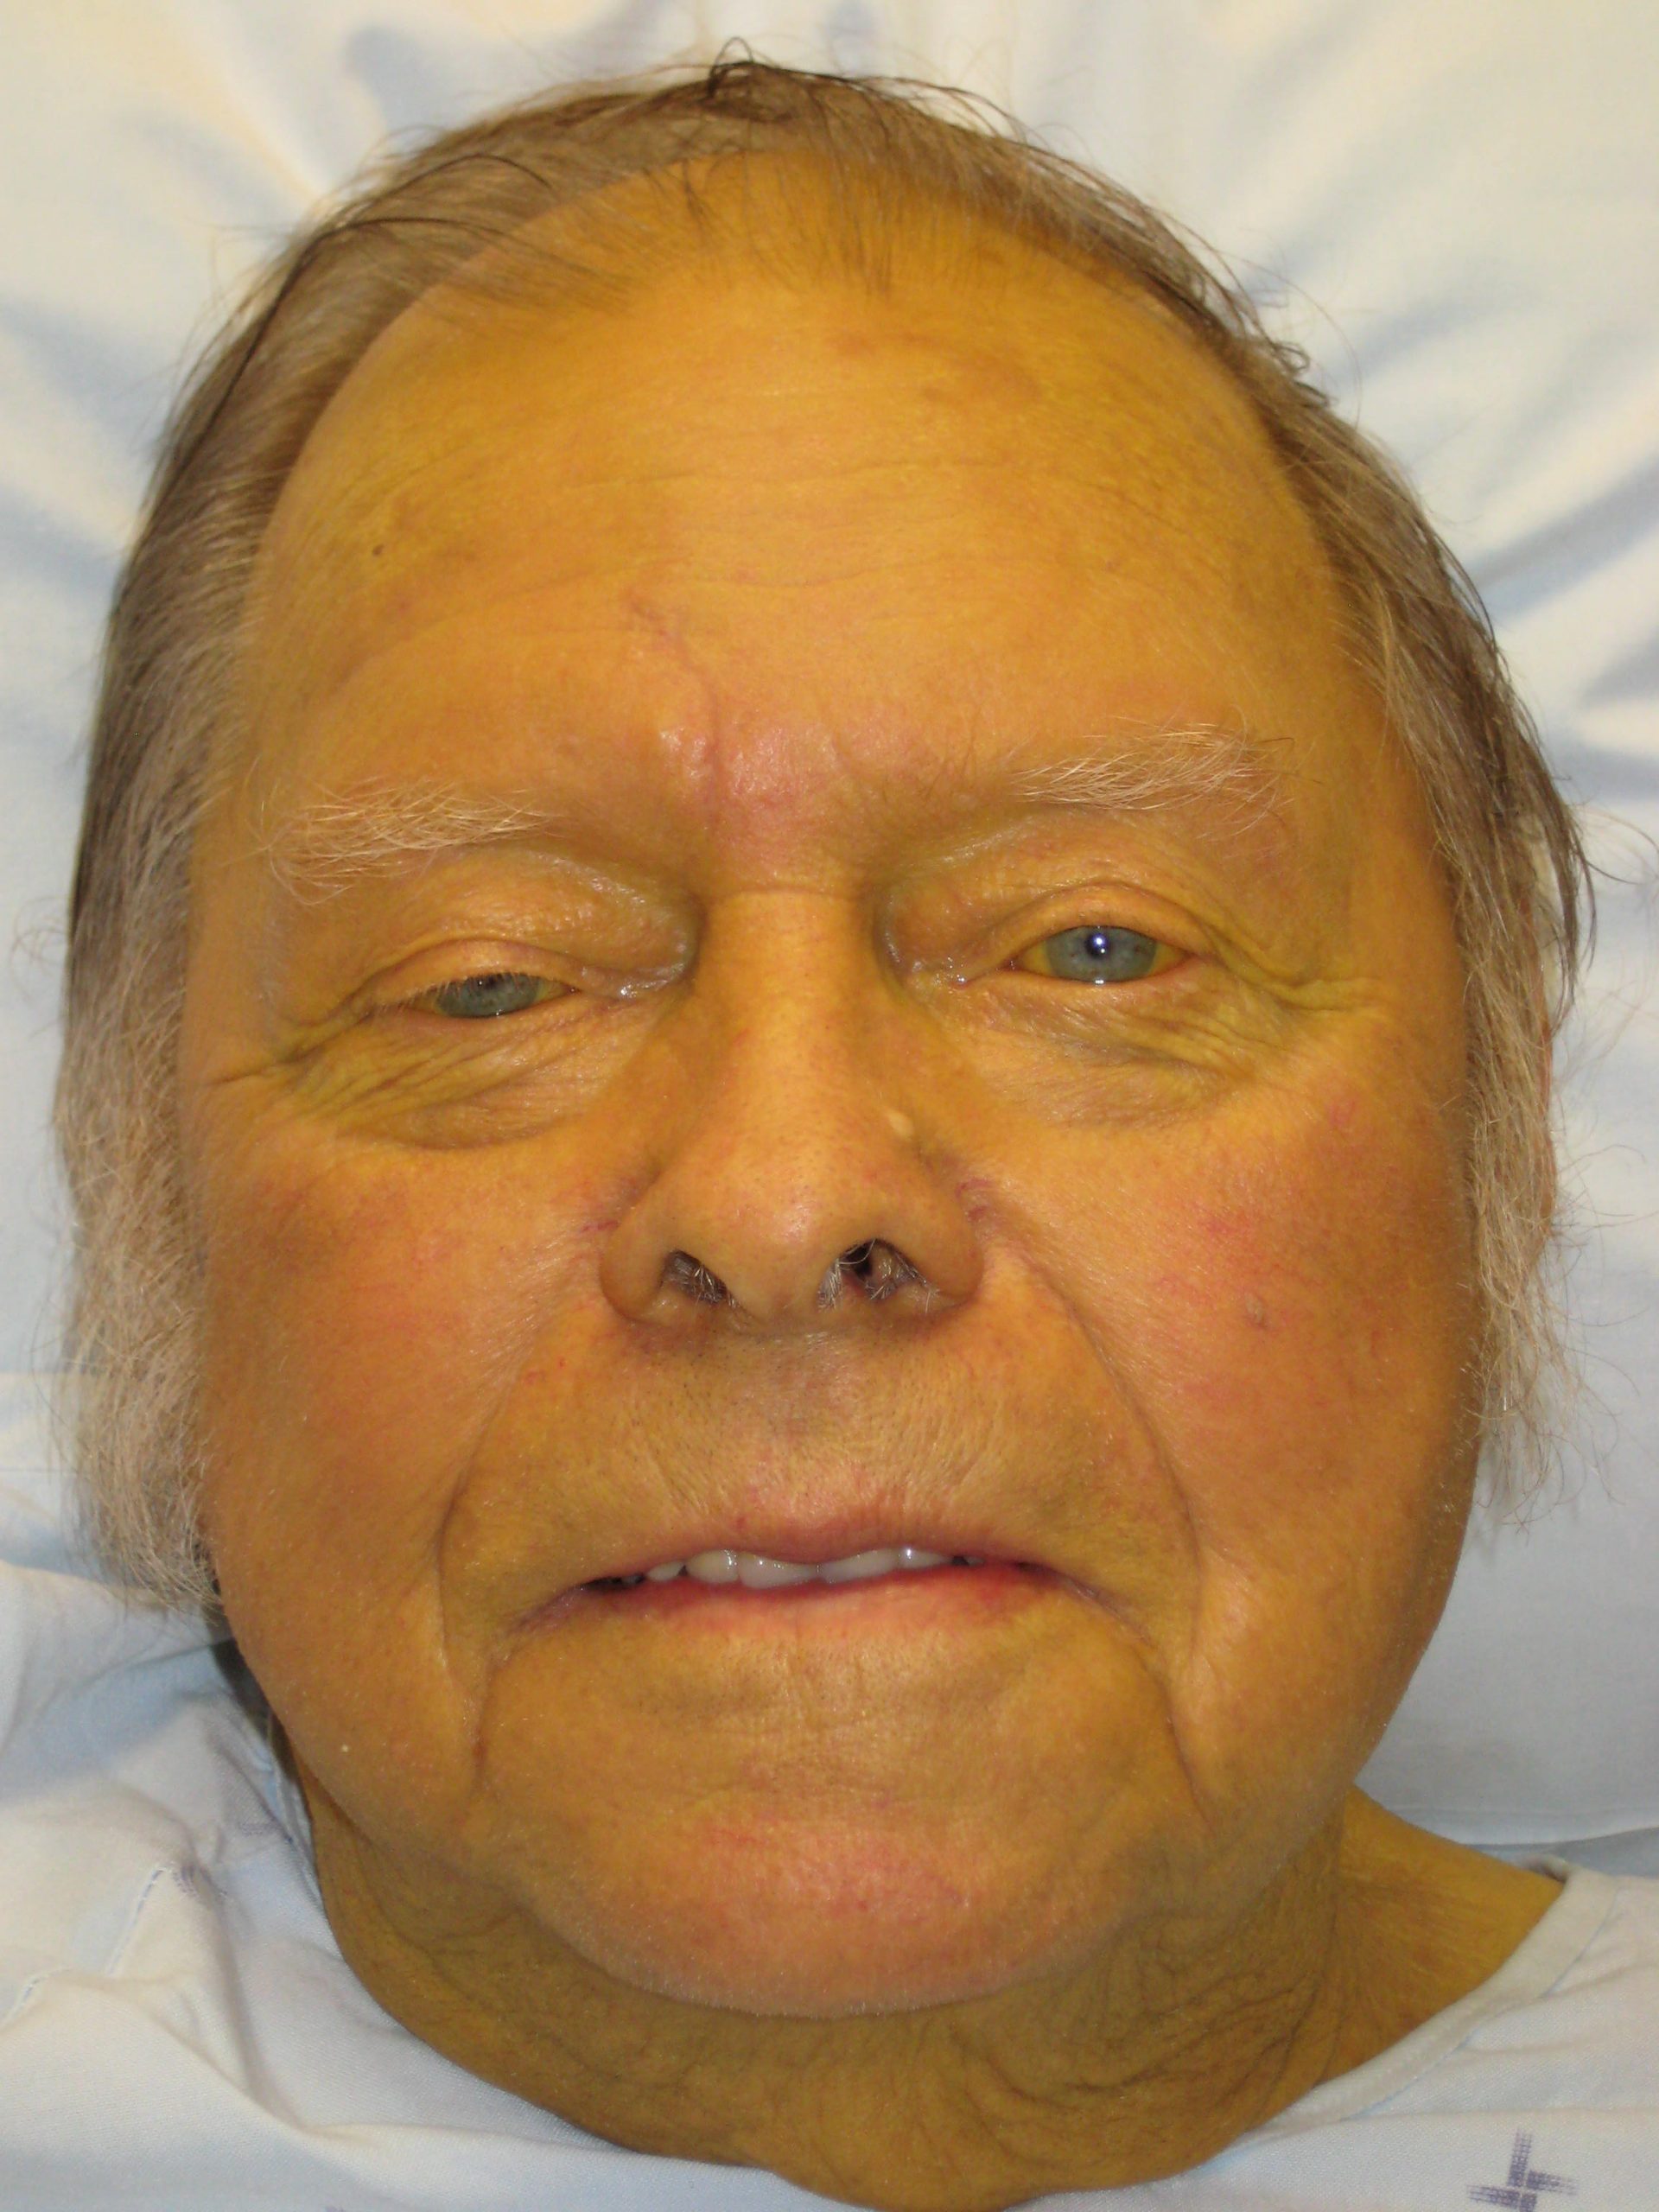
Jaundice is a yellowing discoloration of skin, sclera, and mucous membranes. It is typically brought on by a buildup of bilirubin and breakdown of red blood cells in the body.
(Attribution: Photo by By James Heilman, MD – Own work, CC BY 3.0, https://commons.wikimedia.org/w/index.php?curid=9389660) |
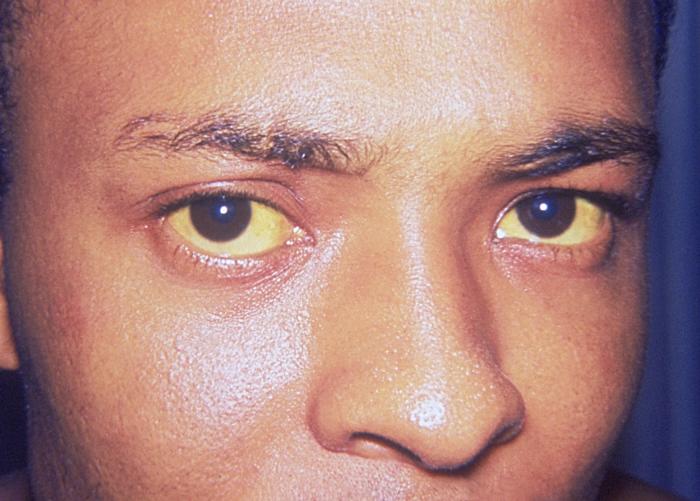
In persons with darker skin tones, discoloration may be subtle or go unnoticed, but may be visible in the sclera as shown in the image below. In persons with lighter skin tones, jaundice can appear yellow or even orange in color. Jaundice is typically confirmed by blood test or urinalysis.
(Attribution: Photo by Unknown author – CDC / Dr. Thomas F. Sellers / Emory University, Public Domain, https://commons.wikimedia.org/w/index.php?curid=4394119) |
|
Vitiligo is a condition where the skin loses pigmentation in certain regions (patchy). Image is free to use for non-commercial purposes from: https://www.atlasdermatologico.com.br/index.jsf |
Vitiligo can affect persons with all skin tones, but it is more visible among persons with darker skin tones due to contrast. Common regions for vitiligo are near the mouth and eyes or on the fingers, wrists, armpits, or groin. |
2. Inspect the skin for lesions. When conducting a skin assessment, it’s essential to distinguish between primary and secondary lesions. Understanding these categories helps in identifying and assessing skin conditions effectively. Typically, lesions are associated with pain because they generally involve the epidermis and/or dermis which are both innervated (supplied by nerves). However, nerve damage may limit sensation and therefore pain to the region. Clients with nerve damage are at increased risk for secondary infections and lesions because they are not restricted by pain at the site. If lesions are present, describe the location and characteristics in detail, including size, color, movability, borders, elevation, drainage, and pain levels.
Primary Lesions:
- Definition: Primary lesions are the initial, direct result of a disease process or a response to an injury. These lesions are often the first observable changes in the skin and provide critical clues to the underlying condition.
- Examples:
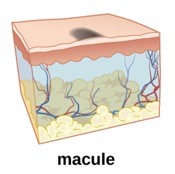
- Macules: Flat, small (less than 1 cm) areas of discoloration on the skin. They can be pigmented (e.g., freckles) or non-pigmented (e.g., vitiligo spots).
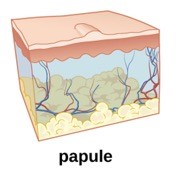
- Papules: Small, raised, solid lesions less than 1 cm in diameter. These can be either pigmented (e.g., certain moles) or non-pigmented (e.g., warts).
- Moles (Nevi): Typically pigmented lesions that can be macules (flat) or papules (raised). Moles are common and usually benign, but changes in their appearance should be monitored closely.
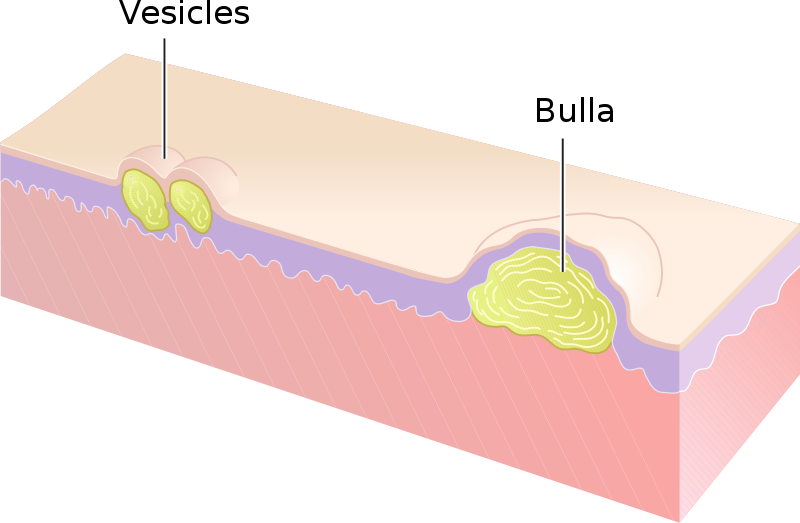
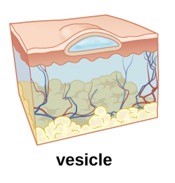
- Vesicles: Small, fluid-filled blisters less than 1 cm in diameter. Common in conditions like herpes simplex.
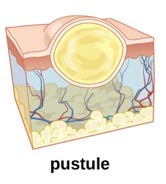
- Pustules: Raised lesions filled with pus, often seen in conditions like acne.
Secondary Lesions:
- Definition: Secondary lesions develop from primary lesions or are caused by external factors such as scratching, infection, or the healing process. They often indicate the progression of a disease or the body’s response to an initial lesion.
- Examples:
- Scales: Flakes or dry patches made up of excess dead epidermal cells. Commonly seen in conditions like psoriasis.
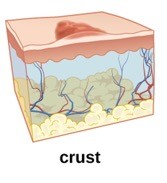
- Crusts: Dried blood, serum, or pus on the surface of the skin, often formed after a blister or pustule breaks.
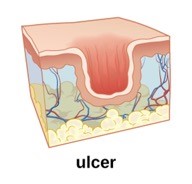
- Ulcers: Deeper losses of skin, often extending into the dermis, seen in conditions like pressure sores.
- Scars: Fibrous tissue that replaces normal skin after an injury or surgery, indicating the skin’s healing process.
If the client has expressed concern about specific moles, check them first. Otherwise, inspect the face, arms/hands, back, chest, abdomen, and legs/feet for the presence of nevi. If you observe any, use the ABCDE mole screening mnemonic (Table 6.5 and Figure 6.4); this is vital to screen for melanoma, a life-threatening skin cancer in which early detection is essential (Rigel et al., 2005). Most moles are benign, but they can become malignant: people with more than 50 moles, light-colored skin, regular sun exposure without sunscreen, and/or a family history of melanoma are at increased risk for melanoma.
-
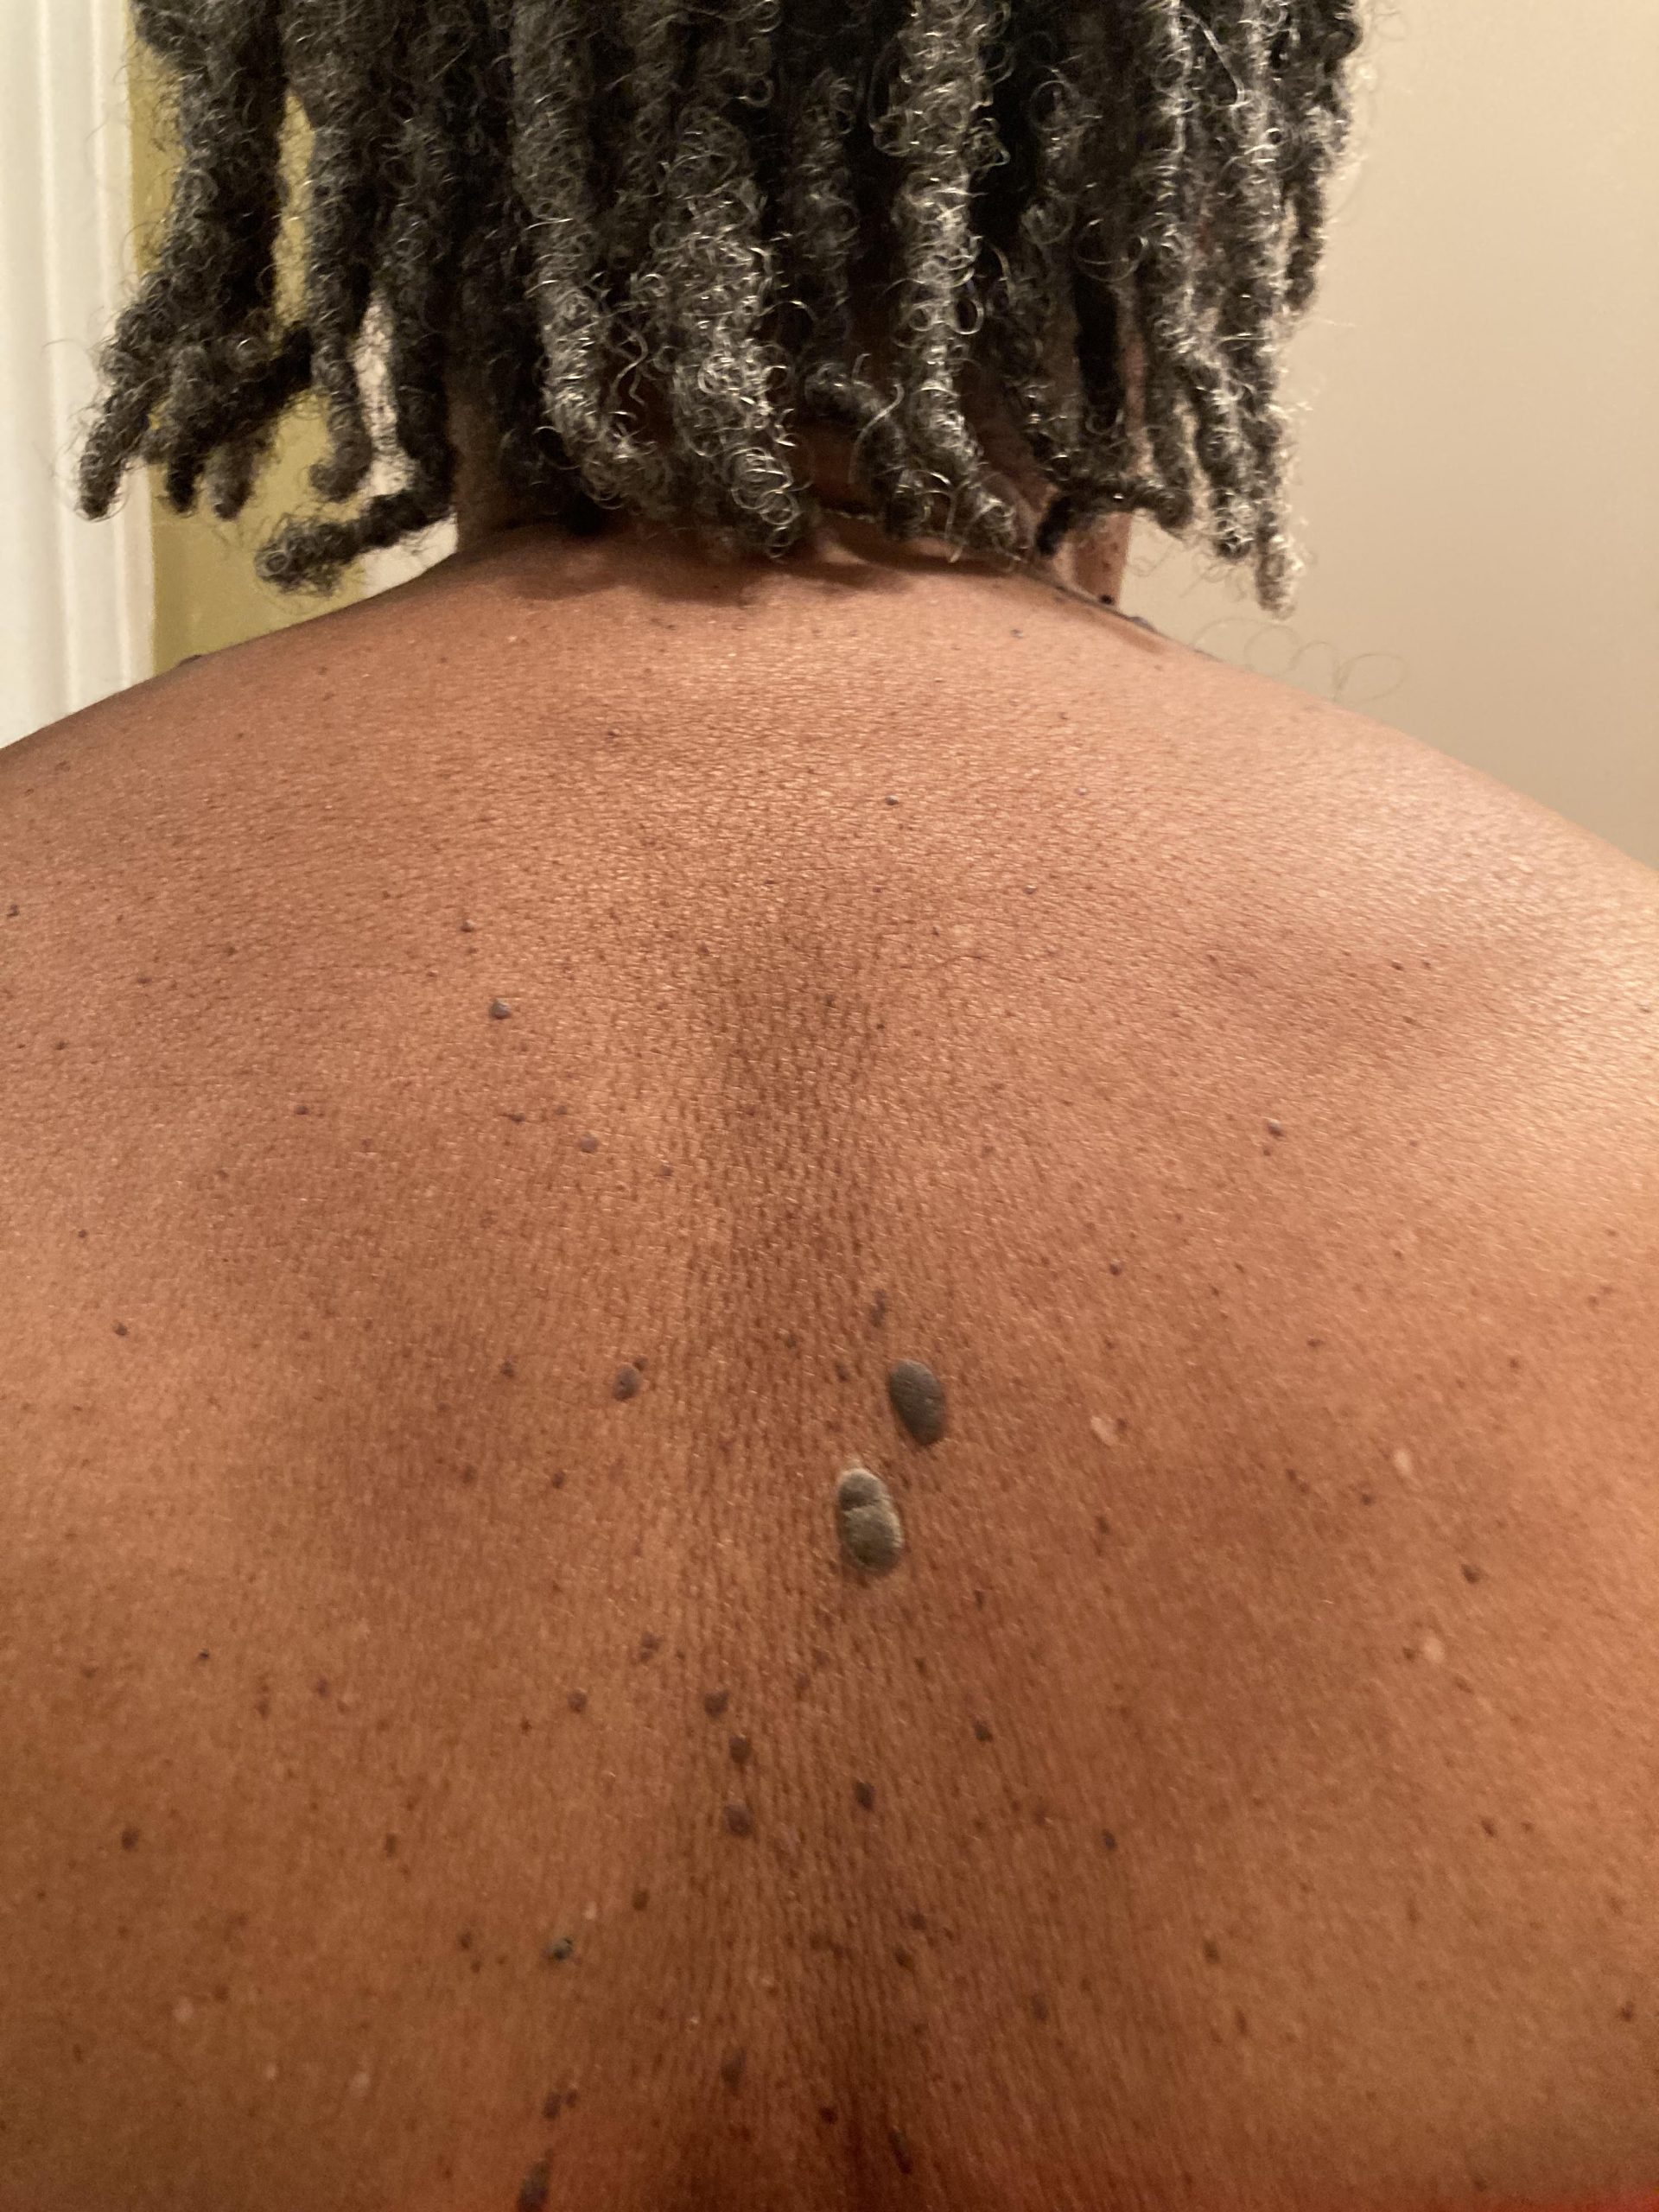
- Normally, nevi are smaller than 6 mm in diameter, round, and smooth-surfaced, with distinct/round edges. They can be elevated or not; their color can be pink, tan, brown, or dark brown. Generally, persons with darker skin tones have darker moles and persons with lighter skin tone have lighter moles. See Figure 6.5 for examples of what is considered normal nevi.
- Abnormal moles are often larger than 6 mm with variation in colors and asymmetrical with irregular borders. Note any atypical moles, including the location and description.
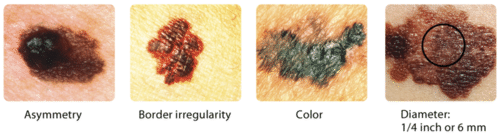
| Screening Characteristic | Warning Sign |
| A: Asymmetry | Moles that are asymmetrical/irregular in shape (one side does not match the other). |
| B: Border irregularity | Mole borders that are irregular or jagged in appearance. |
| C: Color | Moles that have more than one color within the mole (mixture of colors like tan, brown, black, red/pink) or changes color (white, red, or blue) or a dark mole that does not match other moles on the client’s body (dark black). |
| D: Diameter greater than 6 mm | Moles that are larger than 6 mm (pea-size) or moles that start small and grow larger than 6 mm. |
| E: Evolving | Moles that have changed/evolved in terms of bleeding, pain, size, color, shape, texture (crusting), elevation, or itching. |
Clinical Tip
ABCDE is a useful mnemonic for screening moles and is easily teachable to most clients. Teach-back is an effective technique: this involves presenting the ABCDE mnemonic to the client and then having them “teach” it back to you. This method helps with memory retention; fill in any gaps you may have overlooked as you taught them. Ask them to screen one of their moles based on the mnemonic; it may be appropriate to take a picture for comparison purposes.
| Type | Example | Clinical consideration |
| Abscess: Localized lump filled with pus. | Tooth abscess, peritonsillar abscess. | Pain is typically present. |
| Bulla: Fluid-filled blister. | Shingles, burns.
(Attribution: Adapted photo by Madhero88 – Own work, CC BY-SA 3.0, https://commons.wikimedia.org/w/index.php?curid=14546567) |
Less than 5 mm in diameter. |
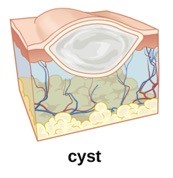
| Cyst: Encapsulated sac filled with fluid, semi-solid matter (such as dead skin cells), or gas; typically located in the upper layer of skin. | Dermoid, cutaneous, ganglion, sebaceous cysts.
|
Firm masses can be cysts. |
| Macule: Flat (non-palpable) spot typically discolored (hyperpigmented or erythematous). | Freckle, café au lait spot.
|
Less than 1 cm. |
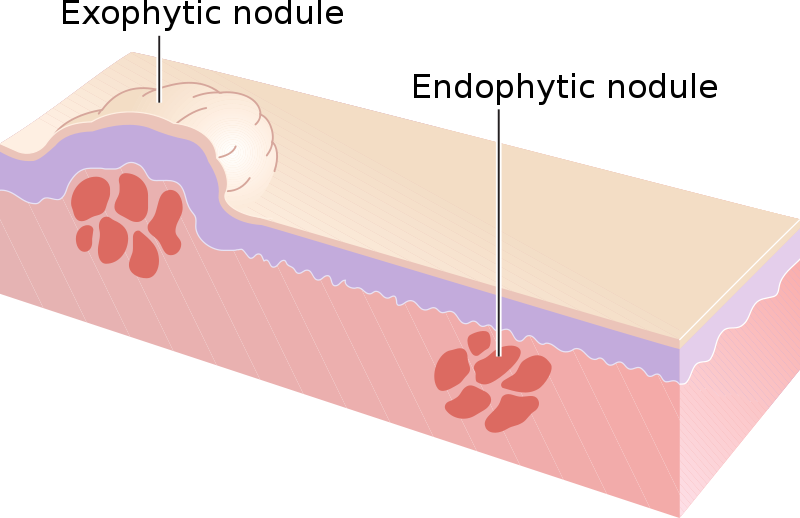
| Nodule: Solid, elevated, palpable growth. | Xanthoma, some nevi.
(Attribution: Photo by Madhero88 – Own work, CC BY-SA 3.0, https://commons.wikimedia.org/w/index.php?curid=14546471) |
1–2 cm in size. |
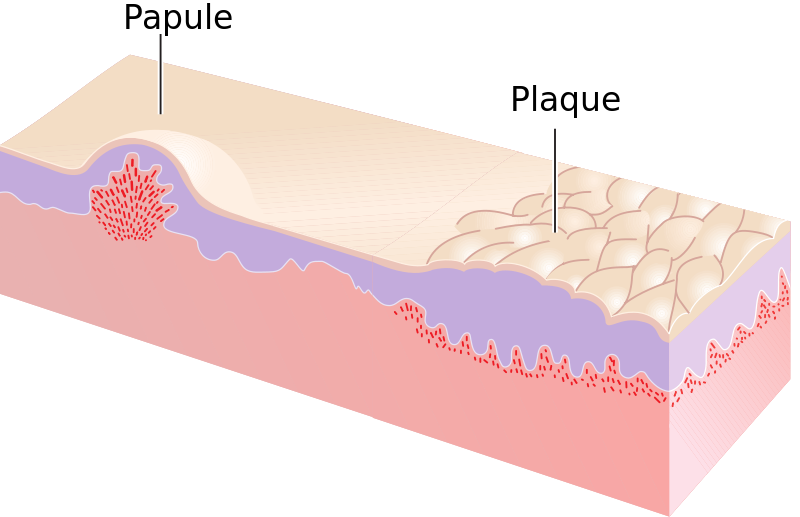
| Papule: Elevated, solid, palpable, circumscribed (with limits/bounded). | Elevated mole, mosquito bite.
|
Elevated, less than 1 cm in diameter. |
| Plaque: Circumscribed, elevated, solid deposit. | Psoriasis, eczema, seborrheic dermatitis.
(Attribution: Adapted photo by Madhero88 – Own work, CC BY-SA 3.0, https://commons.wikimedia.org/w/index.php?curid=14546485) |
Typically larger than 1 cm. |
| Pustule: Pus-filled, circumscribed, elevated. | Pimple.
|
May have redness/swelling at the site of the pustule. |
| Tumor: Abnormal growth, palpable. | Lipoma, skin cancer. | Typically larger than nodules (> 2 cm). |
| Vesicle: Small, fluid-filled sacs, thin-walled. | Herpes simplex blister.
|
Usually appear in groups. |
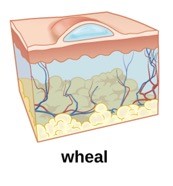
| Wheal: Swollen, inflamed skin patch that itches or burns. | Hives.
|
Generally 3 mm or larger. |
| Type | Description |
| Atrophy | Thinning of the skin (sometimes shiny appearance), translucent, increased fragility. |
| Crust | Accumulation of dried exudate and skin cells on the outer layer of the affected area (scab).
|
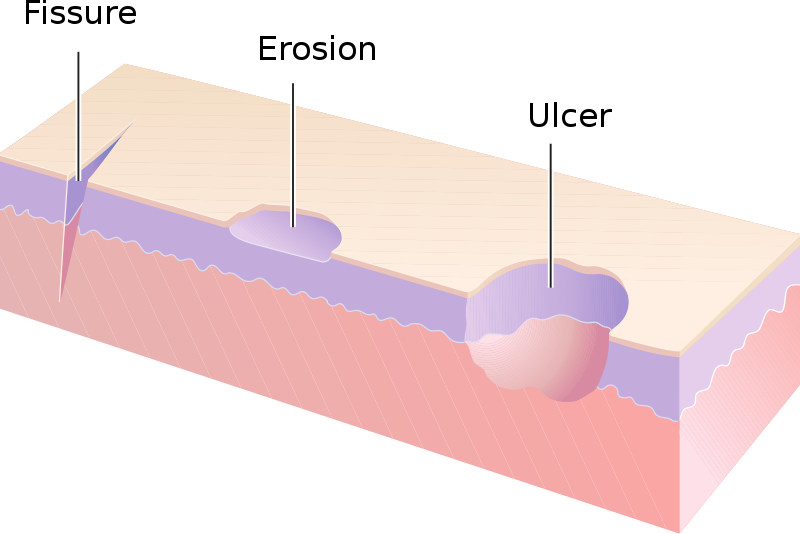
| Erosion | Loss of parts of the epidermis.
(Attribution: Photo by Madhero88 – Own work, CC BY-SA 3.0, https://commons.wikimedia.org/w/index.php?curid=14546561) |
| Excoriation | Skin breakdown caused by repetitive scratching. |
| Fissure | Crack or split of the outer layer of the skin. |
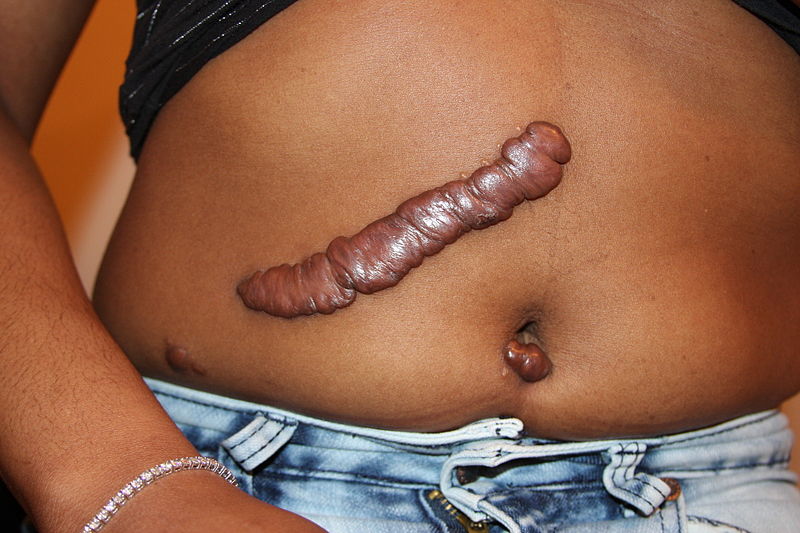
| Keloid | Thick, raised patch of skin (scar tissue).
(Attribution: Photo by Htirgan – Own work, CC BY-SA 3.0, https://commons.wikimedia.org/w/index.php?curid=32782658) |
| Lichenification | Hyperpigmentation and thickening of the skin. |
| Scar | Fibrous, thick tissue, shiny appearance once lesion has healed. |
| Ulcer | Loss of parts of the tissue (crater-like), exposed with some healing formation.
|
3. Inspect for skin integrity including whether the skin is intact. Look for the presence of ulcerations, erosions, contusions, or other damage that can disrupt the normal pattern of the skin. You will learn to recognize the signs of skin breakdown and who is at risk for impaired skin integrity. An important tool to assess skin integrity is the Braden Scale, which is commonly used in many health care settings and is especially useful for hospitalized clients and those with restricted mobility.
-
- Skin is normally intact with no lesions, ulcerations, erosions, and contusions.
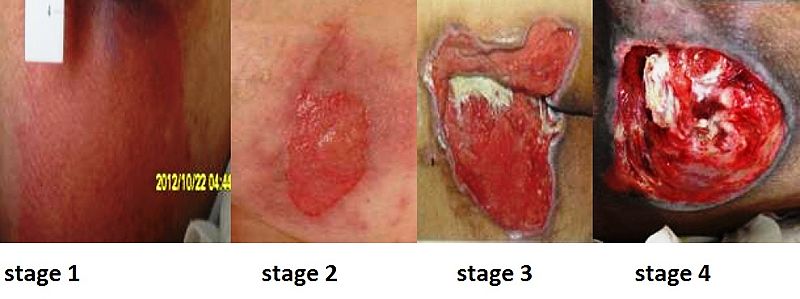
- If you observe any areas where the skin is not intact, note the location and describe the area. Pressure injuries are classified into stages, as shown in Table 6.8. Figure 6.6 presents an example of staging.
Braden ScaleThe Braden Scale is an established tool used to screen and assess for risk of developing pressure sores (Bergstrom et al., 1987; Braden, 2012). Clients at risk are screened weekly. Many factors can increase the risk of developing pressure injuries, including altered sensory perception, increased moisture, decreased activity, impaired mobility, inadequate nutrition, and issues with friction and shear (Open Resources for Nursing, n.d.). As Bergstrom and colleagues note, the Braden Scale is used to screen clients in six areas:
Friction and shear is rated on a scale from 1–3; all other areas are rated on a scale of 1–4 (Open Resources for Nursing, n.d.). The scores for all six areas are totalled to indicate the client’s risk for developing a pressure injury based on the following ranges: Mild risk: 15–18 Moderate risk: 13–14 High risk: 10–12 Severe risk: less than 9 (Bergstrom et al., 1998; Open Resources for Nursing, n.d.). Check out the Braden Scale at this link and assess your own risk, and then try using it with a client in your clinical setting: https://www.clwk.ca/modules/Braden/Slide-1-14.html |
Classify a pressure injury according to Stages 1–4 or note it is unstageable as per the descriptions below and the example provided in Figure 6.6.
| Stage | Description |
| Stage 1 pressure injury. | Intact skin with localized area of nonblanchable erythema where prolonged pressure has occurred. Nonblanchable erythema is a medical term used to describe a reddened skin area that does not turn white when pressed. |
| Stage 2 pressure injury. | Partial-thickness loss of skin with exposed dermis. The wound bed is viable and may appear as an intact or ruptured blister. |
| Stage 3 pressure injury. | Full-thickness tissue loss in which subcutaneous tissue is visible, but cartilage, tendon, ligament, muscle, and bone are not. Depth of tissue damage varies by anatomical location. Undermining and tunneling may occur in Stage 3 and 4 pressure injuries. Undermining occurs when the tissue under the wound edge becomes eroded, resulting in a pocket beneath the skin. Tunneling refers to passageways underneath the skin surface that extend from a wound and can involve twists and turns.
Slough and eschar may also be present in Stage 3 and 4 pressure injuries. Slough is an inflammatory exudate that is usually light yellow, soft, and moist. Eschar is dark brown/black, dry, thick, and leathery dead tissue. If slough or eschar obscures the wound so that tissue loss cannot be assessed, the pressure injury is referred to as unstageable. In most wounds, slough and eschar must be removed by debridement for healing to occur. |
| Stage 4 pressure injury. | Full-thickness tissue loss with visible cartilage, tendon, ligament, muscle, or bone. Osteomyelitis (bone infection) may also be present. |
| Unstageable (Stage X) pressure injury. | Full-thickness tissue loss in which the presence of slough or eschar are making it difficult to evaluate the extent of damage. If slough or eschar were to be removed, a Stage 3 or Stage 4 pressure injury would likely be revealed. |
4. Inspect skin for hygiene including your sense of smell. Look for areas that appear dirty, oily, or overly dry. Assess for areas of excessive dryness or moisture and smell the skin for any unpleasant odors which may indicate inadequate cleaning or infections.
5. Note the findings.
-
- Normal findings might be documented as: “Skin integrity intact. Skin color consistent throughout with no variations. No lesions or rashes noted. Nevus on back examined. Located 2 inches distal to the scapula, left side. Symmetrical with even borders, tan colored, 3 mm in size, and no changes noted by the client. No pain or sensation reported. Image taken and included in the chart.”
- Abnormal findings might be documented as: “Stage 1 pressure injury on thoracic spine 4 inches in length and 2 inches wide”
Priorities of Care
All abnormal findings should be documented and reported, but some findings are more urgent than others. For example, signs of cyanosis and pallor suggest possible issues with oxygenation, so you should conduct a primary survey (ABCCS), assess vital signs, and conduct a focused assessment on related systems including respiratory, cardiovascular, and peripheral vascular. A similar approach should be used when you observe mottled skin. This is a blotching and netlike discoloration that can appear as bluish, red, purple blotches, sometimes referred to as marbled. It is often associated with conditions that involve reduced blood flow and can be associated with peripheral vascular diseases, shock, and end-of-life, and sometimes cold environments. Always report signs of clinical deterioration immediately. For clients with a Stage 1 pressure injury, it is important to ensure good skin care and repositioning so that the client is not lying on a particular area for long periods of time. Medical intervention may be required for ulcers classified as Stage 2 and higher. Report any moles with warning signs to the physician or nurse practitioner, as the client may need a referral to a dermatologist and/or oncologist.
Knowledge Bites
Burns are caused when the skin is damaged by intense heat, radiation, electricity, friction, or chemicals. This damage results in the death of skin cells. Loss of the skin’s protective layers can lead to massive loss of fluid, and makes burned skin extremely susceptible to infection.
Burns are classified by the degree of their severity.
First-degree burn:
- Superficial burn affecting the epidermis.
- Mild sunburn is one example.
Second-degree burn (see Figure 7):
- Partial-thickness burn affecting the epidermis and a portion of the dermis.
- Results in swelling and a painful blistering of the skin.
Third-degree burn:
- Full-thickness burn extends fully into the epidermis and dermis, destroying the tissue and affecting the nerve endings and sensory function.
Fourth-degree burn:
- Deep full-thickness burn affecting the skin and underlying muscle, tendon, and bone.
Third- and fourth-degree burns require immediate intervention. They are usually not as painful as second-degree burns because the nerve endings are damaged. Full-thickness burns require debridement (removal of dead skin) followed by grafting of the skin from an unaffected part of the body or from skin grown in tissue culture.
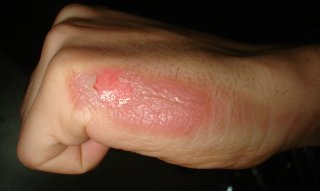
Figure 7: Second-degree burn.
(Attribution: Photo by Kronoman at English Wikipedia, CC BY-SA 3.0, https://commons.wikimedia.org/w/index.php?curid=26501619)
Activity: Check Your Understanding
References
Bergstrom, N., Braden, B., Kemp, M., Champagne, M., & Ruby, E. (1998). Predicting pressure ulcer risk: A multisite study of the predictive validity of the Braden Scale. Nursing Research, 47(5), 261-269.
Bergstrom, N., Braden, B., Laguzza, A., & Holman, V. (1987). The Braden Scale for predicting pressure sore risk. Nursing Research, 36(4), 205-210.
Braden, B. (2012). The Braden Scale for predicting pressure sore risk: Reflections after 25 years. Advances in Skin & Wound Care, 25(2), 61.
Open Resources for Nursing (n.d.). Chippewa Valley Technical College. https://wtcs.pressbooks.pub/nursingfundamentals/
Rigel, D., Friedman, R., Kopf, A., & Polsky, D. (2005). ABCDE–an evolving concept in the early detection of melanoma. Arch Dermatol, 141(8), 1032-1034.
