3 Microscopy
Download this lab as a Microsoft Word document.
Download the lab response form (Microsoft Word document) to access the questions only.
Purpose
To learn to operate a microscope safely and effectively.
Learning Objectives
At the conclusion of this exercise, students will be able to:
- Demonstrate the proper care in setting up a light microscope for use in the lab and in putting it away.
- Compare the view under a microscope to the position and movement of an object viewed by the naked eye.
- Demonstrate the ability to focus on an object under both low and high power using a light microscope.
- Estimate the size of objects viewed using a microscope.
Why It’s Relevant
Many unicellular organisms and parts of multicellular organisms are too small to see with the naked eye. The microscope is a standard piece of scientific equipment used by biologists and medical professionals on a daily basis to view components of living things. Learning to use a microscope will enable you to experience the true nature of the biological world, as well as develop critical thinking skills and an understanding of how this technology provides us with a visual representation of the world too small to be seen with the naked eye.
Introduction
The first microscopes came into use in Europe in the early 1600s. Once they became readily available, microscopes revolutionized the field of biology because scientists were able to view single-celled organisms, as well as the small tissues and cells that make up multicellular organisms, for the first time. Since so much biology happens at this small, cellular level, it is crucial for you to learn how to use a microscope, even in a general biology course like this one!
Many different kinds of microscopes are used by professional biologists today. The most important one in this course is the common light (or compound) microscope. You will be introduced to its use in today’s laboratory exercise, but will gain practice over the course of the semester through several other lab activities in this book. Note that light microscopes consist of 12 important parts (Figure 3.1).
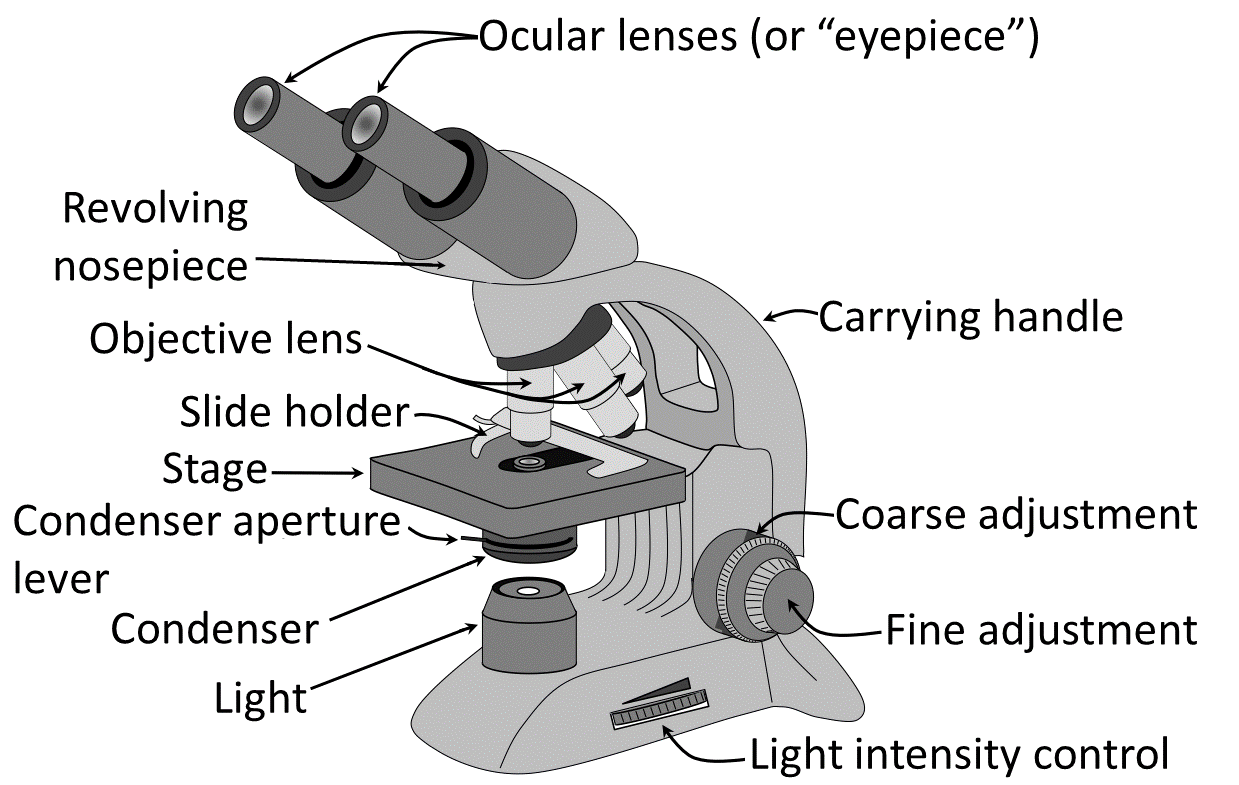
- All light microscopes contain a stage onto which a microscope slide is placed.
- Note the slide holder on top of the stage. This is used to secure the slide in position for viewing. If properly secured, the slide can be moved around on the stage using the controls underneath, and to the side of, the stage.
- Under the stage is a light source that will illuminate any object on a microscope slide from underneath. The intensity of this light can be controlled by the light intensity control at the base of the microscope and by moving the condenser aperture lever, which is immediately underneath the stage.
- The lower back of the arm of the microscope contains a double set of black knobs on each side. These are the focus adjustment knobs. The larger, outer knob is called the coarse adjustment knob—turning this makes relatively large adjustments in focus. Coarse adjusting is important when initially locating an object under the lowest magnifying power on the microscope. The smaller, inner knob is the fine adjustment knob—turning this also adjusts the focus of the view, but in smaller increments. Using this knob is important in adjusting the focus when viewing objects under stronger magnifications.
- Finally, the light microscope also contains two important sets of lenses. One set, called the ocular lens, is contained within the eyepieces of the microscope. Notice that “10X” is written on the side of these, indicating that any time you view anything through the ocular lenses, it will appear ten times larger than it actually is. The second set of lenses, the objective lenses, are found on a rotating nosepiece, directly above the stage of the microscope. There are typically four objective lenses, varying in magnifying power. Three of them will be used in this exercise and throughout the semester in this course. They are the scanning lens (“4X” written on its side; typically used initially to scan the slide for any object of interest), the low-power lens (“10X”), and the high-power lens (“40X”). The fourth lens is called the oil immersion lens (“100X oil”). Whenever you view an object under the compound microscope, you will always be looking through both of the sets of lenses: the ocular lens and whichever objective lens is currently rotated into place.
The total magnification of the view of the object on the slide can always be determined by multiplying the strengths of the ocular and objective lenses together. For example, when viewing an object under low power, the microscope will magnify the object 100X larger (10X from the ocular lens multiplied by 10X from the low-power lens) than it actually is. In a general biology course, we will never use the oil immersion lens. Its use requires special instructions and cleanup, and its magnifying power is greater than anything we will need this semester.
Procedure
Safety Warning: This lab utilizes hazardous materials. Be sure to follow your instructor’s direction on wearing proper personal protective equipment and disposal procedures. The Biology Department Laboratory Safety Practices must be followed.
Obtain a microscope from the supply closet and a blank microscope slide. Always carry the microscope carefully with two hands: one holding the arm of the microscope and the other supporting the base. They cost more than you want to find out! Place the microscope away from the edge on the lab bench, plug the microscope in, and turn it on either by pressing the “on” switch or by simply rotating the light intensity wheel. The scanning objective (4X) should be rotated into position above the stage.
Place the microscope slide into position on the stage by opening the stage clips and inserting the slide. Make sure that the slide is pushed flush against the back of the stage and close the clips. If everything is in order, you should be able to move the slide around on the stage by using the mechanical stage control knobs.
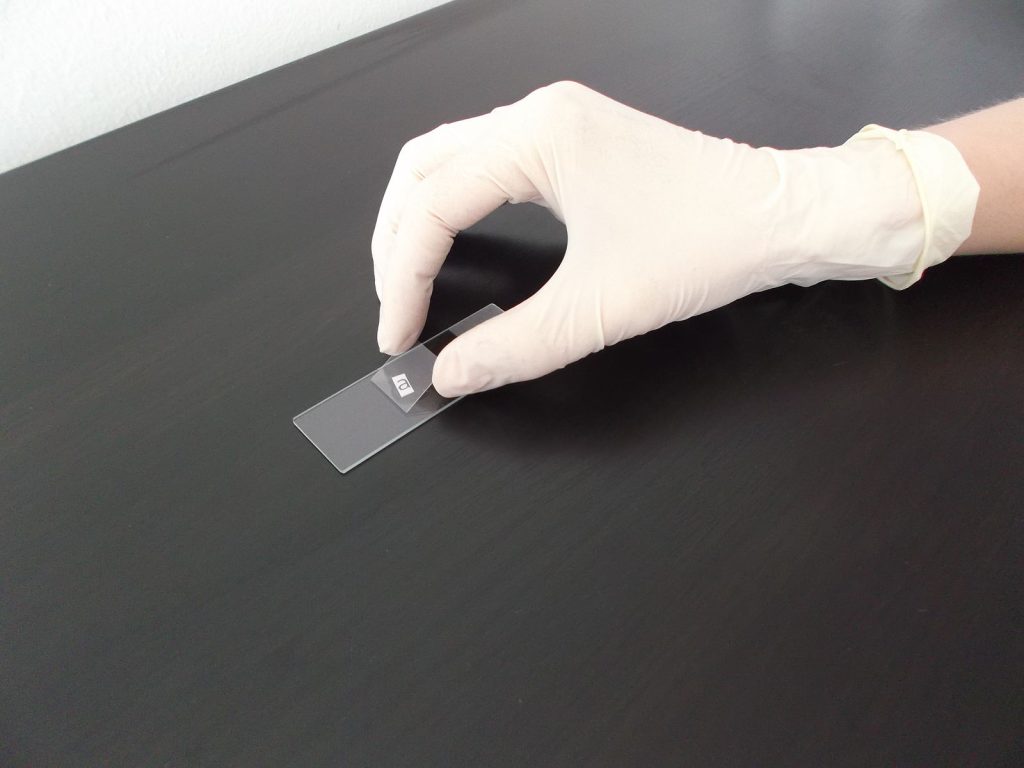
To start today’s exercise, you will learn how to make your own microscope specimen by creating what is called a wet mount. Remove the blank slide from your microscope stage and take it to the side bench. Cut one letter, number, or short word from a newspaper clipping using scissors. Place your newspaper specimen carefully in the middle of the slide, right side up, and add 1 drop of distilled water to it. Finally, place one coverslip from the lab supply over your specimen on the slide (Figure 3.2).
Return to your lab bench and place the wet mount on the microscope stage. Position the slide so that the light from the microscope is shining on the letter or word on your wet mount and make sure that the scanning objective (shortest in length, red in color) is rotated into viewing position. Look through the ocular objective. It’s likely that you will see nothing at first, requiring you to focus the microscope. Do so by turning the coarse focus adjustment knob until your specimen comes into view. When it does, center the specimen in the view by turning the knobs on the mechanical stage control. If done correctly, you are now reading your letter or word at 40X magnification (the object will appear 40 times larger than it actually is). Under scanning power, it is typically sufficient to focus the microscope by using only the coarse focus knob. Make a sketch of the view of your letter or word at 40X magnification. Make sure to name the sketch “wet mount of letter/word” and write the total magnification at which you are viewing the specimen underneath your sketch. Follow this same labeling procedure for all microscope image sketches you will make in this lab.
Before proceeding, note a few things about what you are currently seeing under the microscope. Specifically:
- What has changed about the orientation of your letter or word compared to what it looks like on the slide using your naked eye?
- When you move the stage to the left, in which direction does the view in the microscope move?
- When you move the stage up, in which direction does the view in the microscope move?
At times this semester, you will be asked to add a chemical stain to a wet mount, which will highlight some feature of the specimen you are viewing. You don’t really need any stain at all for this wet mount, but just for practice, try adding some. Carefully lift one edge of the coverslip over your letter or word and add one drop of methylene blue stain to the specimen. Be very careful with stains because, while not hazardous, they will permanently stain clothing and temporarily stain your skin. The blue coloration you can now see with your specimen under the microscope is completely artificial, but may bring out certain details you couldn’t otherwise see.
Next, you would typically want to view the specimen under high magnification. Once focused clearly and centered at scanning magnification, rotate the low-power (yellow) objective into view. Do this now with your wet mount, even though the results will be unimpressive. You are now seeing your specimen 100X larger than it actually is. Since the letter or word you cut out is already quite large, viewing it at 100X magnification will likely render it a dark mass with indistinguishable features. Remove your wet mount slide from the microscope and set it aside for now.
At times in this course, you will be asked to view a prepared slide. A prepared slide is one with a professional label that has been purchased from a biological supply company. The object of interest is positioned centrally on the slide and typically stained a bright, artificial color. When viewing prepared slides, simply obtain them from the side bench and always return them when you are finished.
Now, go to the side bench and obtain a prepared slide of the cyanobacterium Nostoc. Nostoc is a photosynthetic organism, meaning it will appear green in color. It is very small, however, and a lot of magnification will be required to appreciate its body form. Place the slide on the stage, move the stage so that the light is shining in the center of the slide, and view it using the scanning objective. Follow the same procedure as you did with your wet mount. Adjust the focus with the coarse focus adjustment knob until some Nostoc comes into view (it will appear as thin green lines). Make a sketch of Nostoc at 40X total magnification and label your sketch in the same way you did for the wet mount above. Center the view on some of them and move to 100X total magnification. Refocus, using the fine focus adjustment knob this time, and re-center the view. Next rotate the high-power objective into place. Refocus the view with the fine focus adjustment knob until you can fully appreciate what Nostoc looks like. Make sketches of Nostoc at both 100X and 400X total magnification.
If you are a beginner with the microscope, it is perfectly normal to struggle initially with locating objects under higher magnification. Specimens will often “get lost” as you move through the 40X, 100X, and 400X total magnifications. Always follow the process described above. Start with finding the object at 40X, then focus and center before moving to 100X, etc. If you get lost during the process, simply reset by returning to 40X and starting again.
Next, set the Nostoc slide aside and obtain a small plastic ruler from the lab supply. Place the ruler on the microscope stage as if it were a slide and focus on the millimeter markings at 40X magnification. Any time you look into a microscope, the total circular area you can see is the field of view. Next, you will measure the actual size of this field of view, which will differ depending on the magnification.
Using your fingers, position the ruler under the objective so that one of the millimeter bars is located at the extreme left of your field of view (Figure 3.3). Now record the size of the diameter of the field of view at scanning magnification (40X total magnification)—i.e., how many spaces between millimeter bars can you see across the view? Estimate to the nearest half-millimeter. Now determine the size of the field of view for low- (100X) and high-power (400X) magnifications. Theoretically, you could follow the same procedure at the higher magnifications as you did for 40X, but this becomes quite difficult when trying to position the ruler with by hand and when estimating distances between millimeter bars. Instead, use the simple mathematical formula below to determine field of view sizes.
Figure 3.3: self-generated image of someone placing a ruler on the microscope stage
- For field of view at low power: Field of view at scanning power(mm) x (total magnification at scanning power/total magnification at low power). Or, for example, the field of view distance you measured at 40X multiplied by 40/100.
- For field of view at high power: field of view at low power (mm) x (total magnification at low power/total magnification at high power).
Record field of view measurements for low- (100X) and high-power (400X) total magnifications.
When viewing a slide under the microscope, it is tedious to place a plastic ruler over the top of it to measure the size of specimens that you are viewing. You followed the above procedures so that, for the remainder of the semester, you can accurately estimate the size of specimens. Once you know the measurement for the diameter of the field of view at each magnification, you can make a reasonable estimate of size by approximating how much of the field of view is taken up by an object.
Remove the plastic ruler from the microscope stage and place your wet mount on the stage. Adjust the microscope so that your letter/word is again visible at 40X total magnification. How much of the field of view does it take up? If your letter is smaller than the total field of view, then its length is shorter than the diameter of the scanning magnification field of view. How much less is it? Would you say it takes up 90% of the length? 80%? Whichever percentage you choose, use the following formula to make your estimate of length:
- Length of object (mm) = Diameter of field of view at specific magnification (mm) x (estimated % of diameter taken up by object/100).
Return to your original sketch of the letter/word and add the estimated length of the letter/word to your sketch.
Follow the same procedure to estimate the length of an individual cell in a Nostoc colony. Do this first at 100X total magnification, and then at 400X. Make sure to estimate the size of the same cell in the colony at each magnification. Record both length estimates on your original Nostoc sketches.
When you are finished with your length estimates, you can return your microscope to the supply closet. Before you do, make sure to complete the following steps so that it can be stored safely:
- Check the stage to make sure you have removed any slides from it.
- Return all prepared slides to the lab supply and dispose of all wet mounts (with cover slips included) in the broken glass box.
- Rotate the scanning objective into position and use the coarse focus adjustment knob to lower the stage all the way down; the idea here is to maximize the distance between the stage and the delicate objective lens.
- Turn off the light on the microscope and move the microscope switch to the “off” position (if applicable).
- Unplug the microscope and wind the power cord up so that it is not swinging loosely.
- Return the microscope to the supply closet, arm facing out, so that the next student can safely remove it from the shelf.
Alternate Procedure for Online Courses
Since you are not currently in a campus lab, navigate to Virtual Urchin to learn how to use a microscope virtually. Click on the three-lined icon near the top of the page to bring up the table of contents. Click “microscope tutorial” to begin your work.
Create a document (e.g., .doc, .pdf) that you submit for a grade when you are finished with the laboratory exercise. The first part of the tutorial involves learning the important parts of a light microscope. Use the cursor to navigate to the different parts of the microscope and then, in your own words, briefly describe the functions of the following microscope parts on your document:
- Stage
- Objectives
- Light source
- Condensor diaphragm
- Coarse focus control
- Fine focus control
- Dimmer switch
- Binocular eyepieces
Once completed, progress through the tutorial by clicking “set-up” on the banner near the top of the screen. There are steps to follow in this section to simulate how a microscope in a campus lab works. Follow the on-screen instructions and complete each step, listening for the distinctive chiming sound once you have completed a step correctly. On your document, write the magnifications that are written on the side of the three rotatable objective lenses (red: scanning power; yellow: low power; blue: high power).
Proceed through the “remember,” “slide,” and “focus” sections in order by clicking on their names on the banner near the top of the screen. Remember that the chiming sound indicates that you have satisfied each procedure in each section. Follow the on-screen instructions and proceed to the “low-mag” and “high-mag” sections. In these, you will need to use a combination of the condenser diaphragm control as well as the coarse and fine focus controls to obtain a clear image of the specimen. Once you have completed both the “low-mag” and “high-mag” sections, answer the following questions in your document.
- Compared to at low power, is the view darker or brighter at high power?
- Compared to at low power, is the field of view bigger or smaller at high power?
- Compared to at low power, can you see less or more of the specimen at high power?
- Compared to at low power, does the specimen appear larger or smaller at high power?
Once finished with this basic tutorial, click on the 3-line icon at the top of the page again and select “microscope measurement.” Click “start” to begin and rotate the objective lenses on the microscope on the next screen to appreciate the fact that specimens appear larger as you increase the magnification of the objective lenses. The actual size of the specimen does not change, of course, but it will appear larger and larger as you increase the magnification of the view.
Progress through the tutorial by clicking “calibrate” on the banner near the top of the screen. You will now simulate measuring the field of view at different magnifications by dragging the virtual ruler onto the microscope stage (in place of a slide) (see Figure 3.3). Follow the on-screen steps and enter the field of view measurement in the provided box for each of the three objective lenses. Copy this table of measurements onto the document that you will submit for scoring. Make sure to check your answers using the provided button to make sure your measurement is correct, and don’t be afraid to use the hint button if needed!
Once you have correctly measured the field of view at each magnification (and copied the table into your document), proceed to the “estimate” section of the simulation. Since you can either have a ruler or a slide with a specimen on the stage at a given time, you will need to estimate the size of specimens based on the field of view measurements you made. In this section, you will estimate the sizes of five different objects—three life stages of a sand dollar (a marine organism), a human hair, and a blade of grass.
To complete this tutorial, you will need to do two things for each specimen. First, decide which magnification is best to use to estimate the size of the specimen. Do this by viewing the specimen at scanning power (the 4X objective) first. If the specimen appears tiny, rotate the objective to increase the magnification until it fills most of the view. Second, estimate the size of the specimen compared to what you measured for the total field of view. For example, if a given specimen takes up approximately 2/3 of the field of view at low power (the 10X objective), then you will multiply the size of the field of view for low power by 2/3. Make sure to check your answer after each estimate to assess accuracy (the simulation will award you credit as long as your size estimate is reasonably close). Copy the resulting table (including your size estimate and the magnification at which you made an estimate) into your document to be submitted for scoring. Submit this document in the way indicated by your instructor.
Summary Questions
- Calculate the total magnification of a hypothetical microscope with a 20X ocular lens and 30X objective lens rotated into viewing position.
- Does the field of view (in mm) get larger or smaller as you increase the magnification with a microscope?
- When biological supply companies produce prepared slides, they often place specimens upside down (compared to the words on the slide label) on the slide. Why do they do this?
- You estimated the length of individual Nostoc cells today at both 100X and 400X magnifications. Obviously, the actual size of a cell is the same no matter what magnification it is viewed at. Given that, why do your two length estimates for the same cell differ? For which magnification do you suspect you have the more accurate estimate?

_-_larger_text.png)