7 Propositional Logic
We have seen that with a crisp understanding of how to translate natural language expressions into formal symbolic expressions, we can use formal tools to evaluate many logical properties of statements. In this chapter, we will learn one of the most important methods for evaluating arguments, not simply for its accuracy but also for the many logic life lessons it imparts.
Natural Deduction
Truth tables provide a powerful tool for evaluating the validity of an argument. In one shot we capture all possibilities to help us evaluate the argument. However, this strength is also the source of its shortcoming.
A truth table works like a litmus test. It only shows you “after the fact” that something is or is not possible. In this case, the table reveals that “after the reasoning that led to the conclusion,” one can say with confidence that the overarching inference between premises and conclusion can or cannot guarantee the preservation of truth.
While this is nice, this is also not terribly revealing of how we (or someone much smarter than us) got to the conclusion in the first place. Truth tables do not show this to anyone who might not immediately see it. An example may help illustrate the point.
Let’s say I want to offer the following argument:
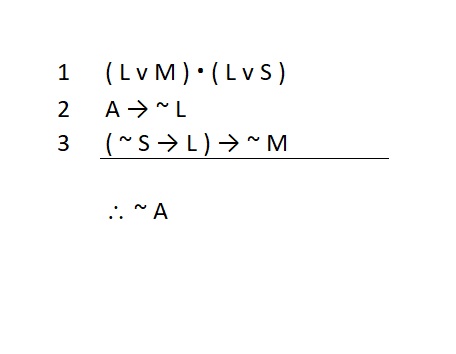
Remember back in the first chapter we said that an inference is like “a leap of the mind.” Logicians really only care if the leap is a secure move, one that preserves whatever truth we have in hand. Logicians don’t care if the leap is large or small, only that it is secure. Yet some folks can make both large and secure leaps of mind. Everyone can jump, but only some can compete in the Olympics and make really large jumps. A really sharp mind may look at this and just “see” that the conclusion follows from the premises. Their mind jumps from those premises to the conclusion in a single bound.
“Oh yeah, of course, that follows.”
Wow…that guy is sharp. Frankly, when I look at it, I do not just “get it” immediately. My mind can’t jump that far. Sure, some people can do this; their minds can recognize in one shot that the conclusion really does follow from the premises. However, most folks cannot (so don’t feel bad if you don’t see it either). We’re not all Olympic-level competitors in the inference jump.
What most of us can do is make tiny jumps. Those Olympic athletes can soar over 25 feet in one jump! But you know, if I want to get from here to some place 25 feet away, I can also do it. I just walk. Walking is a series of super-small jumps. For a split second you launch yourself, teetering over your foot on the brink of falling, only to elegantly land on the other foot. Nice. Even better, I can go further than 25 feet, and I don’t even have to be a super athlete to do it. Natural deduction is like that.
While truth tables give us a picture of the argument for a litmus test of its validity, natural deduction provides us with a way to show something much closer to how we actually think (at least when we are being very careful and very precise). A method of natural deduction breaks down very large inferences into much smaller steps. Indeed, like walking, those steps are so small that they can seem rather easy: we might even say they are trivial, at least until we see how far they can take us.
Let’s revisit our argument example. Let’s say I wanted to help a friend out. My friend does not see how the conclusion follows—or at least they are skeptical that it follows. I need to demonstrate this to them (and no, I don’t hang out with Olympic-level inference leapers). So, I need to take them through it step by step.
I can continue to number my statements but move my conclusion to the side to make this easier. I could first say something like this:
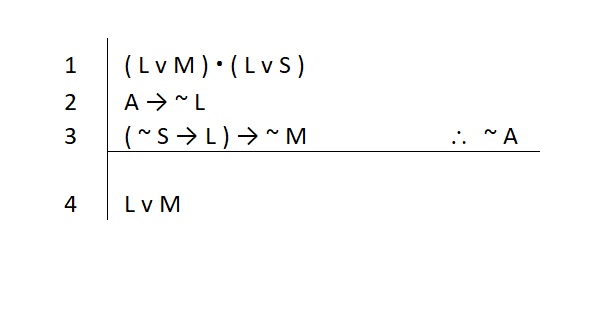
With a puzzled look, my friend asks why I should believe that this claim is true. To help my friend, the exchange follows as such:
Me: Look, remember on line 1 when we said ( L v M ) and ( L v S ), so you see, that’s why. Right? If both of those are true, the left side has to be true.
My Friend: Oh, okay, I get that.
Now I can continue like this:
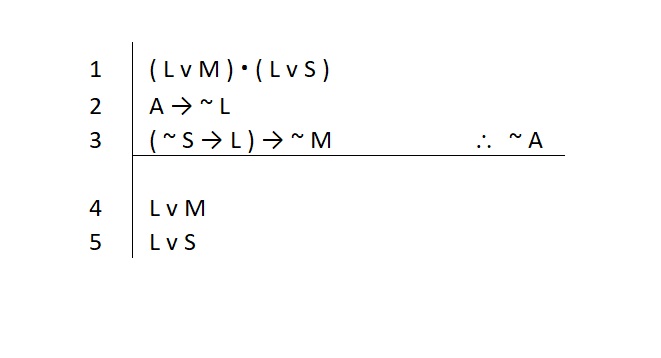
Again, my friend wants to know why I would say that. So I offer:
Me: Look, remember again on line 1 when we said ( L v M ) and ( L v S ). If both of those are true, the right side has to be true. So you see, that’s why. Right?
My Friend: Oh right, right, I get that.
This goes on a few times. I keep pointing my friend to the statements we previously agreed upon, and my friend works hard to figure out why we’re on solid ground. Eventually, we get a full account. It might look like this:
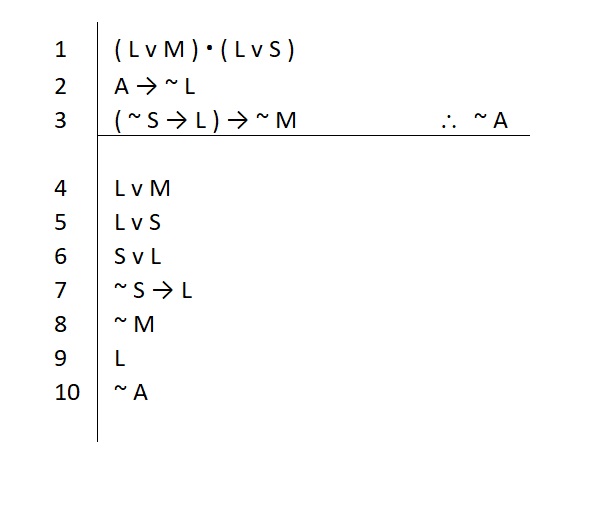
At each step along the way, my friend asks for a justification, and for each line I point out what my friend should look at to understand where my little inferences are coming from.
In a very natural way, I have taken a step-by-step approach to help my friend understand why the conclusion ultimately does follow from the truth of the premises. Now my friend is assured not just that the argument is valid, but that they can understand the line of reasoning that led to the conclusion. This is a major advantage over the simple litmus test of a truth table.
However, what we have seen thus far is not really a proof. In this little story, as I made my way to the conclusion, I made my friend do all of the heavy lifting. I asked him: Don’t you see? Don’t you see? Right? Right? My friend had to dig deep to figure out why each claim was ensured by the statements I was pointing out. They may have even needed to whip out a truth table to ensure these were solid moves. That’s not nice. I made my friend do all the work!
Had I really offered a full proof, I would have done work of justifying each statement—not simply making my friend figure that part out for themselves.
To remedy this shortcoming, when we do a proof we will offer complete justification for each small step that leads us to a new statement. Each line of our proof will include a quick justification that my friend can easily follow. These justifications will invoke basic rules of logic.
These “rules of logic” are really just small valid inference forms that we know we can rely upon.
And yes, you can use a truth table to verify that they express valid inferences.
Derivations, a.k.a. Symbolic Proofs
We will develop a system of natural deduction that takes advantage of our symbolic translations. We casually call these “logical derivations,” “formal proofs,” or “symbolic proofs.” This method will make use of the syntax of our propositions, because we can directly apply the valid inference forms to them. Thus, this method is often referred to as “proofs in propositional logic.”
A complete proof will contain:
- Our starting point: the premises we are given to treat as true statements
- A notation of our final goal: the conclusion
- Intermediate statements derived from our starting point: these are the small steps we took along the way
- Justification for the truth of every statement made after the premises: these use the rules of logic and are abbreviated for ease of reference
Our method[1] will be organized in a specific and common way to make it easy to communicate our proof to other logicians. Here’s our previous example with each line justified:
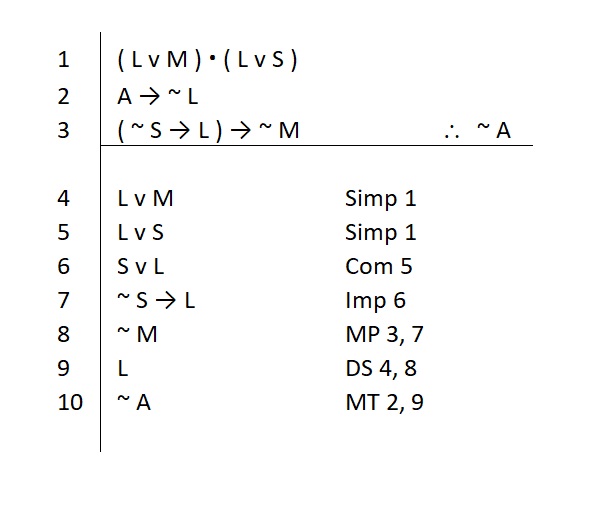
Note that much like in our truth tables, we again see two lines used to help organize our proofs. The vertical line is called a scope line. This visually shows us how far we are allowed to treat assumed statements as true. For now, the only assumed statements we have are the premises, so the vertical line is referred to as the primary scope line.
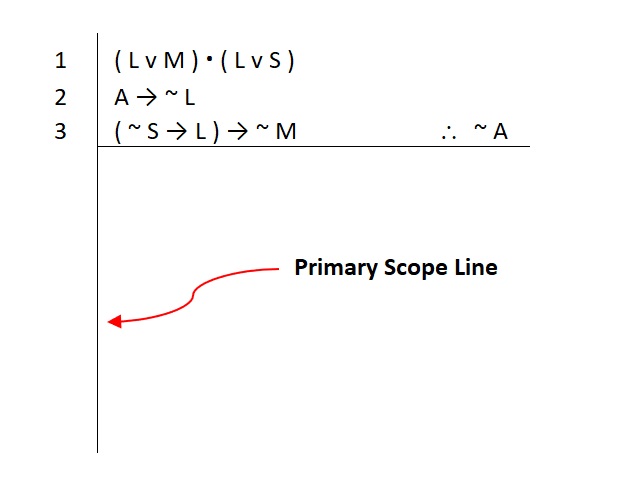
The horizontal line separates those assumed statements from the rest of the statements in our proof—the rest of these are not assumed to be true, so they must all be justified. If we are unable to provide a justification correctly and completely for all of the lines that appear below the horizontal line, our proof is not complete.
Many people enjoy doing proofs, because completing them is like doing little puzzles. They have a game-like quality to them, which is rewarding all by itself. However, the real reason we practice proofs is for the mental discipline they require. By showing us each step of a large inference, we are practicing the focus and patience needed to follow a complex train of thought. When we practice this, we are learning to use a linear problem-solving method that has far more application in everyday life than it might appear at first.
There’s a Zen-like quality to proofs. We can learn the rules of logic for themselves, but over time you will realize that doing proofs offers many logic life lessons. Like any good meditation practice, the depth of insight is mostly up to the dedication of the practitioner. Logic is always useful in life…if you let it be.
Inference Rules of Logic
In order to read and understand the proof above, we need to be familiar with some basic rules of logic. The first set of rules we will learn are called “inference rules” because they justify small leaps we make from one set of statements to another. Later we will learn more rules to supplement these, but they work a little differently. The sample proof above makes use of both sets of rules, so it will be some time before you are able to fully read and understand it.
For now we will focus on the foundation of our system of natural deduction: the basic eight inference rules. The inference rules are not difficult to learn, but they require practice.
Each inference rule works on a type of statement. If you have ever played chess, then you know the drill. A type of statement is like a type of chess piece. Pawns have rules that apply directly to them. You cannot move a knight in chess the way you move a pawn. You cannot move a pawn the way you can move a queen. Each piece has rules that apply specifically to it.
The same is true of our inference rules. They apply to certain types of statements. So, a conditional statement has rules that only apply to it. Conditionals do not move like conjunctions (or any other type of statement). You cannot make “moves” in your mind with this type of statement in the same way you can move with a conjunction. If you try to move a bishop in chess the way you move a rook, you will be in violation of the rules of chess. The same applies with symbolic proofs.
In chess, we know the piece we are looking at by its shape (chess players, remember when you learned that “the horsey looking thing” is a knight). In symbolic derivations, we know the piece we have in hand by its main connective. The main connective tells you what type of statement is on any given line, and thus, what type of rules apply to that statement.
IMPORTANT NOTE: You must be able to identify the main connective correctly and quickly. If you cannot, you will not be able to do proofs (it’s that simple). There is no way around this.
Metacognitive Checks
The rules of logic are useful for practicing the mental discipline of metacognition. Simply put, this is thinking about your own thinking. We will practice checking our own thinking by recalling simple elements of what we were thinking and asking questions about it.
A mind that is skilled at metacognitive checks is a superior thinker: it is better at problem solving than a mind that relies on “insight” and “intelligence” to find solutions.
You don’t have to be what some call “smart” to be good at doing logic; you do have to be disciplined.
The metacognitive checks we will perform help us understand if we are using the rules correctly. The first check is general. The second check will be specific to the rule itself and we will describe these as we look at each of them.
General Metacognitive Checks
At the most basic level, we check in with ourselves about our general use of the rule. We ask:
Q: Am I using this rule to accomplish the general task for which it was intended?
There are two general types of rules, divided according to the following general tasks:
- Introduction Rules: these “build up” and create a statement that you don’t have but want to establish (think of stacking blocks to create a pyramid)
- Elimination Rules: these “break apart” a statement to gain access to a part of the statement or to another related statement (think of opening a cookie jar to get to its contents)
So each type of statement will have a specific way to build it up and a specific way to break it apart. Our first meta-check will be to verify that we are using the rule for its intended purpose.
Knowing when and where you will use these rules is knowing how to play the game. Every chess player worth their salt knows that learning the rules is only the beginning. Chess is not a game of rules; chess is a game of strategy. The rules are merely a way to define some structure in our possible moves; the game itself is all about the strategy.
Of course, the rules of chess need to be firmly understood. You do so first by memorizing the rules and then by putting them into practice. Simply put, you have to spend time playing the game. The same holds for symbolic derivatives: we learn the rules merely as a starting point. But do not be confused on this matter. Logic is not about rules. Logic is about using those rules to effectively guide your mind. Logic (like life) requires strategy.
NOTE: In what follows, when we describe the inference rules, we will follow this convention:
- Provide the rule’s nickname in quotes: this helps memorize the rule
- Provide the full formal name of the rule
- Provide the rule’s abbreviation in parenthesis: for use in a proof
- Conjunction Rules
Conjunctions are fairly intuitive. If we know that an And statement is true, we know each one of its conjuncts is true. So that’s our first rule.
“AND Elimination” Simplification (Simp.)
The rule of simplification is an elimination rule, so it breaks apart And statements. We use this when we have an And statement on a line and we want to take out one of its conjuncts to write it on a line by itself. The form looks like this:
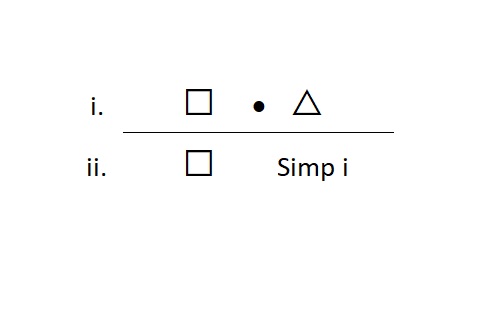
We can also use Simp to break out the right-hand conjunct. Like this:
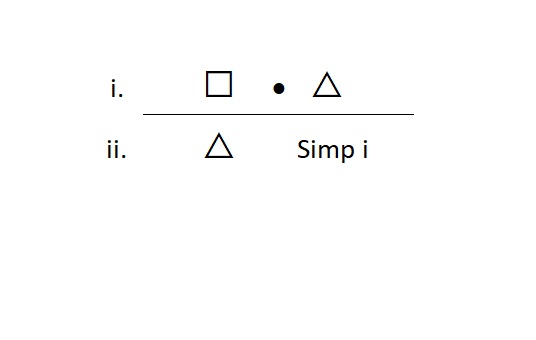
Meta-Check #1: The rule of Simp only applies to And statements, so the main connective of the statement on the line I reference must be a dot.
Meta-Check #2: The rule of Simp always requires one and only one line as the reference, so if I have more than one line referenced, I did something wrong.
Note that in describing this rule, we did not number the lines as we usually do. This is simply a schematic of the form of the rule. In an actual proof we will often find that our references are spread out. For example, in our previous example we saw this line:
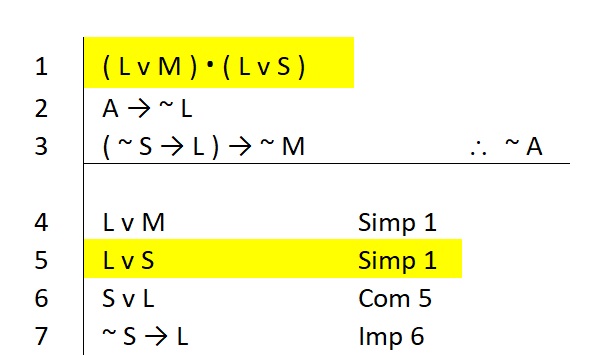
We used Simp here to justify the truth of line 5 by reference to line 1. In what follows, we will use “i, ii, iii” etc. to describe the form of the remaining inference rules. Just keep in mind that the actual lines in a proof may be spread out very far.
“AND Introduction” Conjunction (Conj.)
The rule of conjunction is an introduction rule, so it builds And statements. We use this when we don’t have an And statement, but we would like to assert one as true. To do so, we need to know that the truth of each conjunct has been previously established. The form looks like this:
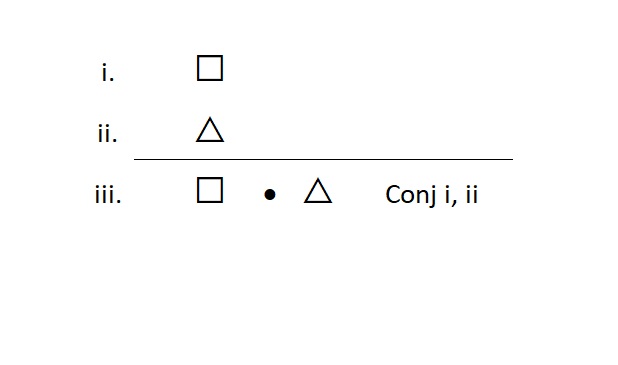
Meta-Check #1: The rule of Conj. only builds And statements. So, if the statement on the line I am justifying is some other type of statement, I did something wrong.
Meta-Check #2: The rule of Conj. requires two lines for justification. So, if I have only one line or more than two lines, I did something wrong.
Disjunction Rules
“OR Introduction” Addition (ADD)
The rule of addition is an introduction rule, so it builds Or statements. We use this when we don’t have an Or statement, but we would like to assert one as true. To do so, we need to know that at least one of its disjuncts is true. The form looks like this:
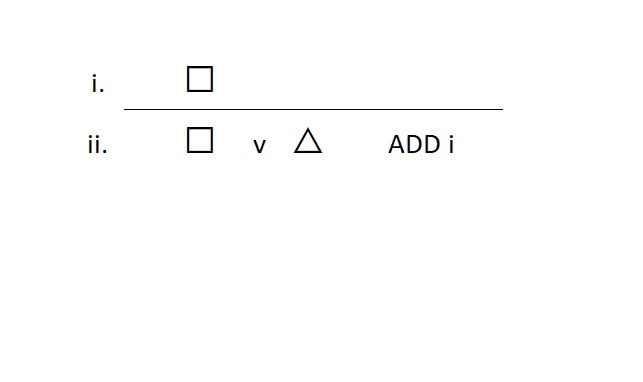
We can also use ADD to build Or statements if we know the right-hand disjunct is true. Like this:
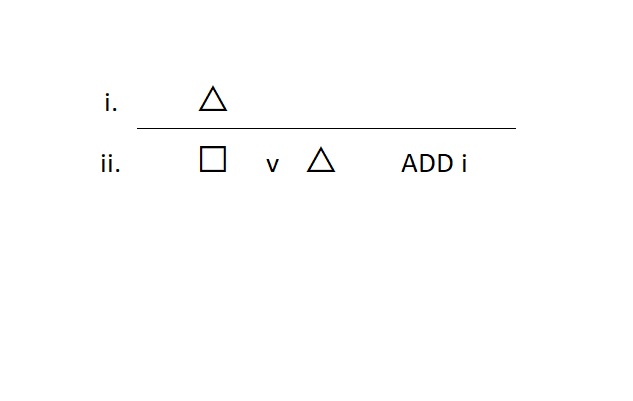
Meta-Check #1: The rule of ADD only builds Or statements. So, if the statement on the line I am justifying is some other type of statement, I did something wrong.
Meta-Check #2: The rule of ADD always requires one and only one line as the reference, so if I have more than one line referenced, I did something wrong.
“OR Elimination” Disjunctive Syllogism (DS)
The rule of disjunctive syllogism is an elimination rule, so it breaks apart Or statements. We use this when we have an Or statement on a line, and we want to take out one of its disjuncts to write it on a line by itself. The form looks like this:
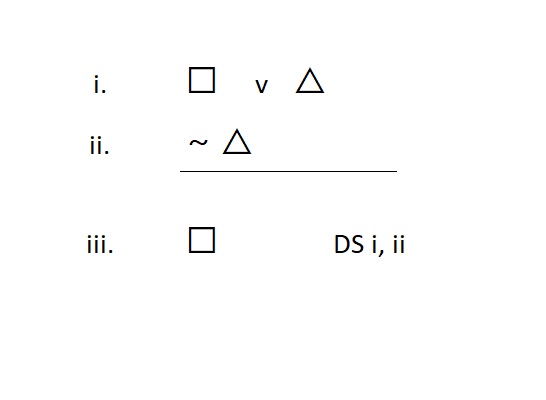
We can also use DS to break apart Or statements if we know the left-hand disjunct is false. Like this:
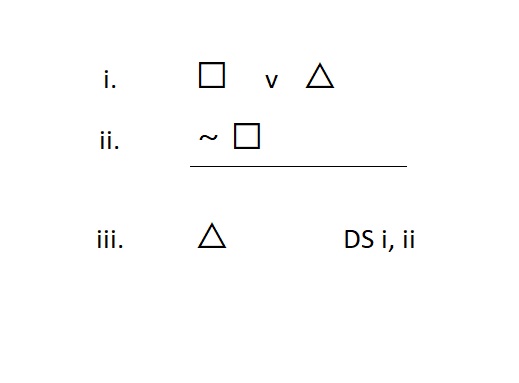
Meta-Check #1: The rule of DS only applies to Or statements. So, if at least one of the lines I reference in my justification is not an Or statement, I did something wrong.
Meta-Check #2: The statement I am justifying must be one of the disjuncts that appears in the disjunction that I cite in my justification.
Meta-Check #2: The rule of DS requires two lines for justification. So, if I have only one line or more than two lines, I did something wrong.
Special Note on Double Negations
There are times when the use of DS (and other rules) requires that you provide the negation of a negation. For example:
I have ~ E v S on a line, and I want to break it apart to get the S
Since □ in ~ E v S is already a negation (i.e., ~ E), DS requires the negation of that ~ E. Under very strict systems, the inference rules require a ~ in front of whatever the □ happens to be, even in cases like this where it already contains a negation (such as this ~ E). That means we would need a ~ ~ E in order to use DS to get the S out of that line. These “double negations” are simply the result of a hyper-strict application of the inference rules.
Our system of natural deduction will not require “double negations” to justify the use of any rule which requires the negation of a negation. Our system will accept what we all likely already intuitively know. The negation of ~ E is in fact simply E.
Of course, we will accept ~ ~ E as the negation of ~ E if we can provide that, but we may find it is easier to show that E is true. So we will also accept the following general rule:
The negation of ~ □ can be expressed as ~ ~ □ or it can be expressed as simply □.
“Big V OR Introduction” Constructive Dilemma (CD)
The rule of constructive dilemma is an introduction rule, so it also builds Or statements. We use this when we don’t have an Or statement, but we would like to assert one as true.
Often, we use this after our attempts to use addition fail to build the Or we want. To do so, we need to know that three statements are true. The form looks like this:
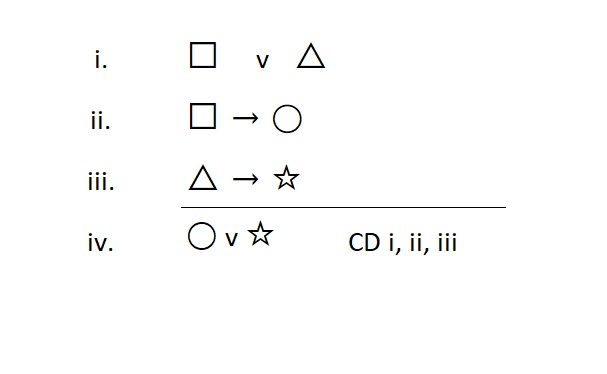
Note that we used extra statement variables (◯ and ☆) to illustrate this rule.
Meta-Check #1: The rule of CD only builds Or statements. So, if the statement on the line I am justifying is some other type of statement, I did something wrong.
Meta-Check #2: The rule of CD always requires three lines as a reference, so if I have fewer than that, I did something wrong.
Conditional Rules
“Conditional Elimination” Modus Ponens (MP)
The rule of modus ponens is an elimination rule, so it breaks apart conditional statements. We use this when we have a conditional statement on a line, and we want to take out its consequent to write it on a line by itself. The form looks like this:
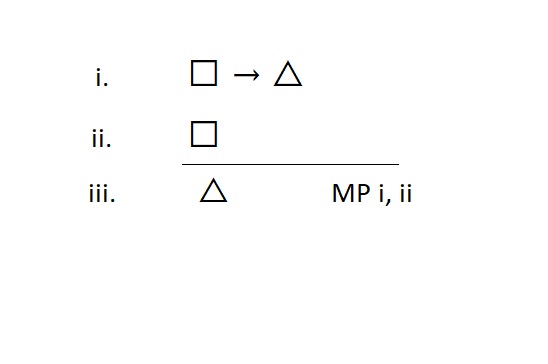
Meta-Check #1: The rule of MP only breaks apart conditional statements. So, if at least one of the lines I reference in my justification is not a conditional statement, I did something wrong.
Meta-Check #2: The rule of MP always requires two lines to justify its use. So, if I have fewer than two lines referenced, I did something wrong.
Special Note: MP is always used to secure the tip of the arrow (the consequent). You can never get the antecedent out of a conditional statement. If you want that antecedent, you have to find another way to get it—the conditional will not give it up.
“Backwards Conditional Elimination” Modus Tollens (MT)
The rule of modus tollens is an elimination rule, so it also breaks apart conditional statements. We use this when we have a conditional statement on a line, and we want to write the negation of its antecedent on a line by itself. The form looks like this:
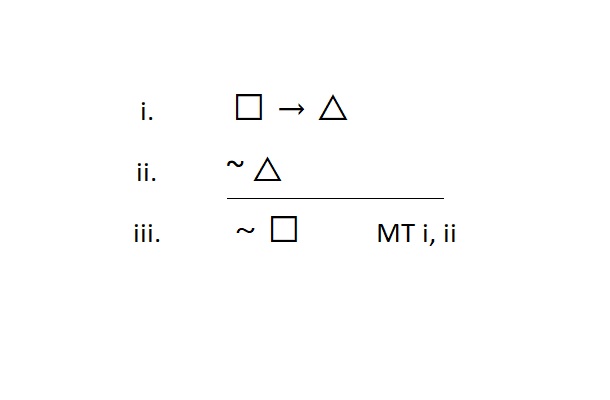
Meta-Check #1: The rule of MT only breaks apart conditional statements. So, if at least one of the lines I reference in my justification is not a conditional statement, I did something wrong.
Meta-Check #2: The rule of MT always requires two lines to justify its use. So, if I have fewer than two lines referenced, I did something wrong.
Special Note: MT is always used to secure the denial of the antecedent. Remember, you can never get the antecedent out of a conditional statement, but you can get its denial.
“Conditional Introduction” Hypothetical Syllogism (HS)
The rule of hypothetical syllogism is an introduction rule, so it builds conditional statements. We use this when we don’t have a conditional statement, but we would like to assert one as true. Conditional statements build conditional statements; you will need two in order to make another. The form looks like this:
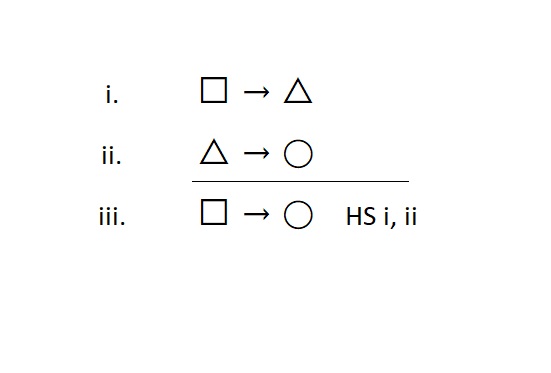
Note that we used an extra statement variable [i.e., ◯] to illustrate this rule.
Meta-Check #1: The rule of HS only builds conditional statements. So, if the statement on the line I am justifying is some other type of statement, I did something wrong.
Meta-Check #2: The rule of HS always requires two lines to justify its use. So, if I have fewer than two lines referenced, I did something wrong.
Special Note: When using HS, the conditional statement you are trying to justify drives its use. The other two conditionals should have a very precise relationship to the one you are justifying. One should share the exact same antecedent, while the other should share the exact same consequent.
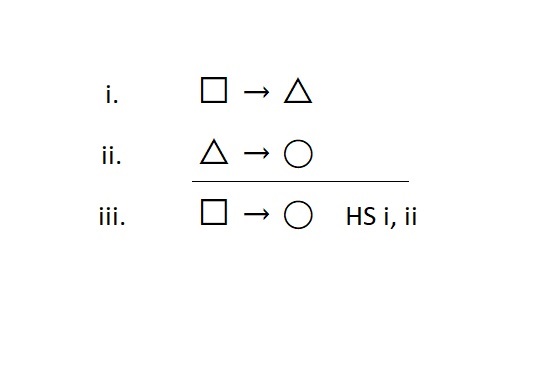
Additionally, each of these two conditionals should share the exact same statement that acts as a “middle term” (i.e., the △), which does not appear in the final conditional.
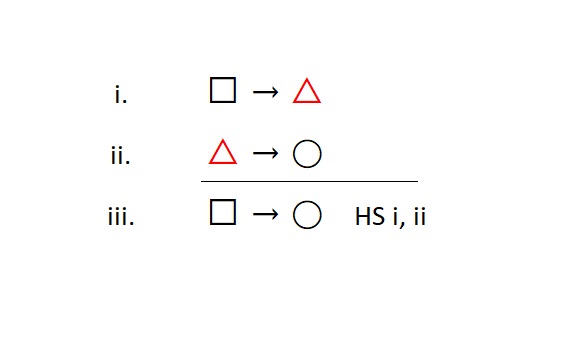
When we say “exact same,” this means there should be no deviation at all.
Biconditional and Negation Rules
Note the following for biconditionals: We have no basic inference rules for making direct moves with biconditional statements. In the next chapter we will learn rules that give us robust access to these statements. For now, they are bricks—you can only use them in their entirety if they happen to be helpful in their current form for another inference rule.
Note the following for negations: We have seen that negations can be produced, i.e., they can be “introduced” through conditional statements (using MT). If you want to “build” or “introduce” a negation (i.e., you want a ~ □) that you do not have, then you need to start looking for a conditional statement that has that □ in its antecedent (i.e., □ → △).
However, if you wish to “break apart” a negation statement, you cannot currently do so with the basic 8 inference rules. We will have to wait until the next chapter to get rules with this power.
Using the Basic 8 Inference Rules
There are a few general restrictions on using the basic 8 inference rules. These are:
- Inference rules only apply to the main connective of a statement
- e.g., You cannot apply an And rule to this statement: ~ R v ( Y ∙ P )
- This is because that statement’s main connective is the “v”
- e.g., You can apply an And rule to this statement: ~ R ∙ ( Y v P )
- This is because that statement’s main connective is the “∙”
- e.g., You cannot apply an And rule to this statement: ~ R v ( Y ∙ P )
- Inference rules must cite statements that appear above the line they are justifying
- e.g., The justification for line 8 may only include lines 1-7
- e.g., The justification for line 8 can never include lines 9 and higher
- Cited lines cannot include the same line they are justifying (i.e., they cannot be circular justifications)
- e.g., The justification for line 8 can never include “8” in its citation
The savvy student will note that the first general restriction is the basis of some of our meta-cognitive checks. The other two general restrictions should be used as additional general meta-cognitive checks. You should always look to ensure that your references are neither circular nor provided as promises for what you hope will be true later in the proof.
Apart from these restrictions, the basic 8 inference rules are fairly easy to remember and use.
Strategy (a.k.a. Working Back from the Goal)
Allegedly, the second habit that highly effective people practice is to begin with the end in mind.[2] This is nothing more than starting your thought process with a clear sense of your goal, and then working backwards from there to make sensible progress towards it. Practicing symbolic derivations offers an excellent opportunity to discipline the mind in this habit—yet another logic life lesson.
To be fair, you can get through life (and get through many proofs) without being focused, without being strategic, and without being highly effective. You can flail about in a non-strategic manner, starting with what you have been given (in life or in the premises) and hope that something wonderful happens to get you to your goals. You can do this—whether or not you should do it or even want to do it is up to you.
Many people do not want to be highly effective, they just want to get by.
You are in charge of you. Maybe wonderful things will come your way…or maybe you will not wait for this: you will use your mind and develop a strategy to succeed.
The Two-Step Method
Approaching a proof in a strategic manner is actually very easy. There’s a simple two-step process to help you develop a reasonable strategy to get you to your goal. It looks like this:
Step 1: Identify your goal
Step 2: Identify what you have to work with
Sounds simple, but two things make it hard when you are starting out.
First Challenge: You have to identify your goal and identify what you have to work with—you cannot get by simply “seeing” your goal or “reading” what your resources happen to be.
When we say “identify,” we mean understanding the main connective of the goal and of the resources you have. For example, consider this statement:
B v ~ R
What is this statement?
If you answer that question by simply reading it, then you are not understanding it. If you say, “I want B v ~ R” then you are not understanding what you want. To understand it, you have to do more than point to it, and you have to do more than read it back to yourself. You have to look at the statement and recognize that it is an Or statement. You have to know the type of statement it is. Once you do that, you know what rules apply to it. Now you know what possibilities there are for what you want or what you have to work with in the proof. Now you have power over the statement.
Second Challenge: We lose focus very quickly.
You might know clearly what you want and what you have in hand. However, that clarity does not last. Welcome to life. Everyone loses focus more quickly than they are willing to admit. So, all that great power we just acquired over the proof will be gone in a split second.
The secret of this method is to control your eyes.
What you look at is only half the battle. The real secret is to control when to look at things. This is why we have a two-step method. Step 1 means put your eyes on the goal. DO NOT LOOK AT THE PREMISES. Step 2 means you are now allowed to put your eyes on your resources (the premises).
Virtually every student I have ever seen struggle has had a hard time doing proofs because they kept looking at the premises.[3]
They have a flawed mental image in their mind: they believe that the premises have the answers.
Put differently, they believe that the premises are valuable. They believe that the premises will unlock the path to the conclusion. This is false.
Or at least, we can say that focusing on the premises first is useful only when the proof (and life) is not very difficult. So, perhaps this is the most important logic life lesson: your goals are what matter most, not your present resources.
In what you have presently available (in the premises), you will find confusion.
In your goals, you will find clarity of purpose.
Thus, we’ll start with the conclusion, with our purpose firmly in mind. The following cheat sheet (Inference Rules as Strategies [PDF, 130kb]) lays out the basic 8 inference rules for you to reference. Note that they are presented as strategic moves rooted in your goals, in what you want.
An Example of the Reverse Method
Let’s walk through a sample problem to see how this method plays out. Consider the following problem:
- ( A v G ) → K
- K → ( B → F )
- A ∙ B ∴ ~ M v F
We begin by extending our primary scope line far down the page and putting our conclusion at the bottom.
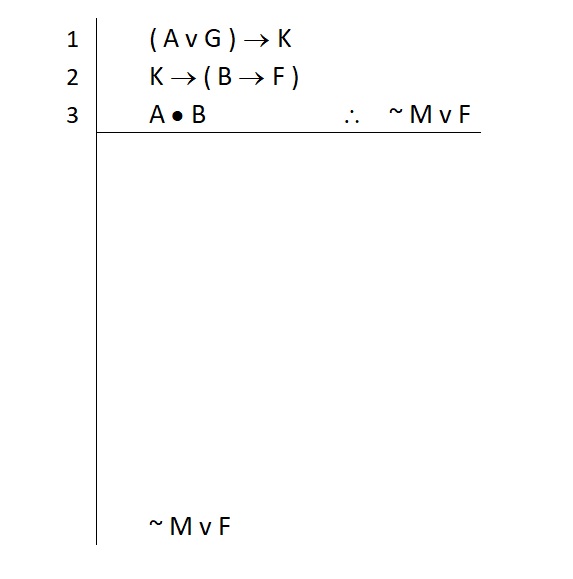
Now we can take Step 1: Identify the goal.
Our Conclusion is an Or statement. This will either be contained in the premises in its entirety, or we will need to build it.
Now we can take Step 2: Identify what you have to work with
NOTE: By taking Step 1 seriously, we are in good shape to look at our resources—they will begin to make sense. Some things we have are valuable, some things are not. All of this depends on a clear understanding of our goals. This is the most important logic life lesson.
The key question we have right now is whether or not the conclusion is in the premises (in its entirety). So we look to the premises for this.
Q: Do you see it?
A: No
Q: What does that mean?
A: We have to build it. We need to “introduce” it.
Now we know we have to build it, so our questioning continues:
Q: How do you build it?
A: Depends on what you want to build…
Q: What do we want to build?
A: An Or statement (we know this because we took the time to identify the goal)
If you do not take Step 1 seriously, you have little to no knowledge of what you want to build. Almost every student who does not take Step 1 seriously struggles—and EVERY student who does not take Step 1 seriously struggles more than they would otherwise.
Knowing we have to build an Or statement, we can look over our rules to find suitable options. We are looking (a) for Or rules and (b) the rules that build them—the introduction rules. So we look and find two rules:
OR Introduction: Addition (ADD)
“Big V” OR Introduction: Constructive Dilemma (CD)
Between the two, we generally favor addition because it’s fast and doesn’t require much. That rule tells us we only need one thing to build an Or statement. Either disjunct will do.
So we return to Step 1 to identify our new goal (or rather, to understand our two new options for the next goal):
Left-hand Disjunct: ~ M
Right-hand Disjunct: F
We don’t need both—that’s not what the rule of addition tells us. Addition tells us that our overall strategy will be to find one of these and use it to build our Or statement. One option is a negation and the other option is an atomic.
We can now take Step 2 with a clear sense of what matters to us. We know what to look for in the premises.
A peculiar feature of addition as a strategy is that we should go look for both—we don’t need both, but we should look for both, because if we find one right away, we may overlook an easier way to get the other one. Look for both before you jump on the first one you see. (Tip: This is another logic life lesson—be patient in developing your strategy.)
When we look at the premises, something odd jumps out at us. There are no ~ M statements anywhere. Heck, there are not even any atomic M statements! So that strongly suggests that our use of addition will require us to find the right-hand disjunct. At least there are atomic F statements in the premises. If we had an F on a line all by itself, we could build our conclusion off of it. So we write that down immediately above our main goal (i.e., the conclusion) as a subgoal. Like this:
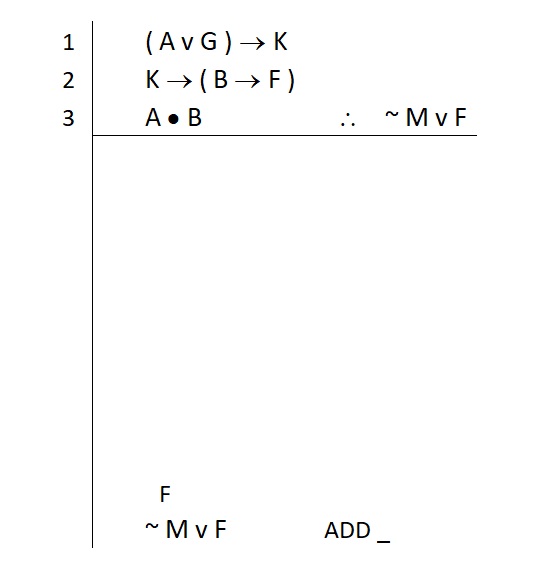
So now Step 1 begins again. We have something to look at and easily identify.
Q: What kind of statement is this?
A: An atomic
Q: Can we build atomics?
A: No. So, 99% of the time this means we must find them in the premises
Now we are empowered to look at the premises again. We know we are going to take Step 2 again to look for compounds that contain what we want now.
Q: Where did we find that atomic F statement?
A: Premise 2
Q: Where is that F statement most immediately located?
When we ask about “immediately located,” we mean to ask the following:
Q: Where does the atomic F appear as a primary component of a statement?
Sure, we find an F in the second premise, but the F is not a primary component of that premise. Premise 2 is a conditional statement. The main connective of premise 2 is the first arrow. When we look at the □ and △ we see that the atomic F is not the sole statement in either of those. In the □ we have “K” and in the △ we have a compound “B → F” statement. So the atomic F is not a primary component of the second premise; it is buried inside a primary component…and we need to get it out.
The atomic F is located in the consequent of the second premise. Inside there, it is a primary component of that little conditional. So we can say that the atomic F is most immediately located in that little conditional statement. (Put differently, if we look only at that statement, we see that the F is the consequent of this little conditional statement.)
( B → F )
Life would be great if we could get this statement on a line all by itself. After all, if this were on a line all by itself, we could apply our rules to it to get what we want.
Remember: the inference rules only apply to the main connective of a statement
Having this little conditional on a line by itself means that one of our conditional elimination rules can be used to break it apart. So we write that statement down on a line immediately above our last subgoal. Like this:
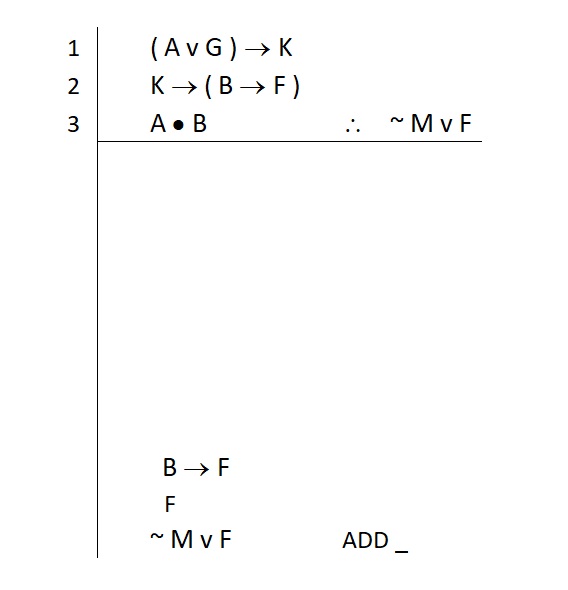
We now can see pretty clearly that our F will be secured by breaking apart the B → F that we are saying we hope to get.
As we noted earlier, breaking B → F apart will require a conditional elimination rule, one that delivers to us the statement in the △ position of the conditional. We look over our cheat sheet to find the rule that will break apart a conditional and give us the △. This rule is called modus ponens (MP). Now we have a strategy for getting the F: we know we’ll try to use MP to justify it. So we write the rule down to remind ourselves of the plan:
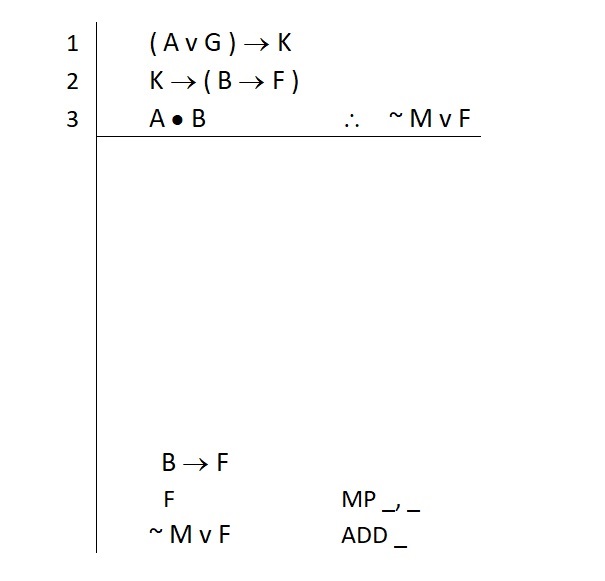
Note that we also drew out how many lines a correct use of MP will take. This helps with our meta-cognitive checks. If we cannot fill in both of these lines, we will know we did something wrong.
Great! We have a plan to get the F, but it will require the B → F statement on a line. This is our newest subgoal. So…Step 1: identify it (it’s a conditional); Step 2: take stock of your premises.
We see that we had this statement (in its entirety) tied up in a larger statement on line 2. Line 2 is also a conditional statement—and it has what we want. So we need to break line 2 apart. We review our conditional rules and once find again that modus ponens will give us the consequent. So that’s our strategy, and we note it like this:
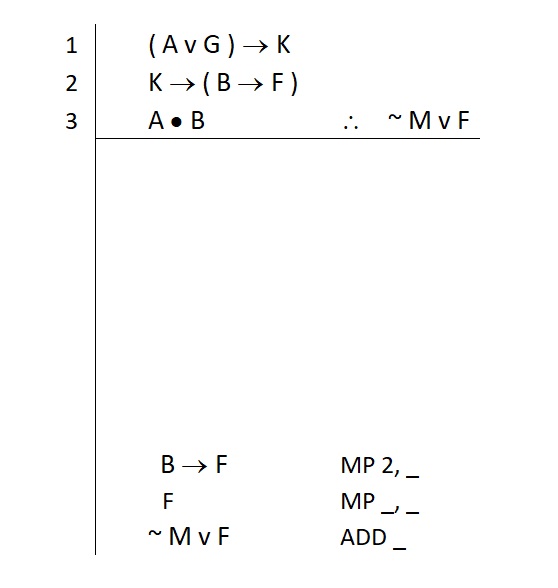
Notice here that when we wrote down MP, we included the direct reference to line 2. We know we’ll need to use MP to break apart that specific line, so we can write it down to finish half of that justification. MP takes two lines as a justification, so we still have a blank spot in the justification. We don’t know what that line will be yet, so we just leave it as a underscored line for now.
Pausing for a moment here, we see that a plan is emerging for how to get our atomic F statement. The F now appears as the primary consequent of this line. So modus ponens will allow us to break apart this statement to get the “F” statement. Modus ponens is being used twice to deliver to us two different consequents.
Since MP requires two lines, this rule gives us clear insight into what we need to proceed. Our application of MP to get the atomic F will reference the line in which B → F appears, as well as another line. The rule of MP tells us that we need this conditional, and we also need the □, the antecedent. In this case, that □ contains the atomic “B.” So we write this down as a subgoal. Like this:
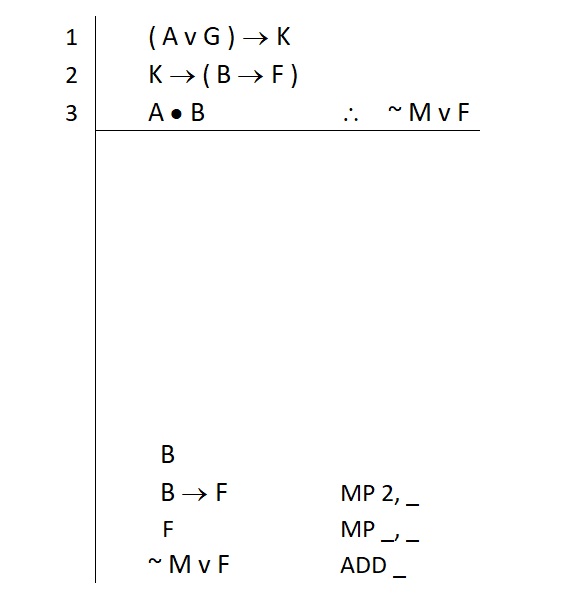
However, in order to get that “B → F” on a line by itself, we have to wrestle it out of the second premise.

MP tells us we need to secure the □ of the second premise in order to get the “B → F” alone. In this case, we require an atomic K to pay off the conditional in the second premise. So we write that subgoal down too. Like this:
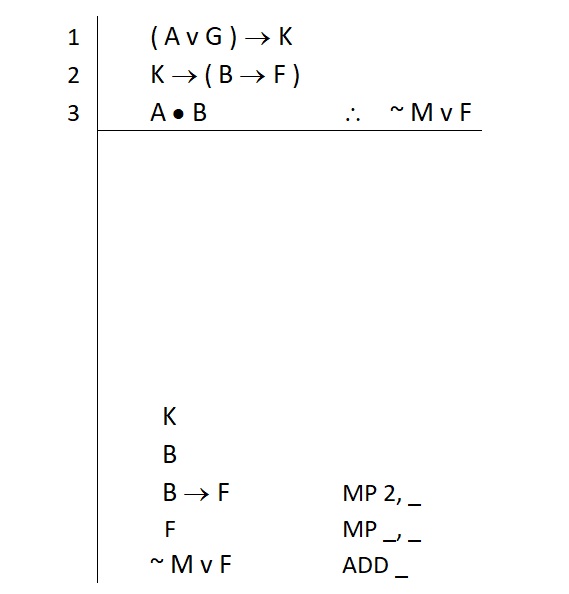
Now we can return to Step 1 for these subgoals. Identify the first.
B is an atomic statement
This likely appears in the premises somewhere
Step 2 repeats: Identify what you have to work with. We look at the premises now:
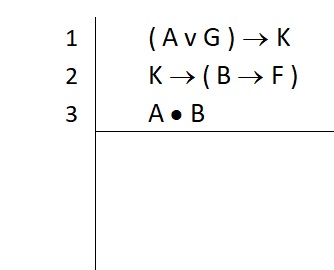
We find an atomic B in the third premise. Even better, we find the atomic B as one of the primary components of line 3. So we identify what kind of statement line 3 is so that we know how to break it apart.
Line 3 is a conjunction
Simplification (Simp) is the conjunction elimination rule
Because Simp requires nothing more than a conjunction as the main connective, we can directly apply it to the third premise. Our justification for the atomic B is complete. Like this:
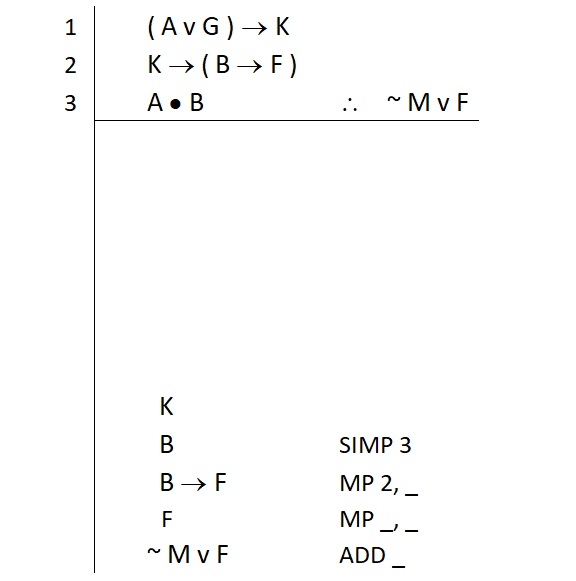
Great. Now we return to Step 1 for our remaining subgoal.
K is an atomic statement
This likely appears in the premises somewhere
Now on to Step 2 to look for this in the premises. We find an atomic K tied up in a compound statement on line 1:
( A v G ) → K
When we identify this statement, we see that:
Line 1 is a conditional statement
Modus ponens is the conditional elimination rule that breaks apart conditionals and yields the consequent
So we have a strategy in place to secure our atomic K statement. Remember, we write that justification down and indicate how many lines it requires. Like this:
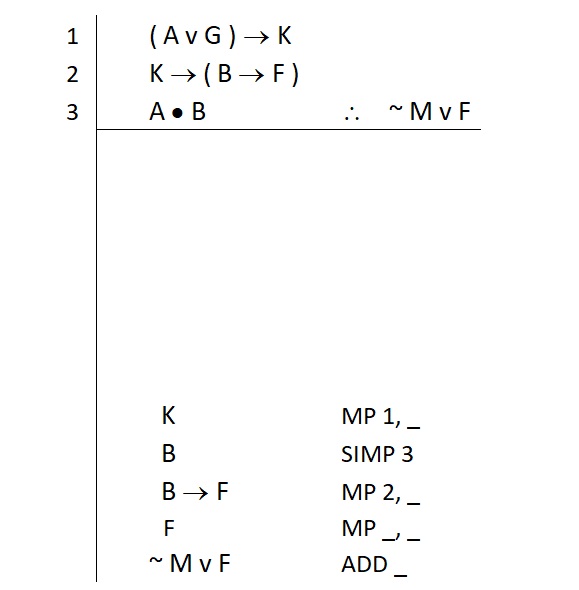
We know one of these references is the first premise. We don’t need to prove that line 1 is true; we directly invoke it in our justification. So we filled that direct reference in and included an underscored line to remind us that we need another statement to complete the MP.
Remember that MP tells us that we have to provide the conditional on line 1 with its antecedent.
( A v G ) → K
So we know we need this new subgoal and we should write it down like this:
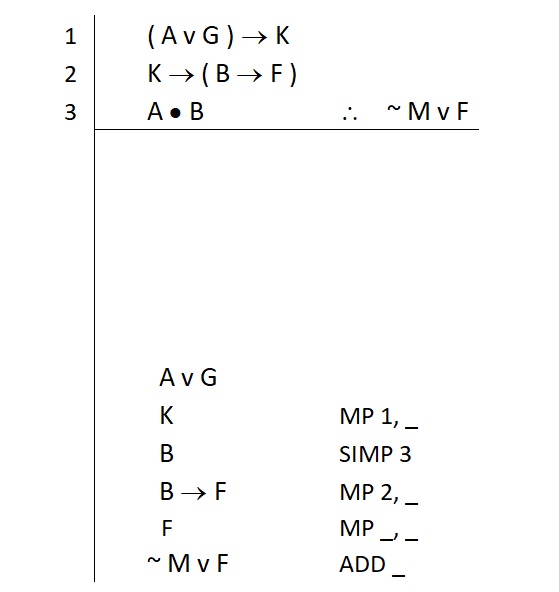
Now Step 1 begins anew. We identify this new subgoal “A v G” as a disjunction.
Now Step 2 repeats. We identify if we have this statement in its entirety in the premises.
We do not
So that means we have to build it
Addition is the quickest fastest way to build Or statements
We know what addition requires: just one of the disjuncts
So we look for both (the atomic A and the atomic G)—in case one is easier to secure than the other
In this case, it seems there are no other atomic G statements in the premises. So this strongly suggests that we will build the A v G by securing the other disjunct, the atomic A. So we write this down as our next subgoal (along with the ADD justification for our “A v G”), like this:
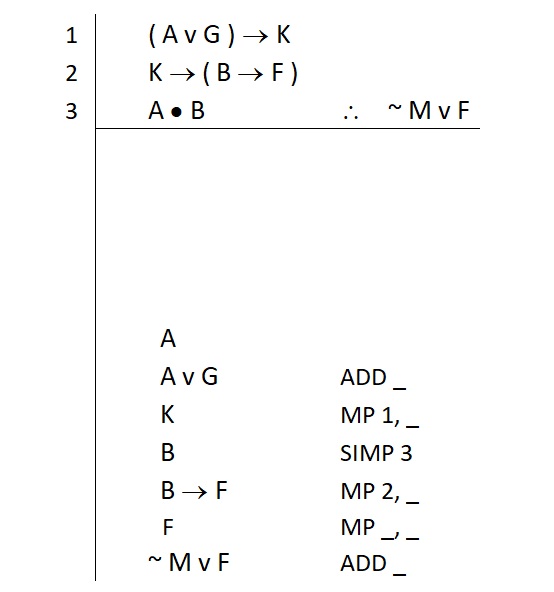
Step 1 takes place for “A.” We identify this as a simple atomic statement, and that means it is likely in the premises somewhere.
Step 2 takes place. We look for the atomic A and find it in the third premise. As we saw earlier, this is a conjunction, and the A appears as the primary conjunct in it. So this means we can use simplification to break the third premise apart and get what we want. So we write our justification like this:
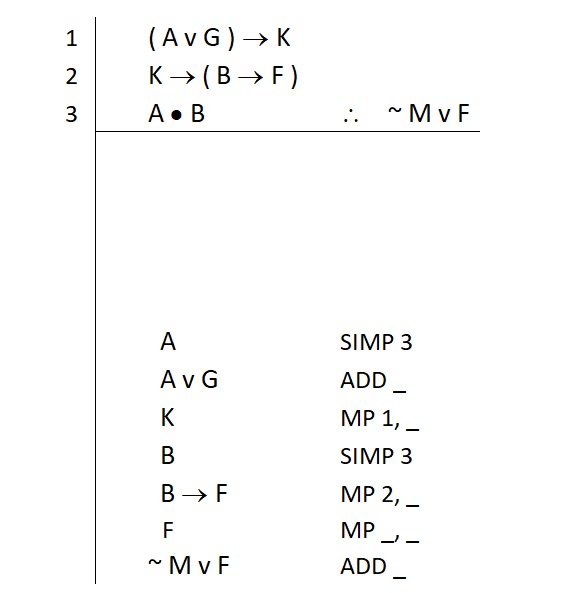
Notice now that we seem to have everything we need. We have a plan for everything and that plan does not require any further statements. At least, this is how it seems. We will perform a meta-cognitive check when we attempt to fill in the rest of our justifications. To do so, we start by filling in the numbering for each of our lines. Like this:
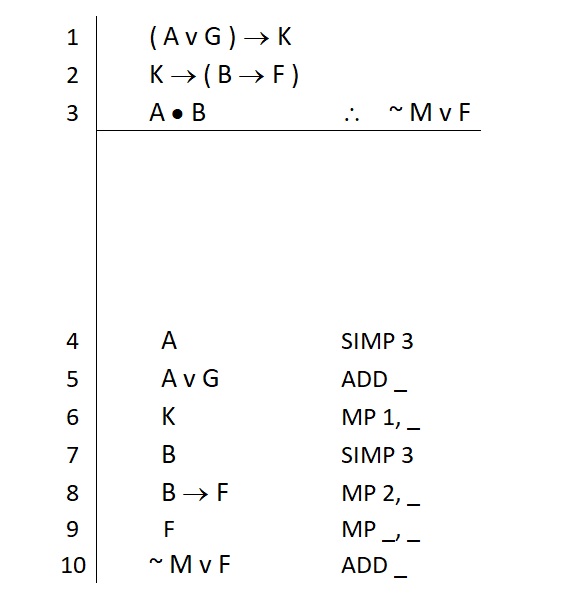
Now we have numbers to use in the rest of the blank spots in our justifications. If we find we are unable to properly cite a line by filling in all the blank spots, our meta-cognitive check will have revealed that we are not yet done. So we give it a try and find this:
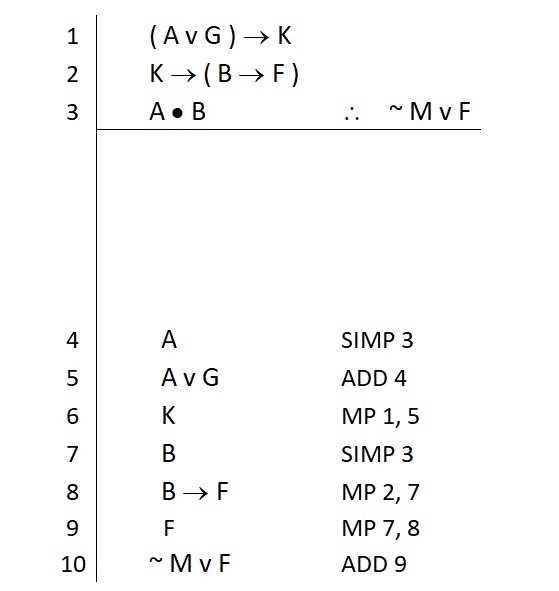
In this case, we were able to provide a complete and correct citation for each rule we used. This completes the justifications for each line in our proof.
A Word on Doing Well
This reverse method is not always intuitive. You will need to practice it to grow comfortable with it. You are well advised to do so even on easy problems.
Easy problems can often be done “quicker” by proceeding from the premises down to the conclusion, using a forward method. This is a trap! You will get the mistaken impression that this is better, simply because you are meeting with early success on easy problems. You are being fooled by your own success.
As problems become increasingly challenging, you will need the reverse method more and more to quickly dispatch them. Your “forward method” will become increasingly slower and harder to pull off. So don’t be fooled.
By practicing the reverse method even on easy problems, you get comfortable with the method quickly. When the harder problems appear, your comfort and familiarity with strategic thinking will pay off.
Additionally, in the next chapter we will look at replacement rules. When these arrive, the floodgates will open and problems will become far more challenging. You will need a firm foundation you can count on. The forward method becomes a recipe for wasted time and confusion. The reverse method will be a reliable base that you can build replacement rules on without becoming overwhelmed.
Here is a useful website to try if you are working with pen and paper. This is not a replacement for meta-cognitive checks, but it is a nice resource to enter problems into as a final verification.
NOTES:
- You must enter a proof into this system (all Ps and the conclusion).
- Additionally, you must use their annotation system (carets ^ for dot ∙, etc.).
- They require double negation
- Not all rules are shown in the sidebar of rules (e.g., DeM is not listed, but the system accepts it as a proper justification)
Practice Problems
Please see section 8.1 of the Power of Logic Web Tutor for a selection of problems using only the first eight inference rules.
These can be done directly online or printed out for pen and paper practice.
Note that sections 8.2 through 8.6 of the Power of Logic Web Tutor provide practice problems that make use of advanced rules. We will cover these rules in the next chapter of this textbook, and you may wish to revisit these sections of the Web Tutor for additional practice.
- In this text, we will be using a modified “Fitch method” of annotation, named after logician Frederic Fitch, who developed this technique. Most contemporary introductory logic texts make use of some form of Fitch method in which the “Fitch bar” (the horizontal line separating premises from derived statements), vertical scope lines, and indentation of statements and justifications are the norm. ↵
- See Dr. Stephen R. Covey, The 7 Habits of Highly Effective People. ↵
- This has played out over two decades of classroom instruction, literally hundreds of times. ↵

