1 Lightroom and Bridge to Photoshop with Smart Objects
 |
In this section I will discuss various workflows using Adobe Lightroom Classic and Adobe Bridge as the starting applications to prepare images prior to opening them in Photoshop. I will also discuss Smart Objects, the role they play in Photoshop, and how to set them up in Lightroom and Bridge.
In our photography courses at the College of DuPage we teach our students to primarily use Lightroom Classic to organize, edit and archive class assignments. This is done for various reasons but primarily as a way for students to organize and maintain a single Catalog with all class assignments from every class that they have taken in our program; where they either capture images digitally or scan film negatives to electronic files. The Catalog and all associated images are stored on an external drive that a student can transport back and forth from school to home, and opened on any of our computers on campus. This chapter should be viewed only as a guide, because there are other applications that may be utilized in an individual’s workflow, such as Capture One which we use for tethered capture in our studio courses.
Lightroom Classic to Photoshop
Lightroom Classic Export to Photoshop
Adobe Bridge / Camera RAW to Photoshop
How-To: Using Smart Objects to Create Templates
HowTo: Create Smart Object Templates in Photoshop
Lightroom External Editing Preferences
As mentioned in the opening of this chapter; Lightroom Classic [LrC] is the application of choice in our classes at COD, and there are a few different ways to open photos from LrC in Photoshop. Before jumping right into Photoshop you should take a look at Lightroom’s Preferences for External Editing to ensure that the settings that you want are correct.
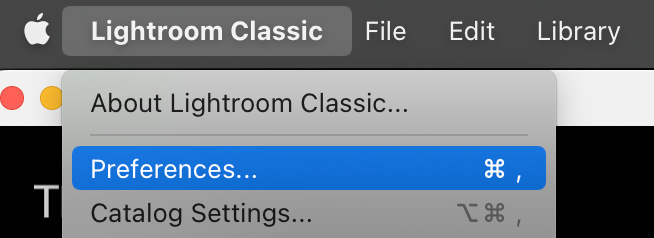
To open the External Editing preferences in Lightroom choose the Lightroom Classic menu on the upper left [see below] and choose the External Editing tab at the top of the Preferences dialog box. This will provide you with options to choose from on how to open your images in Photoshop. These settings are utilized when you use the Edit In Photoshop…. options from the Photo menu, or if you use the CMD/CTRL + E shortcut.
 |
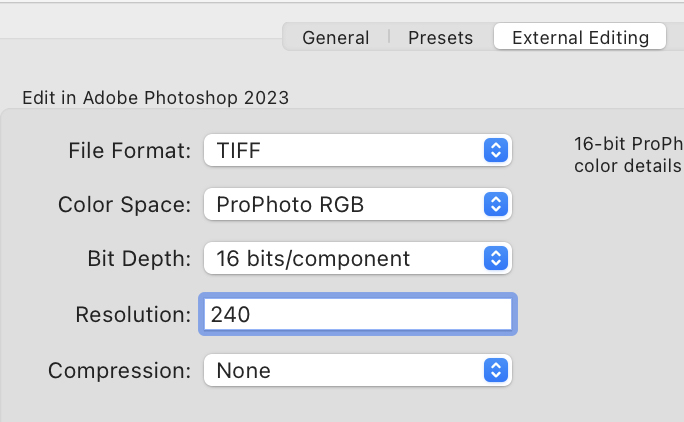 |
External Editing: Edit in Adobe Photoshop . . .
File Format: TIFF [Tagged Image File Format] or PSD [Photoshop Document]
- TIFF: The TIFF format provides greater compression and industry compatibility than Photoshop format [PSD], and is the recommended format for exchanging files between Lightroom and Photoshop. It is a flexible bitmap image format supported by virtually all paint, image-editing, and page-layout applications. It supports up to 65,000 pixels per side. In Lightroom, you can export TIFF image files with a bit depth of 8 bits or 16 bits per channel.
- PSD: The Photoshop format [PSD] is the standard Photoshop file format when saving and working with a multi-layered image. The file must be saved in Photoshop with the Maximize PSD and PSB File Compatibility preference turned on. Lightroom imports and saves PSD files with a bit depth of 8 bits or 16 bits per channel. To work with 32-bit images in Lightroom, save your file as TIFF or PSB.
Color Space: ProPhoto RGB, Adobe RGB, Display P3, and sRGB.
| The Problem with Color: No device in the photographic workflow can reproduce the full range of colors viewable to the human eye. Each device works within a specific color space, or gamut, of colors that the device can record, store, edit, or output. I refer to gamuts as vessels in the classroom where each color space vessel can hold a specific amount of color, but a photo may not contain all colors.
Larger color gamuts can be converted to smaller color spaces in Photoshop if necessary. The same Color Space and Bit Depth options can be applied when Exporting photos out of LrC. |
- ProPhoto RGB: This is the default color space for editing in Lightroom’s Develop module as it better conforms to the larger color gamuts of modern digital cameras, and it is also the default color space for editing in Photoshop as it allows for access to the captured colors. ProPhoto RGB doesn’t work well with 8-bit photos [JPGs], because you will be trying to jam a large gamut into a small bit depth which can can lead to banding. Use 16-bit when using ProPhoto RGB.
- Adobe RGB: This is a wide color space that is slightly larger than sRGB. It is a good choice for inkjet printing or if you are sending photos for printing to a photo lab.
- Display P3: This is also a wide color space that is used with the latest Apple devices. It is similar in size to Adobe RGB, but shifts slightly towards reds-oranges and loses some of the greens-blues. It is mostly useful when exporting photos for display on the Apple devices using the same color space.
- sRGB: This is a small color space but it’s the most widely used. It is a great choice for screen output [social media], lab-based photo printing, emailing images or uploading images to the web.
Lightroom Classic to Photoshop
There are a number of ways to take our photos from LrC to Photoshop; as we can Export images or directly open them by using the Photo menu. Whichever option you choose, I would recommend that you apply tonal, color and any other creative options in the Develop module in Lightroom before moving on. Lightroom was designed with the intent of allowing photographers to work quickly on many photos and using Photoshop to add the finishing touches [if necessary] using tools or techniques that can not be applied in LrC, or that are just easier to do in Photoshop.
When you are ready to work with a photo in Photoshop you will go to the Photo menu from within the Library or Develop modules, and choose Edit In and then Edit in Adobe Photoshop 2023 or whatever version you are working with [CMD/CTRL + E]. Some options will be grayed out because they are intended to work with multiple photos at once, so you must have more than one photo selected before they are made available to you.
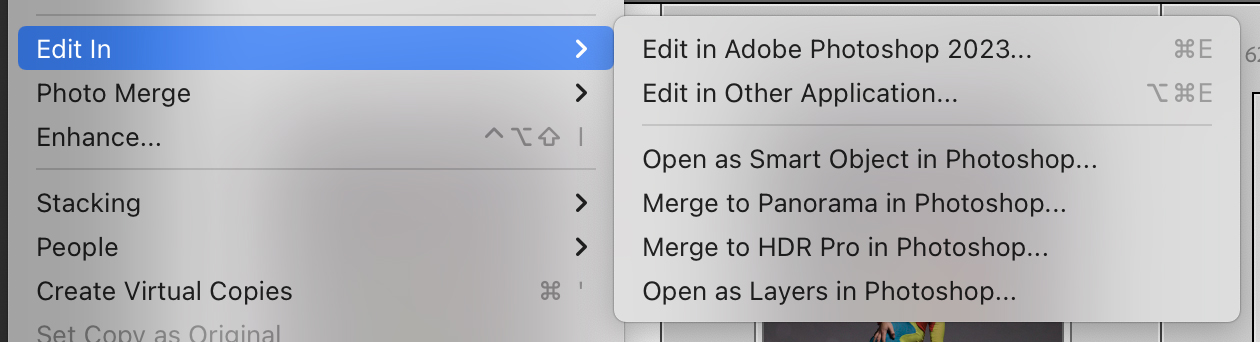 |
Edit in Adobe Photoshop [2023]… : Choosing this option or using the shortcut [CMD + E / CTRL + E] will open the selected photo[s] in your current version of Photoshop. The file[s] will open with the settings chosen in the External Editing preferences.
Edit in Other Application…: This option will open your photo in an application other than Photoshop that you must setup in the External Editing preferences. These will often be third-party plugins that are set up during their installations.
Open as Smart Object in Photoshop…: Similar to Edit in Photoshop option; choosing this will open your image directly in Photoshop but as a Smart Object. This is my preferred method of working in Photoshop to maintain a non-destructive workflow. Smart Objects provide you with the ability to add or subtract from the edits made in Lightroom’s Develop module directly within Photoshop.
The following options must have more than one photo selected in order to be an available option:
Merge to Panorama in Photoshop…: Creates panoramic images by stitching together two or more photos.
Merge to HDR Pro in Photoshop…: Creates High Dynamic Range 32-bit images from two or more photos.
Open as Layers in Photoshop…: This option allows you to combine two or more photos into one document in Photoshop with each photo on its own layer. This is a great option for performing “head-swaps” or creating composites.
Lightroom Classic Export to Photoshop
There may be times in a workflow where you may want to Export your photos as finished files from LrC, but open them in Photoshop to add some final touches, make an animation, prep for social media, etc. From the File menu choose Export [SHIFT + CMD + E / SHIFT + CTRL + E], in the Library module click on the Export button on the lower left, or right-click on a photo and choose Export > Export….
 |
File Settings: The Export dialog box has the same options that we were able to select in the External Editing preferences. When you Export a photo you will be creating a finished file that will be ready for delivery so you will have more options to choose from in the Image Format drop down, but you will still need to choose a Color Space and a Bit Depth for PSD and TIFF files. For JPG files you will only have to choose the Color Space, because they are 8-bit files.
Image Sizing: When this option is unchecked it will still have an active Resolution field, so you can change the output resolution at this point if necessary. Please see the section on Resolution of this book to learn more about these values.
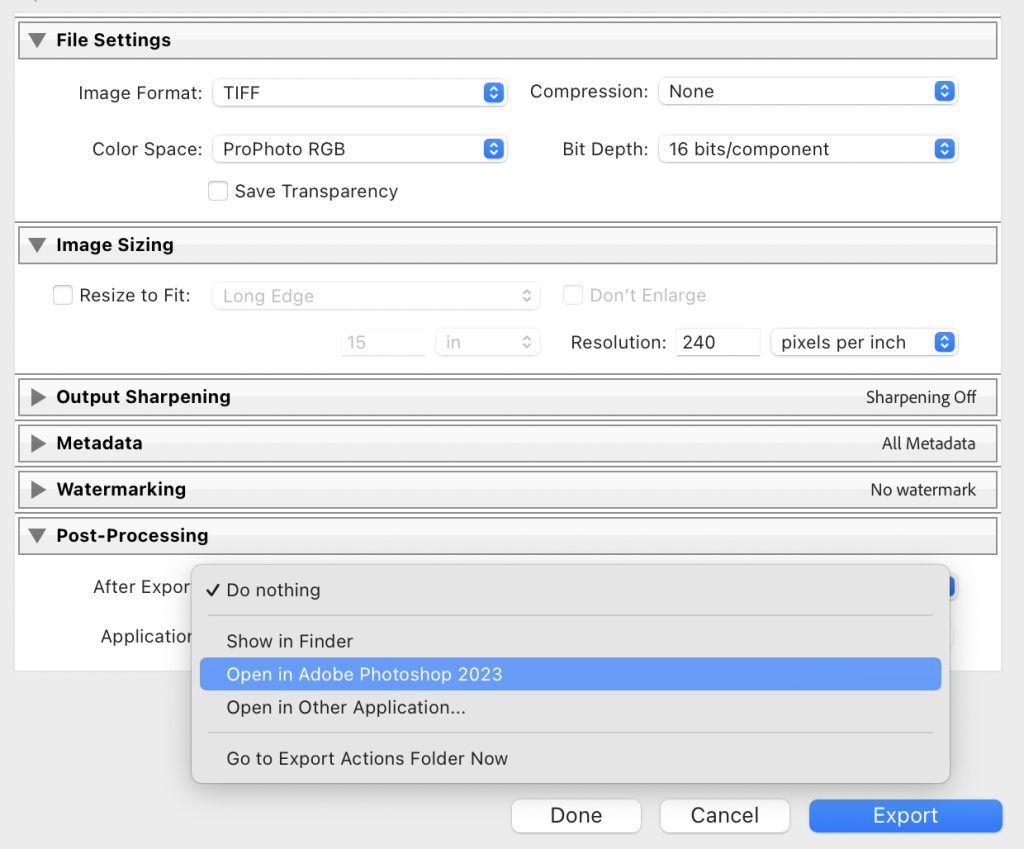
Post Processing: If you have a need to open the Exported files in Photoshop upon completion; choose the Open in Adobe Photoshop… option from the drop down menu for After Export.
Adobe Bridge / Camera RAW to Photoshop
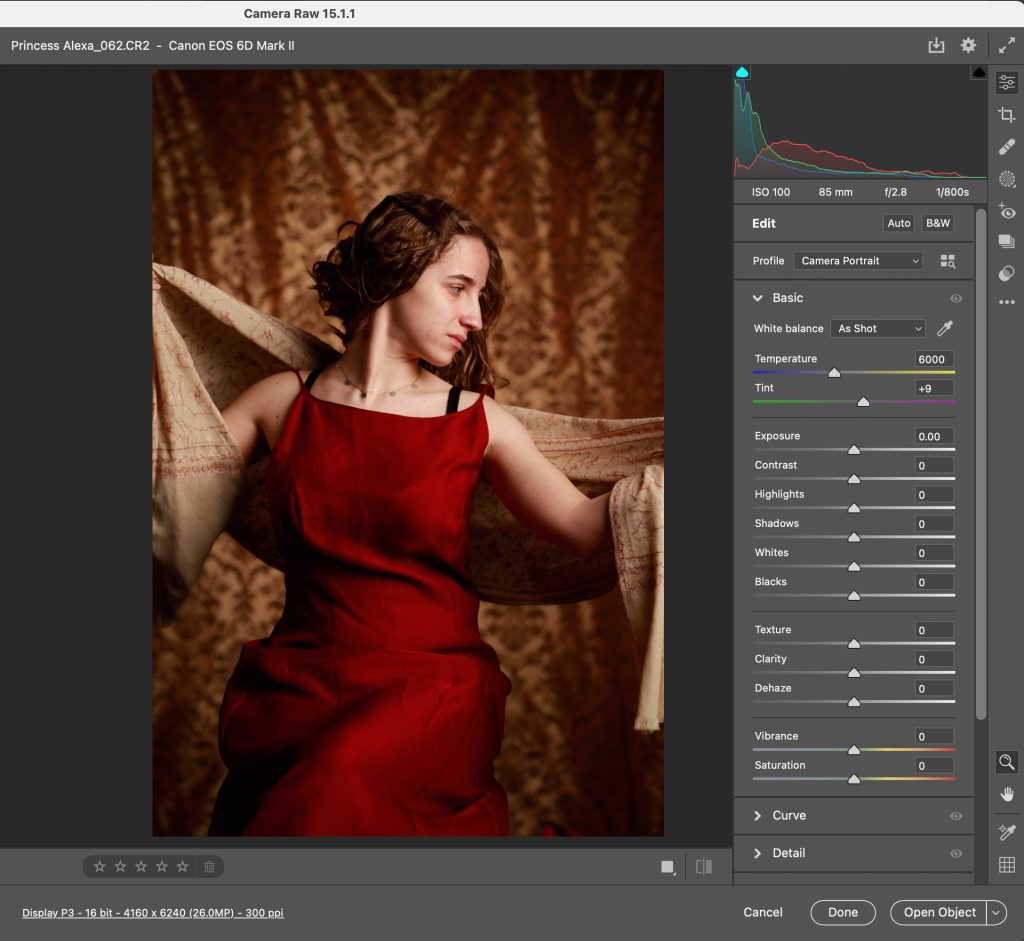
Not everyone is going to want to Import photos into Lightroom before opening them in Photoshop, as some people prefer to work with Bridge, and some will just want to double-click on a file directly from their computer or external drive. Regardless of which option you choose above, when you double-click on a RAW file in Bridge or within Finder on a Mac or Explorer on a PC; the default action is to launch Adobe Camera RAW [ACR]. The ACR tools are similar to those in the Develop module in Lightroom, despite having a different look. As mentioned with Lightroom above, you will want to apply tonal, color and creative adjustments here prior to opening files in Photoshop. Being a bit more straightforward, once these edits have been applied you can choose Done or Open Object[s] on the lower right of the ACR dialog box.
 |
Done: This option will apply the adjustments that were made to the photo[s] within an .XMP sidecar file in the original folder, but will not open them.
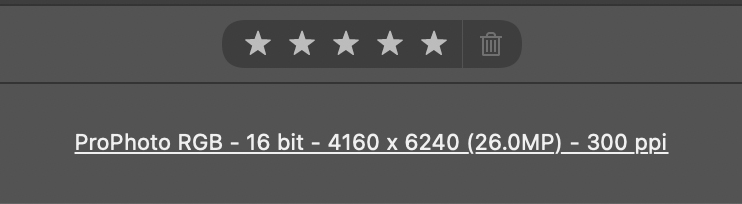
Open Object[s]: This option applies the adjustments that were made to the photo[s] and will open them in Photoshop with the settings that are shown on the link at the bottom-center of the dialog box [see Figure 1.6]. This link shows the Color Space, Bit-Depth and Output Resolution that will be applied, and it also includes the Image Resolution/Megapixel value for the photo.
 |
To make changes to the Workflow Options simply click on the link and this will open the Workflow Preferences.
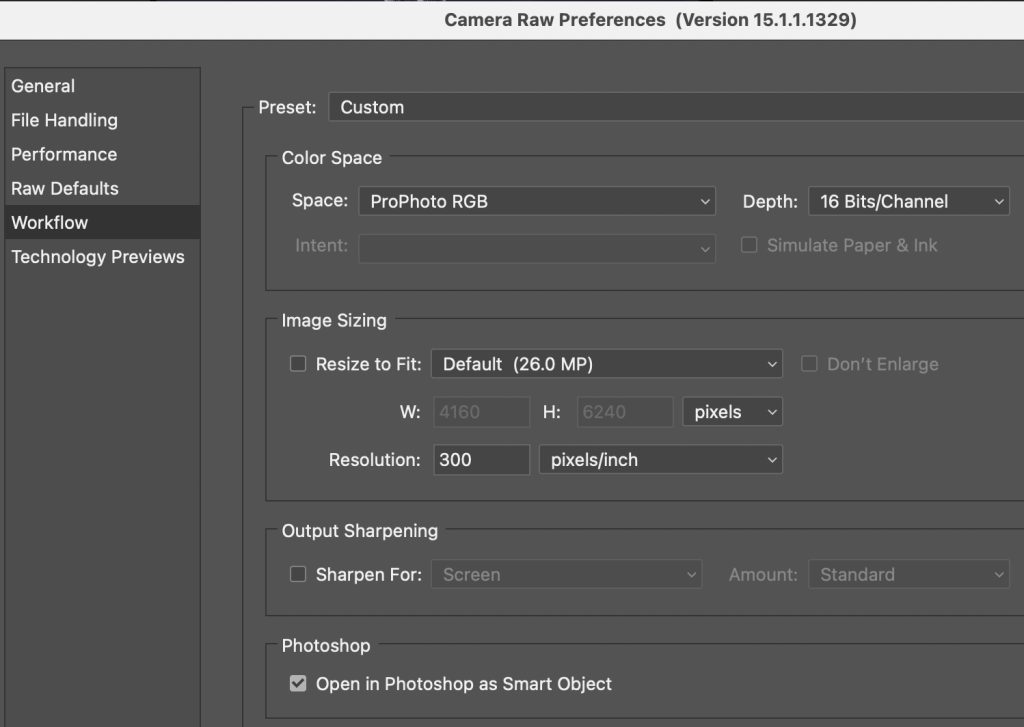 |
The Workflow options are similar to those described above for the Lightroom External Editing options, so you can refer to them for guidance. If you would like to open photos as Smart Object; simply check the box to Open in Photoshop as Smart Object.
All of the options above for Lightroom and Camera RAW are “sticky”, so they will remain as selected until you decide to change them.
Working with Smart Objects
Smart Objects [SO] are layers that contain image data from raster or vector images from applications such as Lightroom, Camera RAW and Illustrator. Smart Objects preserve an image’s source content with all of its original characteristics, and are the best option to choose for a non-destructive workflow. It is important to understand that there are multiple ways to create Smart Objects, but the only way to retain the original RAW editing of an image is to open a file from Lightroom or Bridge/Camera RAW as a Smart Object as described in the sections above. My focus in this section will be on creating Smart Objects directly from the RAW processors of Lightroom and Camera RAW, because this is our suggested workflow when working with photos in Photoshop.
To open a photo as a Smart Object in Photoshop from Lightroom, choose Photo > Edit In > Open as Smart Object in Photoshop; and to open a photo as a Smart Object from Camera RAW check the Open in Photoshop as Smart Object box located in the Camera RAW Preferences. These options are available for individual photos as well as when multiple photos are selected. Opening photos this way allows you to make changes to any adjustments made in Lightroom or Camera RAW. After opening a photo as a Smart Object in Photoshop you can double-click the SO icon on a layer’s thumbnail [see Figure 1.8] and have the photo open in Camera RAW to either undo existing adjustments or apply new adjustments as if you were in the original RAW processing app. Photos opened from Lightroom as Smart Objects will also open in Camera RAW and will never go back to Lightroom for further editing until saved.
In addition to being able to undo or make further adjustments to a photo you can also apply non-destructive transformations like scale, rotate, skew, distort, perspective transform, or warp, without losing original image data or quality because the transforms do not affect this data. You can also apply filtering as Smart Filters, Layer Masks and Blend Modes to a Smart Object layer. However, you can not perform operations that change pixel information, such as painting, dodging, burning, healing or cloning directly to a Smart Object layer. If you feel that this is something that you need to apply to an image, you must first convert the Smart Object layer into a regular layer by rasterizing it.
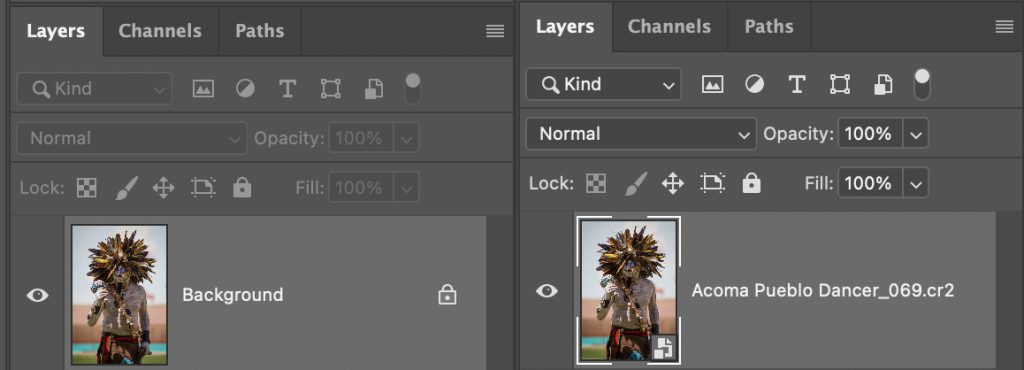 |
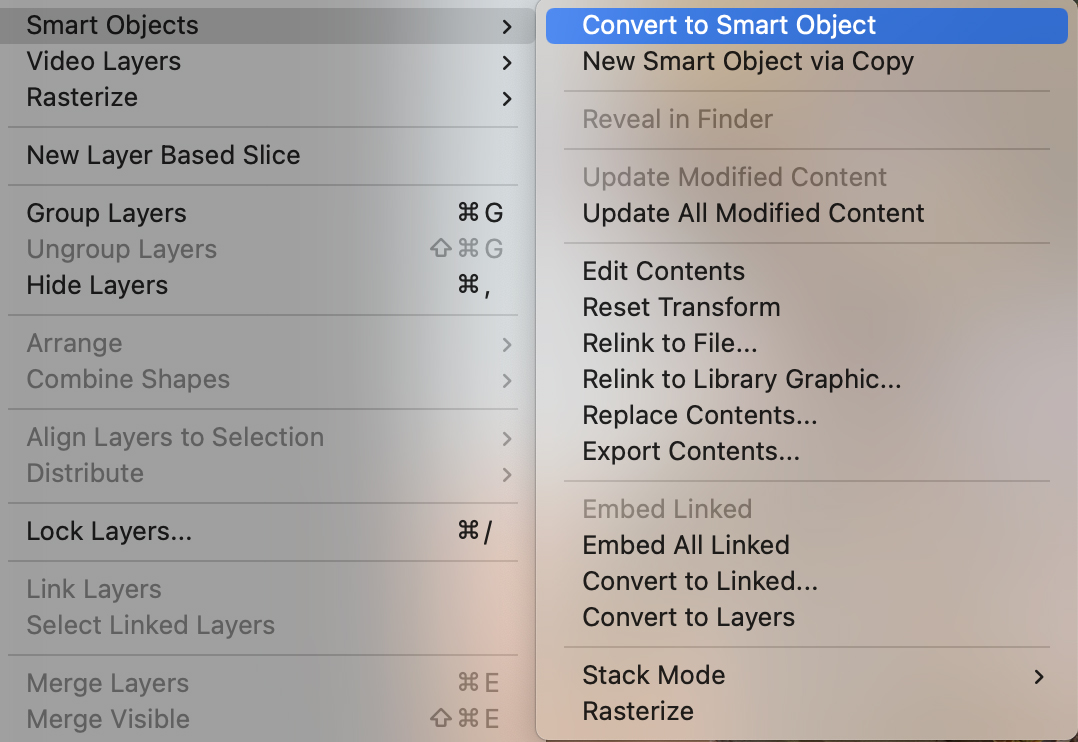
As mentioned above, there are various way to create and work with Smart Objects outside of opening them directly from a RAW processor; any image layer can be turned into a Smart Object by selecting a non-SO layer and choosing Layer > Smart Object > Convert to Smart Object from the menu bar at the top of the application [see Figure 1.9]. I only point this out because it is important to understand the difference between opening an SO directly from LrC or ACR versus creating an SO from a layer in Photoshop; when opening a photo directly from these applications if you double-click the SO thumbnail icon it will open the image in Camera RAW for further editing. However, if you convert a normal layer into an SO in Photoshop when you double-click the SO thumbnail icon, it will open in a new Photoshop tab for adjustments.
Using Smart Objects in a workflow is a great way to retain original editing abilities as if you were still working in Lightroom or Camera RAW, but with the added ability to apply additional creative layers and effects.
 |
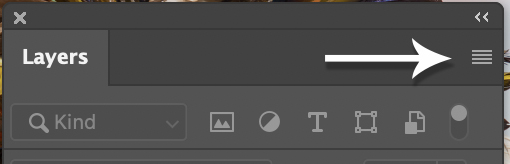
Smart Object options are available in the Layer menu, when right-clicking on the SO Layer, and under the hamburger icon [see Figure 1.10].
How-To: Using Smart Objects to Create Templates
Outside of using Smart Objects in the manner described above, I find that one of the most useful ways of utilizing them is in templates for print. I use this for greeting cards, print, and social media templates when I want to use the same size, placement and rotation without the need to open a photo, drag it into the template image, resize and rotate with each image that I want to work with, or apply the same effects to multiple individual photos. The Smart Object template allows the replacement of the original RAW file, and it remembers the resizing and the rotation of it, so that work is already done for you with a single click.
In this how-to section I will demonstrate two different ways to use Smart Objects to set up a simple template for print, but the technique can be used for any type of design or layout for print, email marketing or social media based on your specific needs. This method also only demonstrates two types of output, so various templates of sizes and resolutions can be created and you can add text or any additional graphics such as logos.
Start with a Smart Object
Step 1: Page Setup
The initial step is to create the exact size document for your needs. For this example I will be creating a 5×7 vertical template with a minimum .5″ border on all four sides. Please keep in mind that the aspect ratio of the area for print may not match the aspect of your photo but you can always start with a photo and add canvas as described in the next section of this book. This section is only intended to show one method of creating a template.
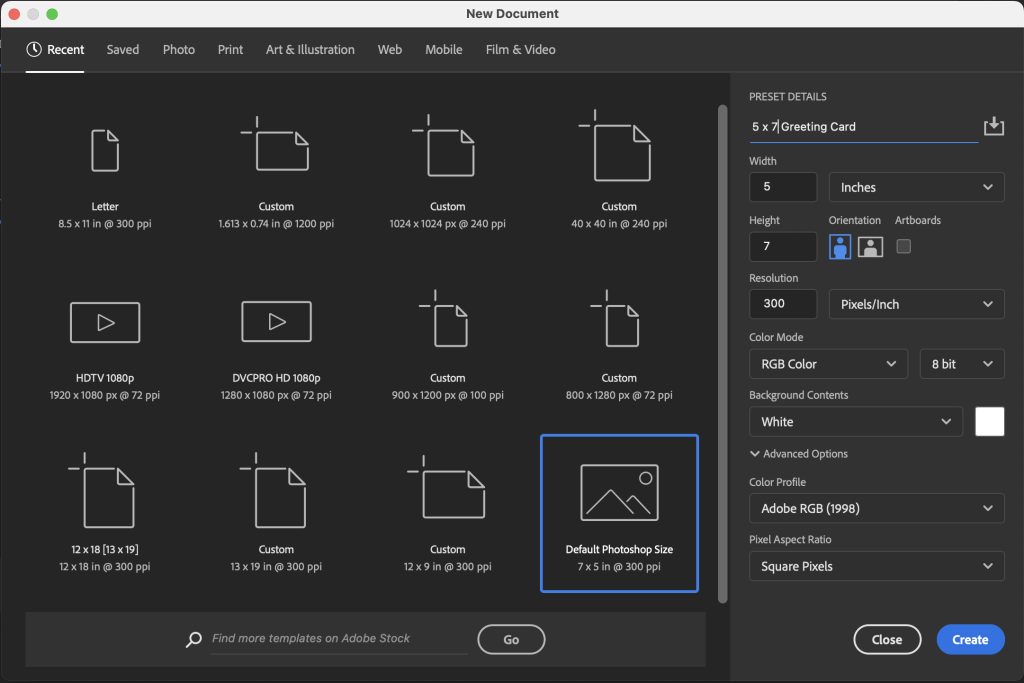 |
To create a template choose File > New. We normally just open a photo directly so you may not be familiar with this dialog box, but it contains all of the settings to create any sized document that you may want, has templates to get started, and even allows for you to create your own templates.
There are templates for various sizes that can be selected from the top list from Photo to Film & Video, but you can also key in Width, Height, and Resolution values on the right to create any custom size that you like. I chose the 7 x 5 @ 300 ppi template and changed the orientation to Portrait to accommodate the photos that I will be using in this demo. I also added a new name and clicked on the Save icon on the upper right to add this layout to the Saved templates.
Step 2: Add Guides [optional] and a Photo
Guides were added to this template by first enabling the rulers; View > Rulers or CMD + R / CTRL + R. The rulers show on the top and left only and you add guides by clicking with your cursor inside of one of the rulers and dragging a non-printing guide down or to the right onto your image. Guides are extremely useful for object placement. Guides can be adjusted with the Move Tool or with various options found in the Menu Bar under View > Guides.
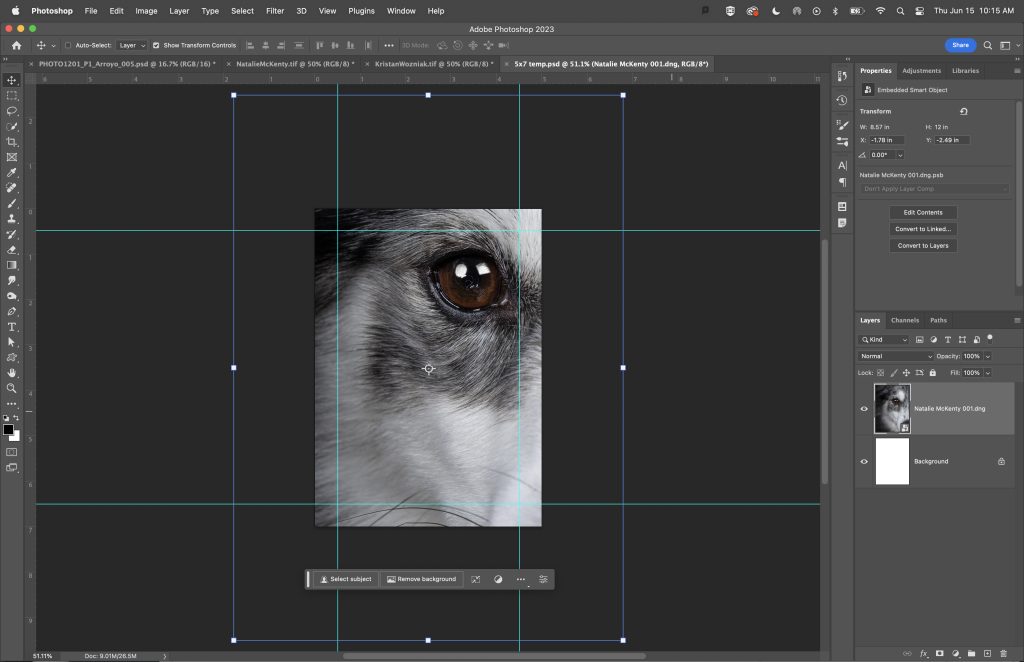 |
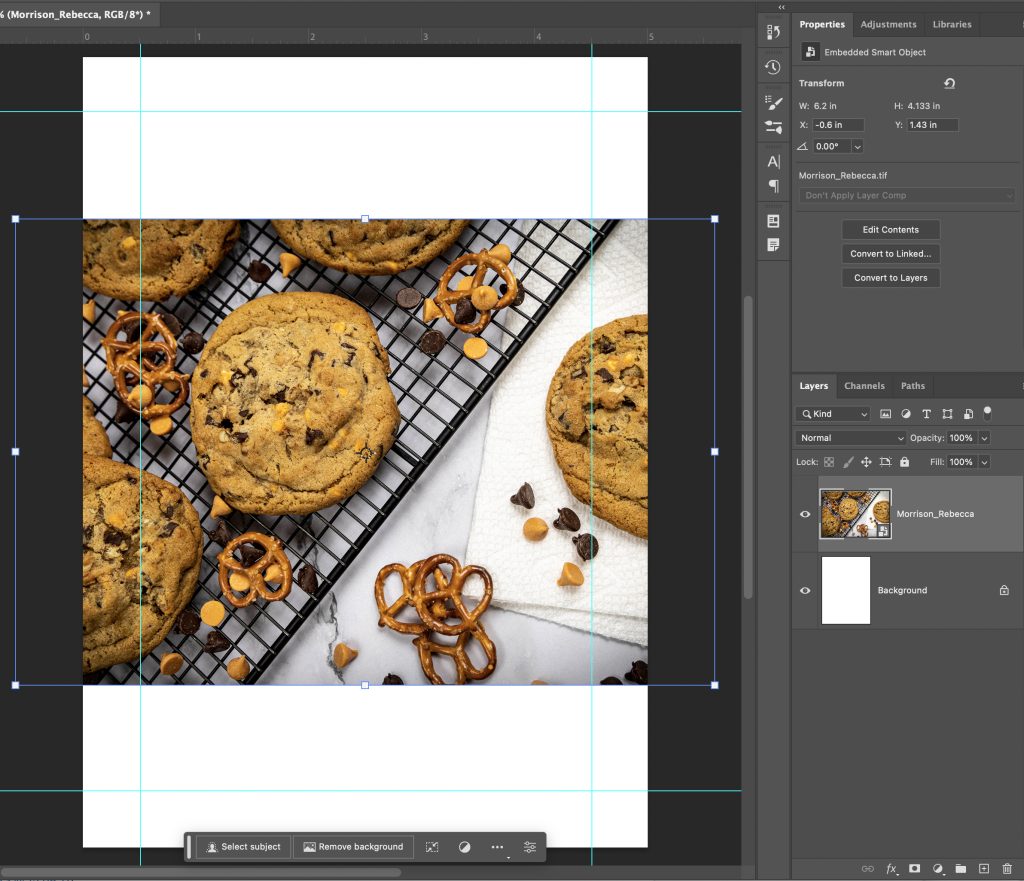
A Smart Object photo was opened separately and dragged into the template with the Move Tool. Please note that the photo is much larger than the size of the template that I am working with so I will scale it down in the next step to fit within the Guides that were also added to this template.
Step 3: Transform Image
In order to get the image to fit within the area marked by the Guides I added, I will need to scale the image down by either using the existing Bounding Box if enabled in the Options for the Move Tool, Edit > Transform > Scale, or Edit > Free Transform [CMD + T / CTRL + T].
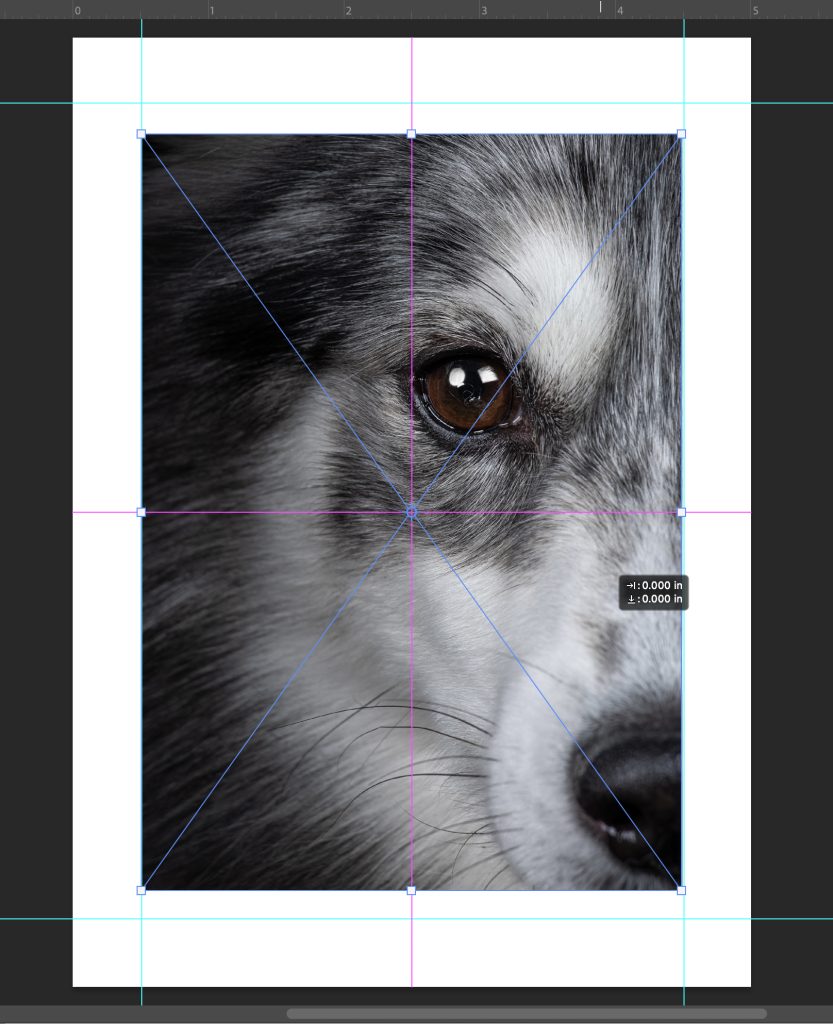 |
As mentioned at the start of this section if the aspect ratio of the photo does not match, the image will not fit properly. In this example if you were to force the image to fit the guides the image would be distorted and become elongated. I want to retain the original aspect ratio so I only want to match the shorter sides and will not worry about the height. Note in Figure 1.13 that Photoshop has Smart Guides turned on by default and shown in magenta, so you will be able to easily center the image or align it to other images if working in a composite.
Step 4: Print
My layout is complete so I would simply make a print at this time, and it would also be a good idea to save this image for future use. Keep in mind that the template that was saved in the New Document dialog box only saves the size that was created, but does not save any of the content that I had set up in the previous steps. If I want to reuse the template to make prints of the same size with different photos I will need to replace the image as seen in the next step.
Step 5: Replace the Smart Object
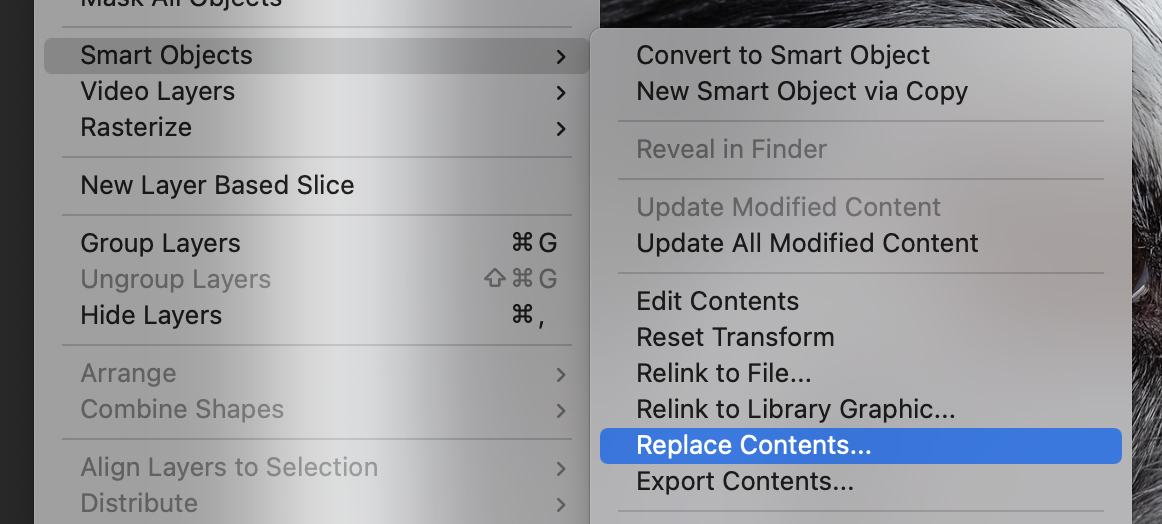
Replacing the original Smart Object is a very easy process and requires a single click to select a new photo by choosing Layer > Smart Objects > Replace Contents or right-click on the SO Layer and choosing Replace Contents from the context menu.
 |
When you choose the Replace Contents option, a dialog box will open to allow you to choose an image to replace the current image. You can choose any image that you like as the replacement regardless of size, file type or orientation. If the photo[s] you use as replacements are in the same aspect ratio they should be automatically resized to fit the window precisely. The same will hold true with other transformations such as rotate if applied to the original.
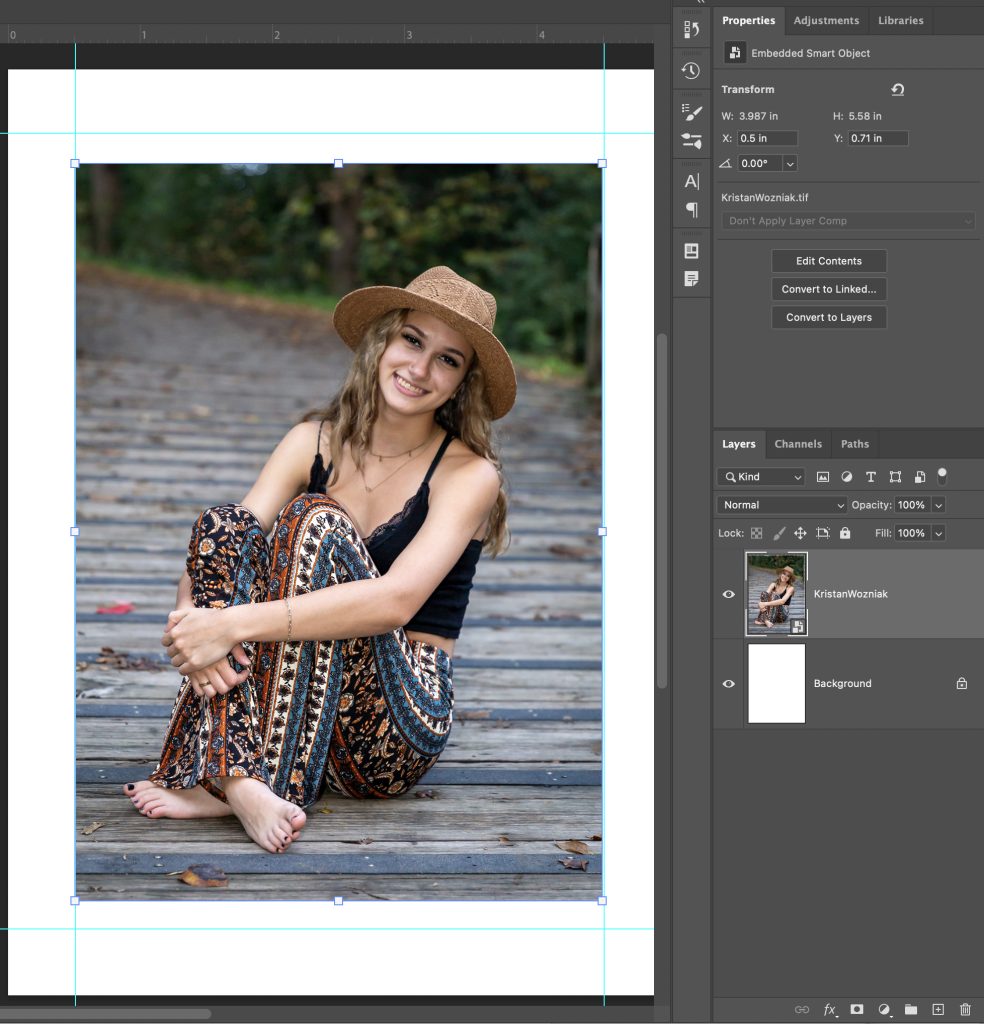 |
If there is a mismatch of any sort the replaced image will need to be transformed to fit as seen in Figure 1.14.
 |
Selected as the replacement, this photo was scaled down but was not rotated because the original SO transformation only had a scale adjustment applied but was not rotated. I would need to manually rotate the image to fit, but it will still fill the area perfectly. Once I have rotated this image, the next replacement will be scaled and rotated according to the previous transformation.
How-To: Create Smart Object Templates in Photoshop
This project is similar to the previous example in how it starts, however, I will not add a Smart Object photo but instead will create rectangular shapes for the layout that I want and turn them into Smart Objects. This example is intended to demonstrate the possibilities of using Smart Objects for production or marketing purposes.
Step 1: Create a New Document
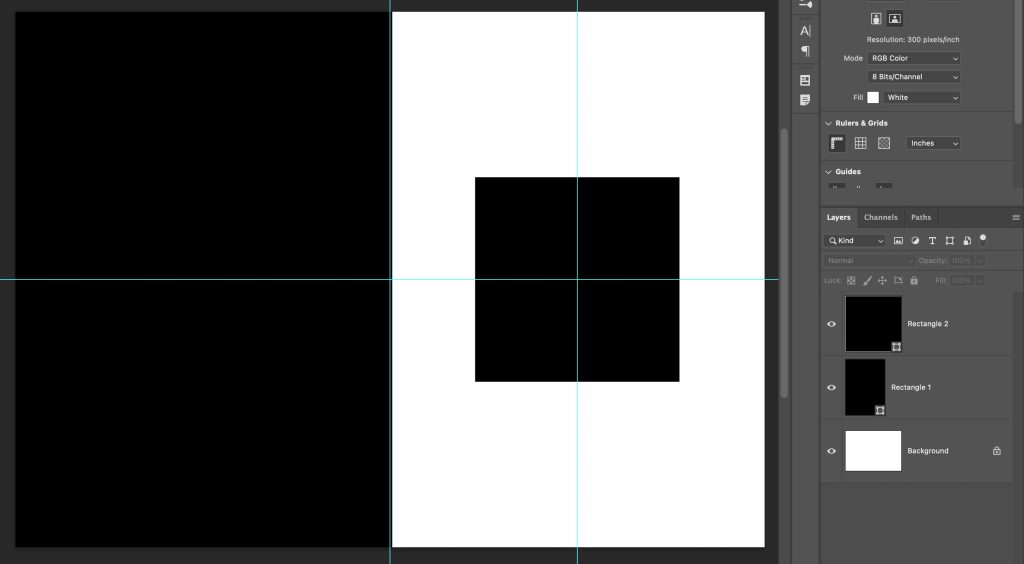
Similar to the previous example you will want to start this project by creating a New Document, and once again I will create a 5 x 7 document in the horizontal format, split the page, and add a square to the opposite side.
Step 2: Create the Rectangles
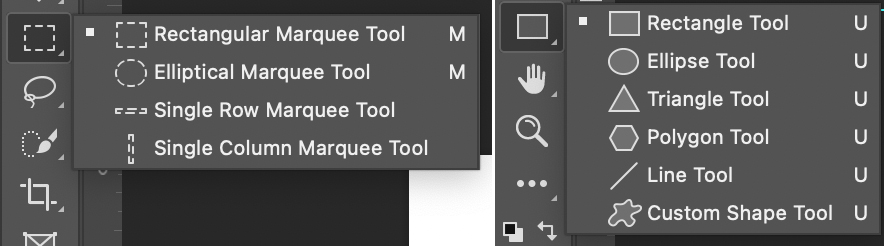
For this step there are a few options to create rectangles but I will use the Rectangle Tool set to Shape in the Options Bar, because this will create a new layer for us and fill with the Foreground Color. You can also use the Rectangular Marquee to create a selection, a New Layer, and then fill the selection.
 |
 |
Step 3: Convert the shapes to Smart Objects
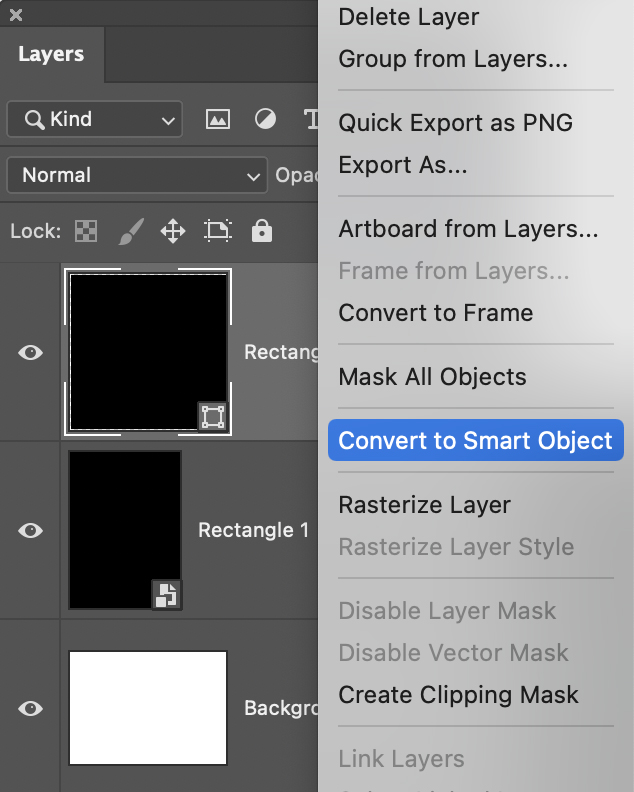
You can turn almost any layer into a Smart Object right in Photoshop by choosing Layer > Smart Objects > Convert to Smart Object. Keep in mind that creating a SO directly in Photoshop does not retain the RAW editing capabilities as if an image were opened in PS as a Smart Object. You can also right-click on the layer and choose Convert to Smart Object as shown in Figure 1.17.
 |
Step 4: Create Selections and Mask Shape Layers
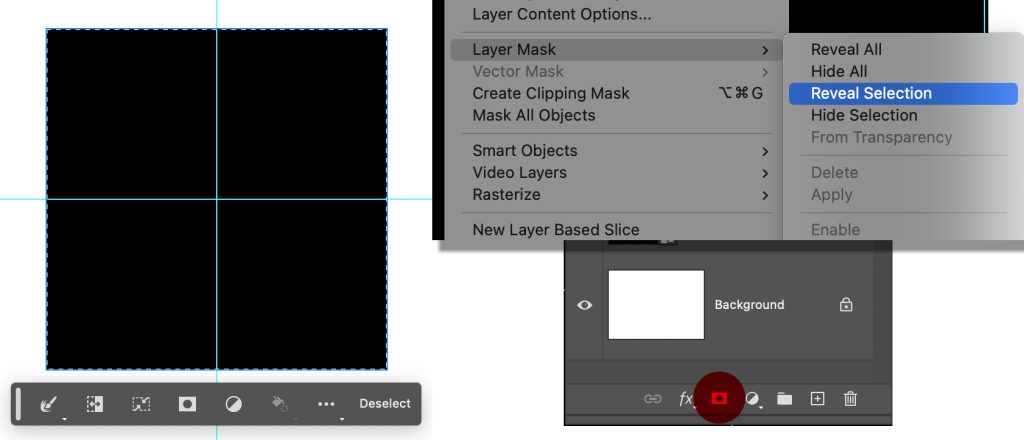
Now that we have converted the shapes to SO we will need to create Layer Masks in the same shapes that we see in our document. This is an important step because it will keep the photos we add in later confined to a specific area. To make a selection for the shape we will use the shortcut of CMD / CTRL clicking on a layer Thumbnail. When you hold down the CMD or CTRL key and hover it over a layer thumbnail you will see that the cursor changes to a pointed finger with a Rectangular Marquee icon. This shortcut will load the contents of the layer as a Selection.
Once the Selection has been created you can choose Layer > Layer Mask > Reveal Selection, or click the Add a Layer Mask shortcut icon at the bottom of the Layers panel.
 |
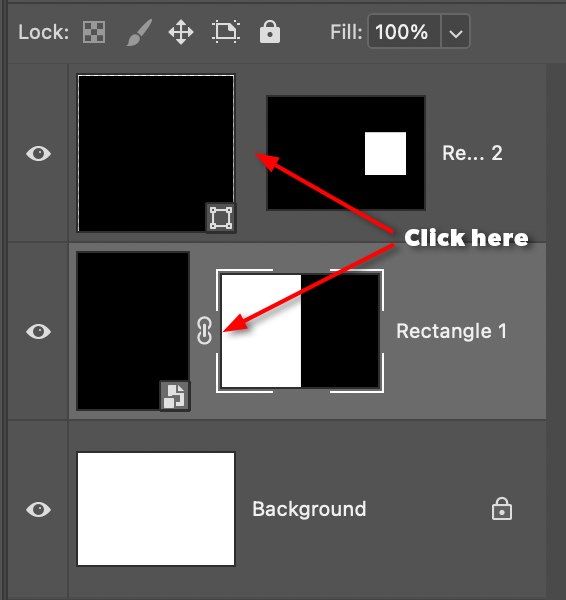
Step 5: Unlink the Layer Mask
One of the most important steps in this example is to unlink the Layer Mask from the image. This step is performed by simply clicking on the chain link icon between the two layer thumbnails. If this step is not performed, the mask will be removed when the Smart Object is replaced and the mask will need to be repeated.
 |
Step 6: Replace Smart Object
In this step the Smart Object will be replaced with a new image by choosing Layer > Smart Objects > Replace Contents or right-click on the layer and choose Replace Contents in the SO section. A dialog box will appear to allow you to navigate to the image you want to replace the rectangle with.
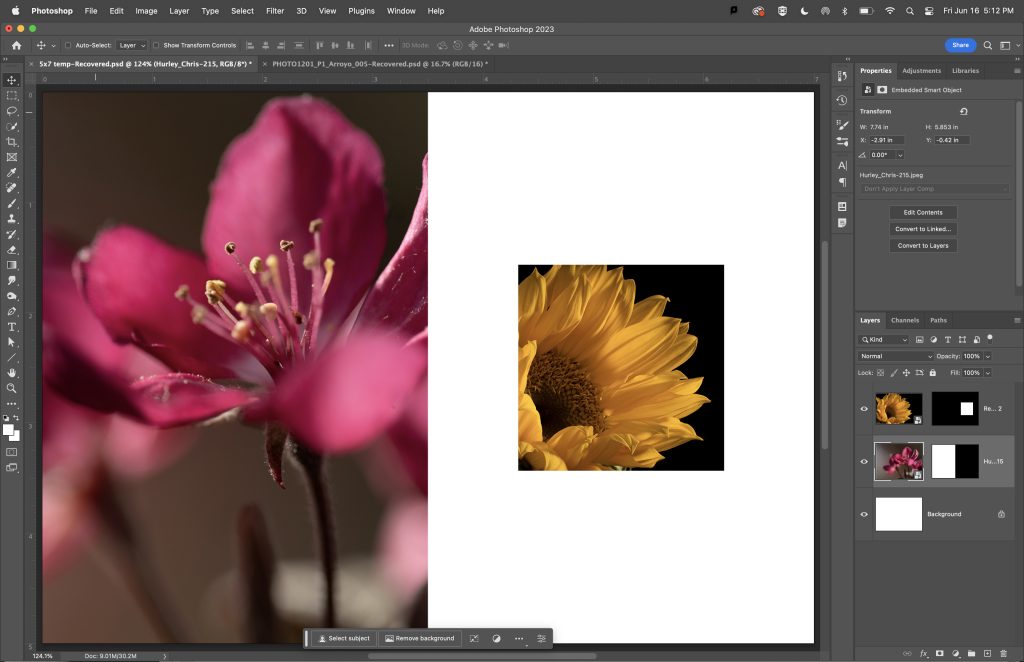
Step 7: Transform Image
The image that you choose will come in at the actual size based on resolution and will need to be resized. This step differs from the previous example because the original shape I created was not scaled or rotated after it was converted to a Smart Object.
 |
Once a photo has been transformed, then next replacement will take on the same transformation attributes so it will come in at a smaller size. The Layer Mask prevents the remainder of the photo from being seen, had I not unlinked the two thumbnails the image would appear on the whole document. The additional benefit to unlinking the Layer Mask is that I can move the image around freely within the shape to show any part of the photo.
Tip: Use the OPT / ALT key to scale to/from the center. This shortcut is a tremendous time saver because the image comes in centered to the shape, so it will eliminate the need to continuously move an image around when transforming.
Get Creative!
 |
This simple layout is clean and can be used for various print or screen outputs. You can add logos and/or text to produce album pages, marketing materials, invitations, business cards, etc. the possibilities are unlimited. You can also easily replace these Smart Objects in a couple of clicks, and any new photos added will take on the same transformation adjustments as these.
