9 Working with Video
How-To: Making a Color Change Animation
Working with Video
Photoshop is a great introductory application when it comes to producing video content, starting with a Timeline panel that reflects dedicated video editors like Adobe Premiere, including transitions and effects that give finished videos a professional polish. Ps takes the intimidating task of video creation and simplifies it with tools and techniques that you are already familiar with from image editing, including multi-layer compositing.
Photoshop supports the most common video and audio file formats including MOV and MP4 video, and MP3 and AAC audio formats, amongst a number of others.
Video Timeline
The Video Timeline has a number of sections that you will want to learn in order to easily work with video. Figure 8.1 highlights each sections..
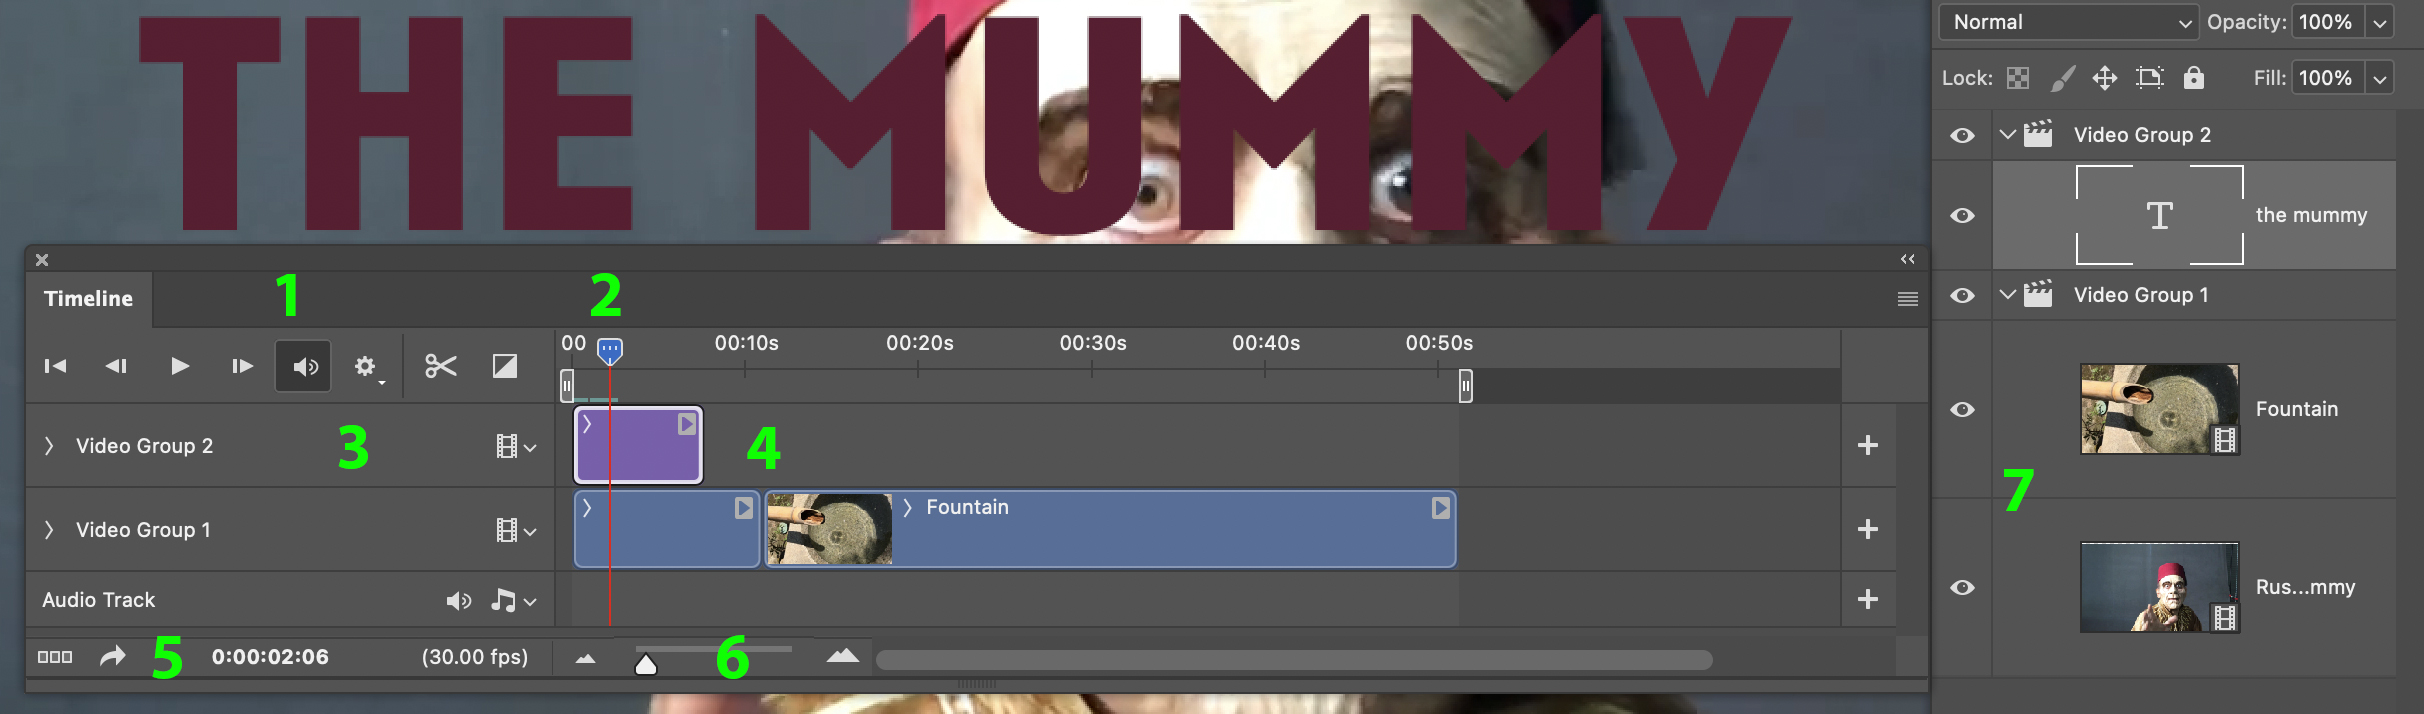
- Playback: These buttons are used for video playback. You can navigate forwards and backward a single frame at a time, go to the first frame, split a clip, and add transitions.
- Playhead: The Playhead is used to scrub forward and back through a clip by clicking on the blue arrow at the top. You can also click along the line to jump the Playhead to that frame. Hovering the cursor over the blue arrow will reveal the frame location based on the total Frames Per Second.
- Video Groups and Keyframe Effects: Use this section to organize video groups in the Timeline and add effects with Keyframes.
- Timeline: The Timeline is where the video clips are organized.
- Time Marker: This section will allow you to see the time marker that can also be used to scrub the Playhead by click + dragging on the time marker. A video can be converted to a Frame Animation, Render a video and view the Frame Rate.
- Timeline Magnifier: Use this slider to increase or decrease the size of clips to view and edit them easier.
- Video Group Layers: The Layers panel can also be used to organize clips and video groups.
| Playback Options | |
 |
|
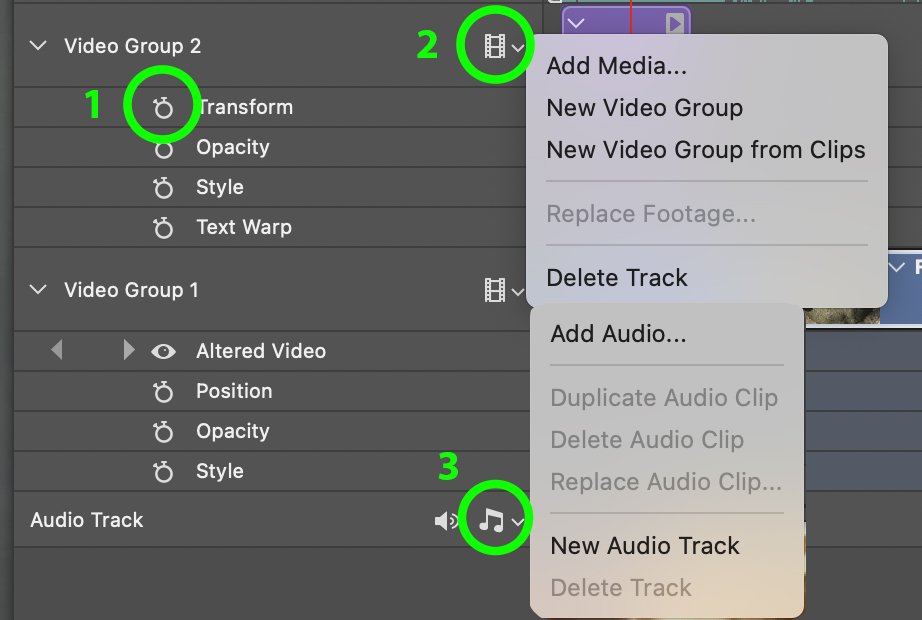
| Video Group and Keyframe Effect Options | |
 |
|
| Timeline Options | |
 |
|
Saving Video Files [PSD]
Video files are similar to saving composite images in that they save to the .PSD format during editing, however, it is very important to understand that you are working with proxies of the original video clips that you open in Photoshop. This means that you are not working on the original video file, but rather a duplicate of it which helps the video preview and save faster, while keeping the file sizes down. The easiest way to think about this is to compare it to working with a Preview of an original RAW file in Lightroom. When working in Lightroom you are viewing a preview of the original RAW file and not directly on it, so if you were to rename or move a file outside of Lr you would essentially break the connection and you would receive a message that the file is missing. It is the same with video in Photoshop, your video is linked to Ps so when you save your file as a .PSD [default] it contains the proxy but not the original video clip, which is linked. When working with videos it will be wise to keep all of your source videos [b-roll] and audio files in one folder so you are not searching for linked clips if a connection is broken. This is especially important if you are working between home and school on different computers, because all files will need to be transported.
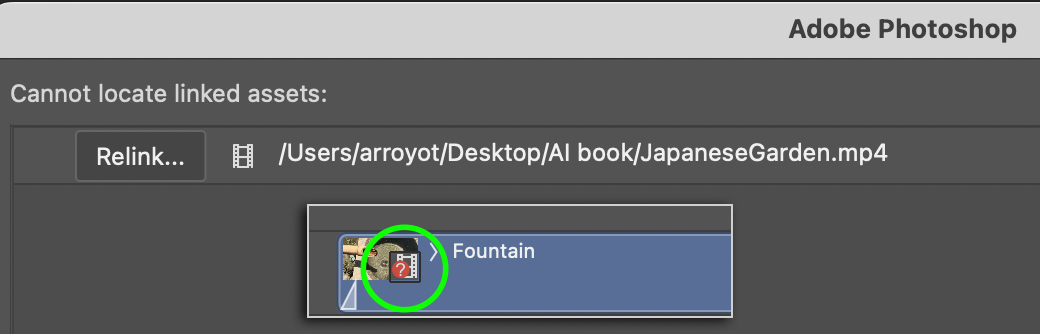
If you open a video file and receive a message that a file is missing, you will have the opportunity to relink the file by clicking the Relink button, or relinking it in the Timeline where you will see a red question mark indicating that the clip is missing as seen in the inset of Figure 8.2 below.
Export Video
Upon completion of a video you will need to save it in a video format, because a PSD will only play a video within Photoshop, but will not be recognized as one outside of of the app. Rendering a video is pretty simple and straightforward. There are plenty of options to choose from, for various playback formats, but you only need to focus on a few of them to get started when first starting out working with video.
Based on the complexity of your video creation, the playback may appear pixelated and choppy with poor audio in Photoshop but it will be smooth once rendered.
| To render a video choose File > Export > Render Video. |
 |
Upon making these selections, you can then press the Render button. |
Tip: Smart Objects
Many special effects can be added to a clip or text, some can be added directly within the Timeline using Keyframes, while others may require the video layer to be converted to a Smart Object, such as when adding Filter effects. You can convert a video layer to a Smart Object in the same manner as an image layer by choosing Layer > Smart Object > Convert to Smart Object, or right-clicking on the layer in the Layers panel.
Frame Animation Timeline
In addition to working with video files, Photoshop is also great for creating animations such as animated GIFs or stop motion MP4s. I find Frame Animations a simple way to animate composite images where each layer of a composite image can be activated, deactivated or moved, with a snapshot take for each movement to create an animation. You can control the duration of each frame to slow down or speed up the movement.
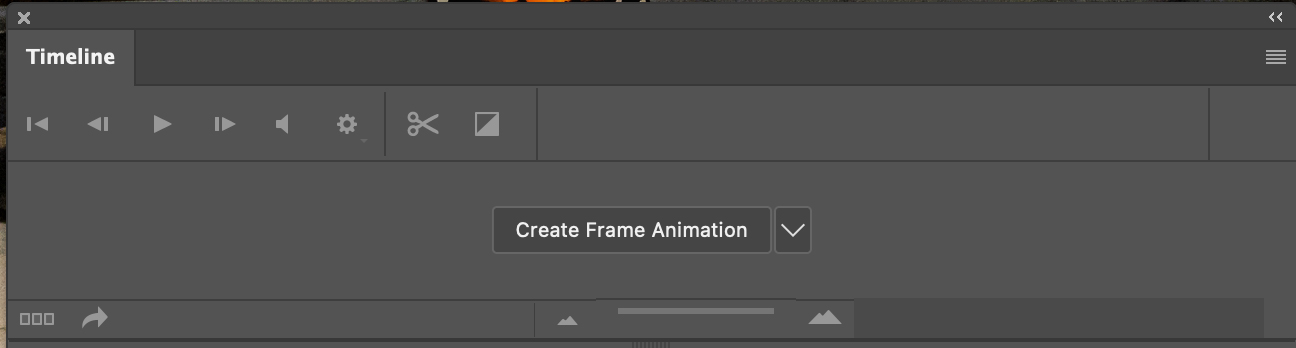
You can start an animation by opening the Timeline panel [Window > Timeline], and clicking the Create Frame Animation button in the center. This will create your first frame from all visible layers.
The Timeline panel automatically opens on the bottom of the application window when a video file is opened, otherwise it remains closed until opened through the Window menu.
| The Frame Animation Timeline Panel | |
 |
|
How-To: Making a Color Change Animation
1] The Setup
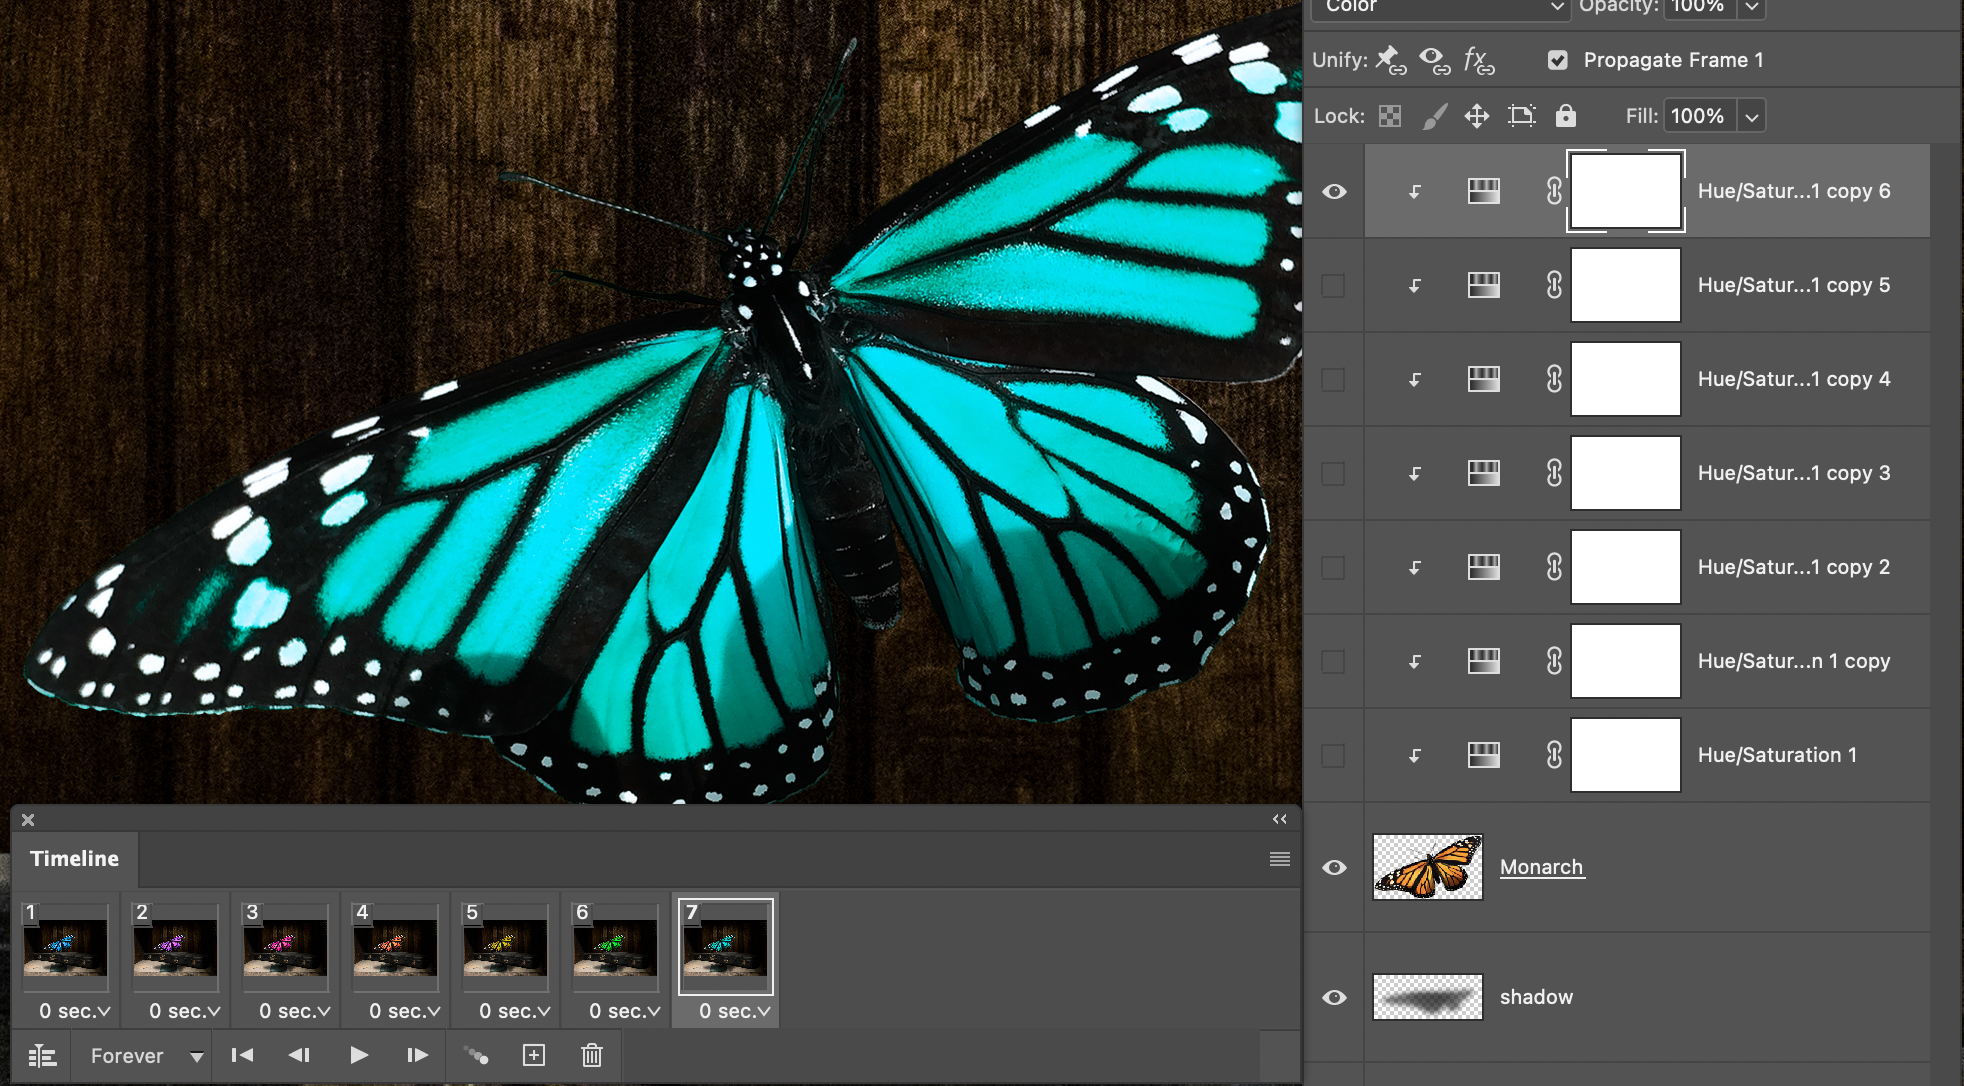
For this animation I wanted to make a very simple animation that anyone could do, while experimenting with color, specifically changing the color of the Monarch’s wings in Figure 8.5 below. I wanted to use the colors of the rainbow and have the wings a different color for each frame.
As with most things when it comes to Photoshop, there are a few different ways that I can think of to create this effect and they would all be fine because they would all produce the same result. However, I wanted to keep this as simple as I possibly could to create the effect in a few minutes. For this example I chose to go with a Hue/Saturation Adjustment Layer, that was clipped to the Monarch’s layer using a Clipping Mask which prevented me from having to make any additional selections. I also changed the Blend Mode to Color to completely color the wings.
The Hue/Sat layer was then duplicated, and a new color was chosen for the Hue. This process was repeated until I had all of the colors that I wanted.
2] Creating the Animation
Creating an animation is very easy in Photoshop, and in this instance all I have to do is turn the visibility of layers on and off to create a sequence. Once I had all of the layers in place I opened the Timeline panel and clicked Create Frame Animation. This produced the first frame. Whatever layers are turned on during this step will show in the first frame.
The next step is to click on the plus [+] icon at the bottom of the Timeline panel to Duplicate the selected frame. The frames will be identical because they have the same layers turned on, so I turned off one Hue/Sat layer and turned on the visibility for the next layer in the stack. I then repeated this step for each Hue/Sat layer until the animation was complete.

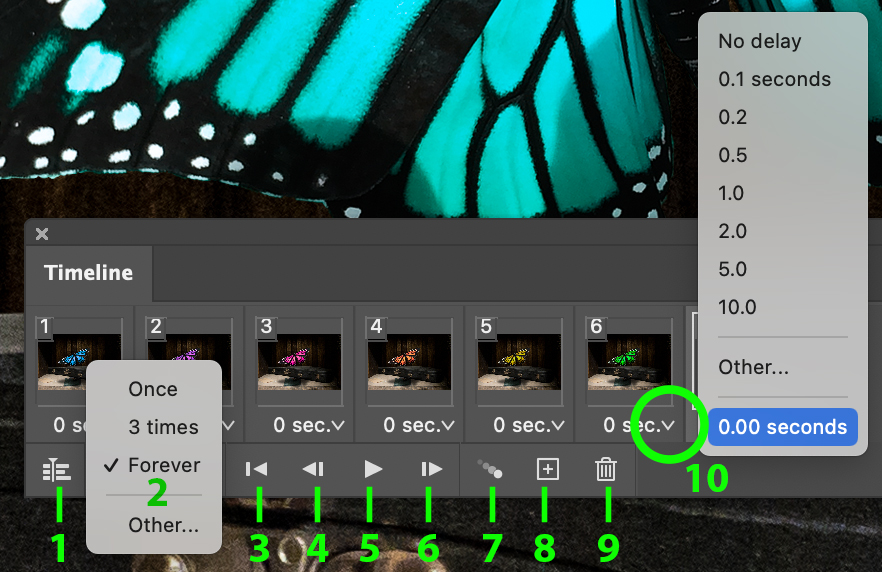
That’s it, the animation is complete! Before exporting however, I may want to adjust the timing of each frame in the sequence. To change the timing all I need to do is click on the arrow at the bottom of the selected frame and choose the duration of the playback for the selected frame. This timing will hold the frame for the selected duration before continuing on to the next frame. The default of zero can seem very fast so do some testing. You can also select a custom duration.
You do not have to select one frame at a time to change duration values, you can also select all of the frames and then change one frame rate that will in turn change them all.
Sequence animations can be saved as animated GIFs or as MP4 files. Use the File > Export > Render Video to export as an MP4 file, or File > Export > Export As to save as a GIF file.
