6 Paths and Vector Masks

Paths and Vector Masks
The Pen Tool in Photoshop is a vector creation tool that can be used to create complex, yet scalable line segments by having the user draw straight or curved lines called paths. These paths can be filled or stroked with a color, or turned into a selection.. A vector differs from a raster in that it uses computer calculations to scale up while always maintaining a sharp edge regardless of how small or large it is transformed; this is in stark contrast to the interpolation methods used with raster images [pixel-based] that add pixels between the original pixels which lose definition when scaled up.
This chapter explores the Pen and other vector-based options found in Photoshop. Some are easy to use while others might seem a bit daunting, but with practice you can become an expert. I have covered a number of different ways to make selections in this book so far because not any one tool may be the best for every image, so it is important to have the knowledge of the most important ones especially if your have a desire to be a professional retoucher or digital artist.
Using the Direct Selection Tool
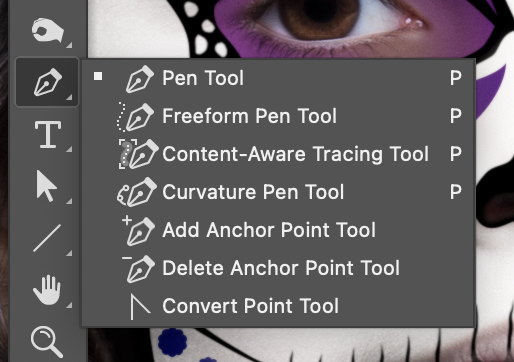
The Pen Tools
| The Pen Tool Options | |
 |
Pen Tool: This tool lets you draw straight segments and curves with great precision. You can automatically Add points to a line by clicking anywhere on the line, or subtract points by clicking directly on a point when the Auto Add/Delete option is checked.
Freeform Pen Tool: This tool lets you draw paths as if you were drawing with pencil on a piece of paper. Content-Aware Tracing Tool: This tool lets you automate the process for tracing images. Curvature Pen Tool: This tool lets you intuitively draw curves and straight segments. Hold down the OPT / ALT key to draw straight lines. Add Anchor Point Tool: This tool allows you to add points to a path. Delete Anchor Point Tool: This tool allows you to delete points from a path. Convert Point Tool: This tool allows you to convert corner points to curves, curved points to corners and points to cusps. |
In my personal opinion, the Pen Tool is one of the best selection tools in Photoshop. I am also biased because as a professional designer I used Adobe Illustrator’s Pen tool for 95%+ of the work that I used to create. The Pen Tool allows you to make the most precise selections of objects, or even create vector shapes. However, you would not use the pen for all selection applications because it only creates hard-edged, well-defined selections and does not take into account soft edges as a result of depth-of-field or blur.
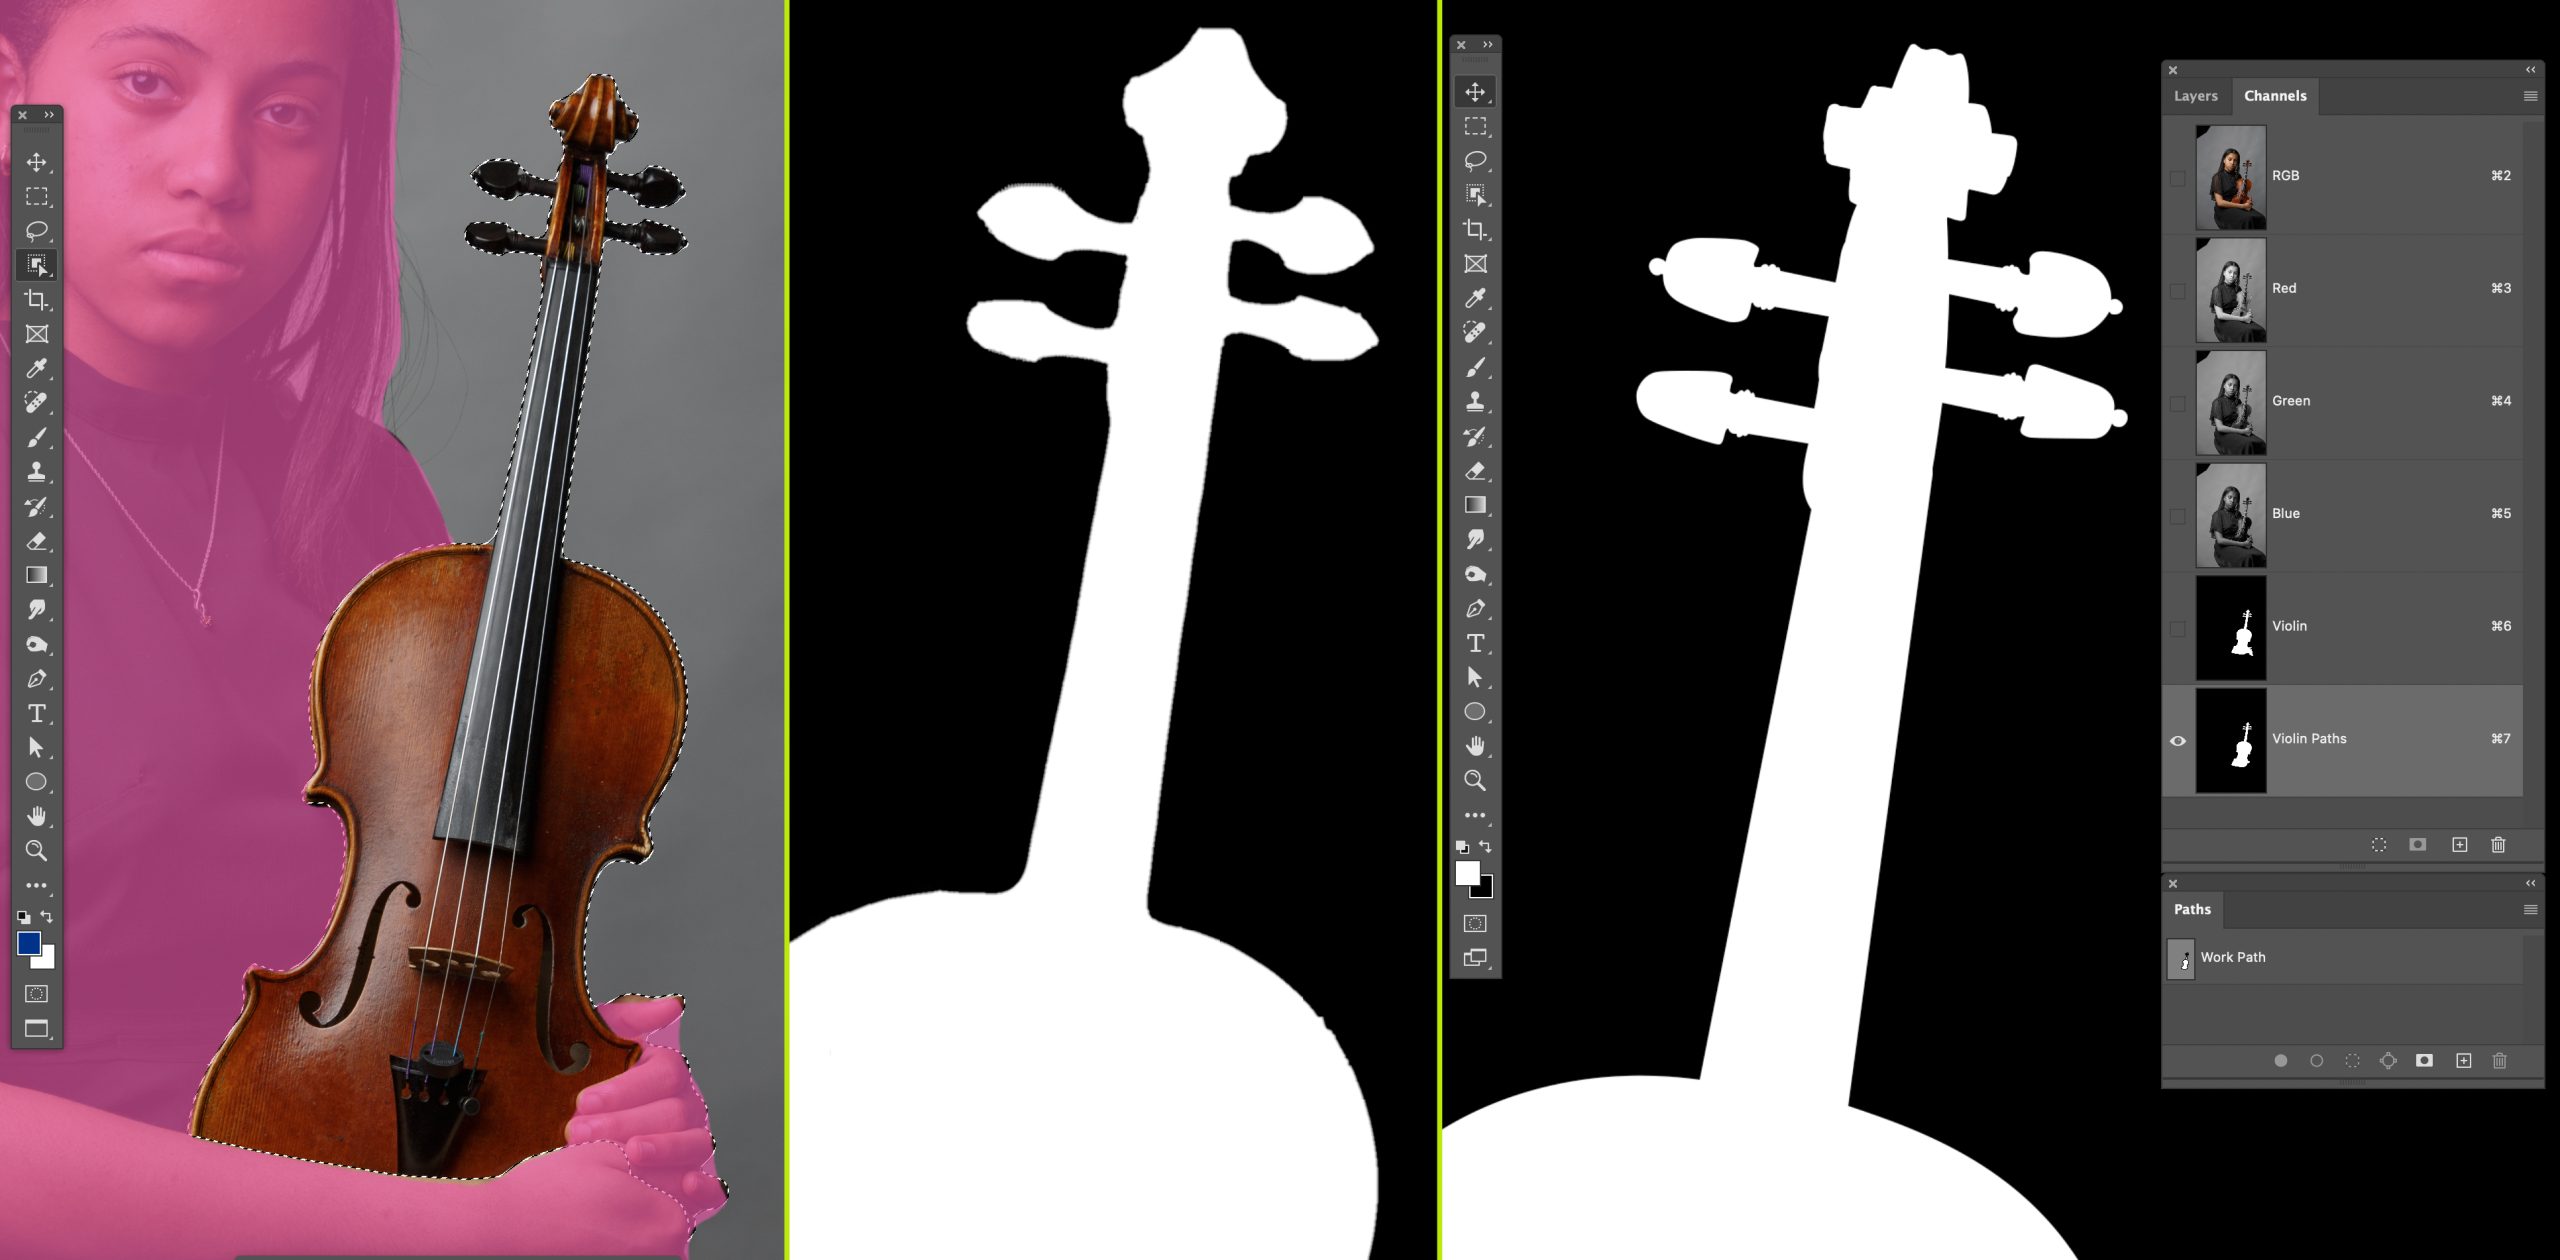
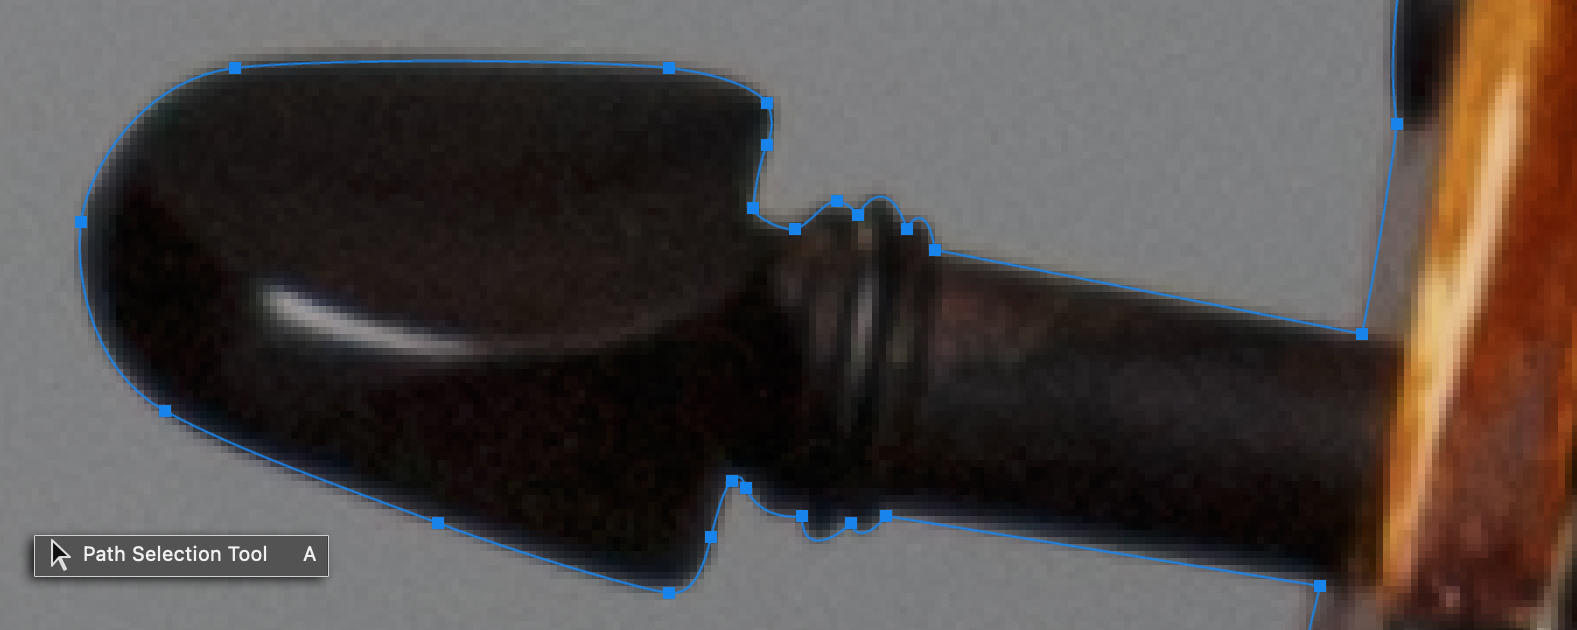
To demonstrate the precision of this tool let’s take a look at Figure 6.2 below. As we have discovered in previous chapters, Ps has great 1-click selection options, so in the image of violinist Autymn I wanted to make a selection for the violin separate from her. I used the Object Selection Tool with the Select Subject option to make a selection overall, and then used the Object Selection Tool to isolate the violin by drawing a rectangle over it as shown in the image on the left. At first glance, the selection looks pretty good, and may work well for a number of editing options. However, the selection was saved as an alpha channel and we can see [center] that the selection is not very precise. I then used the Pen Tool to trace around the violin to make a more precise selection that was also saved as an alpha channel [far right]. It is easy to see the precision of the selection created with the pen in comparison to the selection made with the Object Selection Tool. This precision would be extremely important if this were a photograph being used for advertising purposes or an image that would be enlarged to show the finest details.
How to draw with the Pen Tool
 |
| Straight Lines [corners]: The Pen Tool is capable of drawing straight lines at any angle. To draw straight lines you would simply single-click on the part of the image where you would like to begin a path, this action will create a single point. You need two points to create a path, so move the cursor to the next location and click once to add the second point and Ps will create a path connecting the two. You will continue single-clicking until you create the desired shape. You can constrain lines at any 45-degree angle by holding down the Shift key while moving the mouse to the next point.
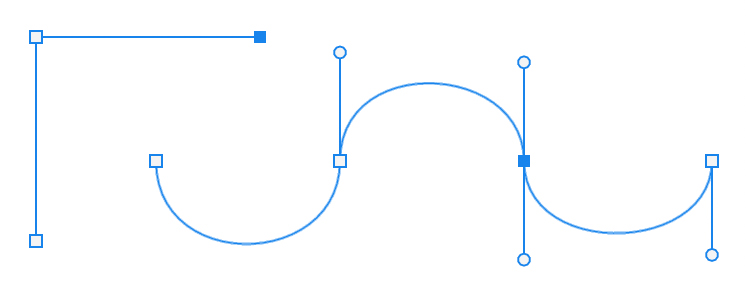
Curved Lines: Curved lines are a bit more complex and will take some getting used to, but once you do they will be life changing for the way you work. Similar to a straight line, a curve also needs two points in order to create a path. You begin a curve with a click + drag. When you click+drag you produce both a point and a control handle. The control handle is not a part of the path selection, instead it is a handle that allows you to change the shape and angle of the curve that it is linked to. As you move your cursor around the image you will continue to click + drag to continue making curved lines, otherwise, if you apply a single-click you will add a corner point, meaning that going forward you can create straight lines. Points: The points of are connected to the line/curve segment before it and after it, so if a single point is selected on a curve you will see the control handles for the segment before it and the segment after, as seen in the image above. Note the four control handles that are visible even though only one point is selected. You can adjust the curve on both sides of a point by dragging either of the control handles. Be sure to pay close attention to how any movements affect both segments, because even a slight movement on one half can throw the opposite half off. Line Segments: Line segments are created by having two points. These segments can be opened, meaning that they have a beginning and an end that do not connect as seen with the two straight lines above. I refer to these points as corner points, because any two straight line segments connected to it to form a corner of various angles. If a selection were to be created from an open path, Photoshop would close the selection by creating a straight line from the first point to the last point. In the example of the curved line above, if I were to make this path into a selection we would see three, half circles. This is important information to ensure that you do your best to close any created shapes, especially if using them to make selections. To close a line segment you will simply return the pen back to the original point and click on it, you will see a circle icon on the lower right of the pen indicating that the path will close.
|
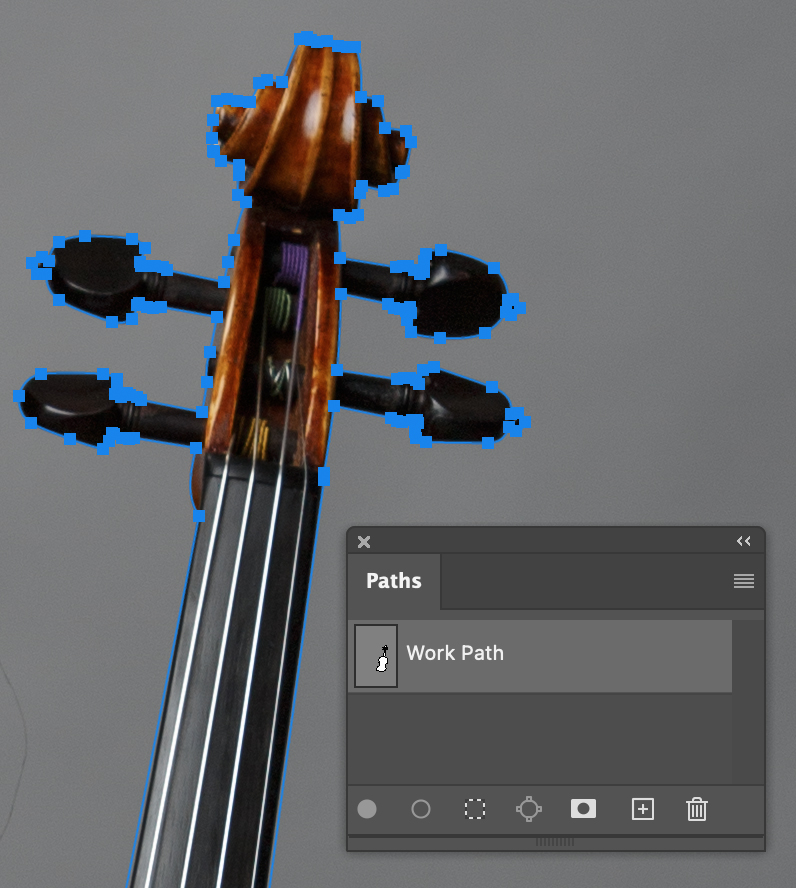
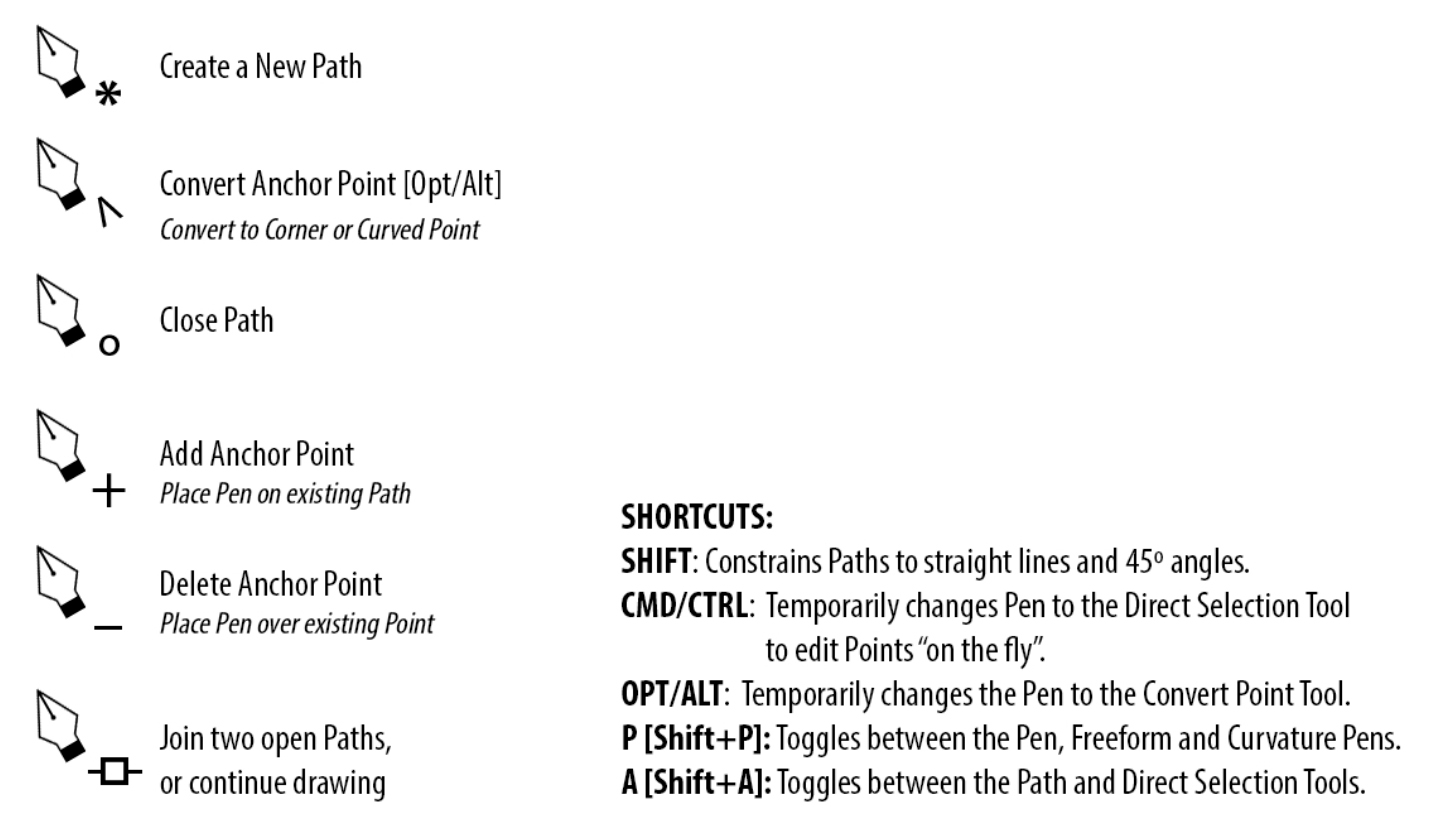
When using the pen to outline an object you will begin by locating a starting point and using a single-click [corner], or a click + drag [curve] to get started. There is a very good chance that an object will have a combination of straight and curved lines, and you will always want to keep the pen on the outside of the object. A rule-of-thumb for curved lines is to only drag a third of the way to the location to where you will add the next point on the outside of the object. Try to avoid dragging all the way to the next point, as this will cause the path to have loops which will make a simple process more complex. When first working with the pen there will be a tendency, to stop drawing or switch tools, which will cause the path to end. If you choose the Pen Tool again you should notice an asterisk on the lower-right [see illustration below], meaning that when you click again it will create a New Path so now you will have multiple paths instead of a single path which can cause serious problems when using the path as a selection because each path segment will create its own selection.
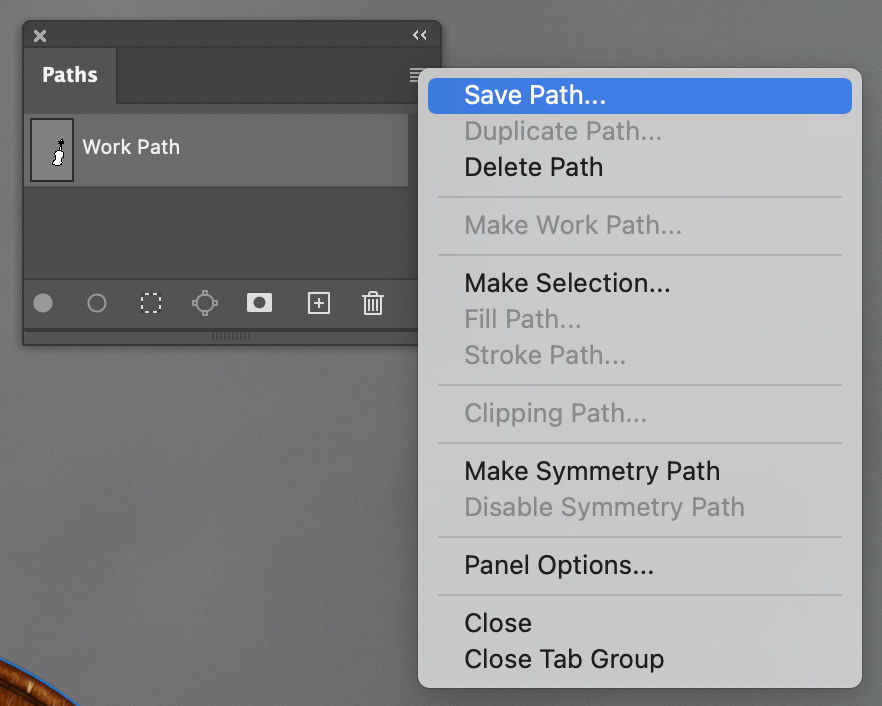
Each path that you create is being created in the Paths panel, and by default will be called Work Path, which is a temporary path so it can be accidentally deleted. To prevent accidental deletion and to save the path, you can double-click the name to rename it as you would a layer, or you can click on the “hamburger” icon on the far right of the panel [see Figure 6.4] to access the Save Path option and additional options that can be used with paths, including making them into selections [Make Selection].
When using the Pen Tool at various parts of the path creation, you will see a small icon on the lower right side of the tool. The illustration below shows the icons that you will see, and they do in the path creation process.
Pen Tool Practice
The links below provide you will two ways to practice making paths.
Pen Basics: https://cod.yuja.com/V/MediaFile?mediaFile=98648&node=4489746&a=111495423&autoplay=1
The Beziér Game: https://bezier.method.ac/
Edit a Path
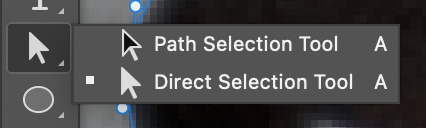
Vector tools have two dedicated selection tools that can be used to edit points or paths only without affecting the pixels of the image. The two tools are the Path Selection Tool and the Direct Selection Tool as shown below. These selection tools can be used to edit, move, duplicate, or delete all paths, including Vector Masks.
Path Selection Tool [above]: This tool is used to select and move a path without affecting the pixels below. When you click on a path with this tool it will select all of the points of the path so you can move it to another location in your image. A point is selected when it has a solid fill, note that all of the points in the path above are a solid blue color indicating that they are selected. While the path is selected you can also use the transform options from the Edit menu, which will now read as Free Transform Path [CMD / CTRL + T], or Transform Path. You can duplicate an entire path by OPT / ALT dragging the selected path, or delete a path by pressing the Delete key.
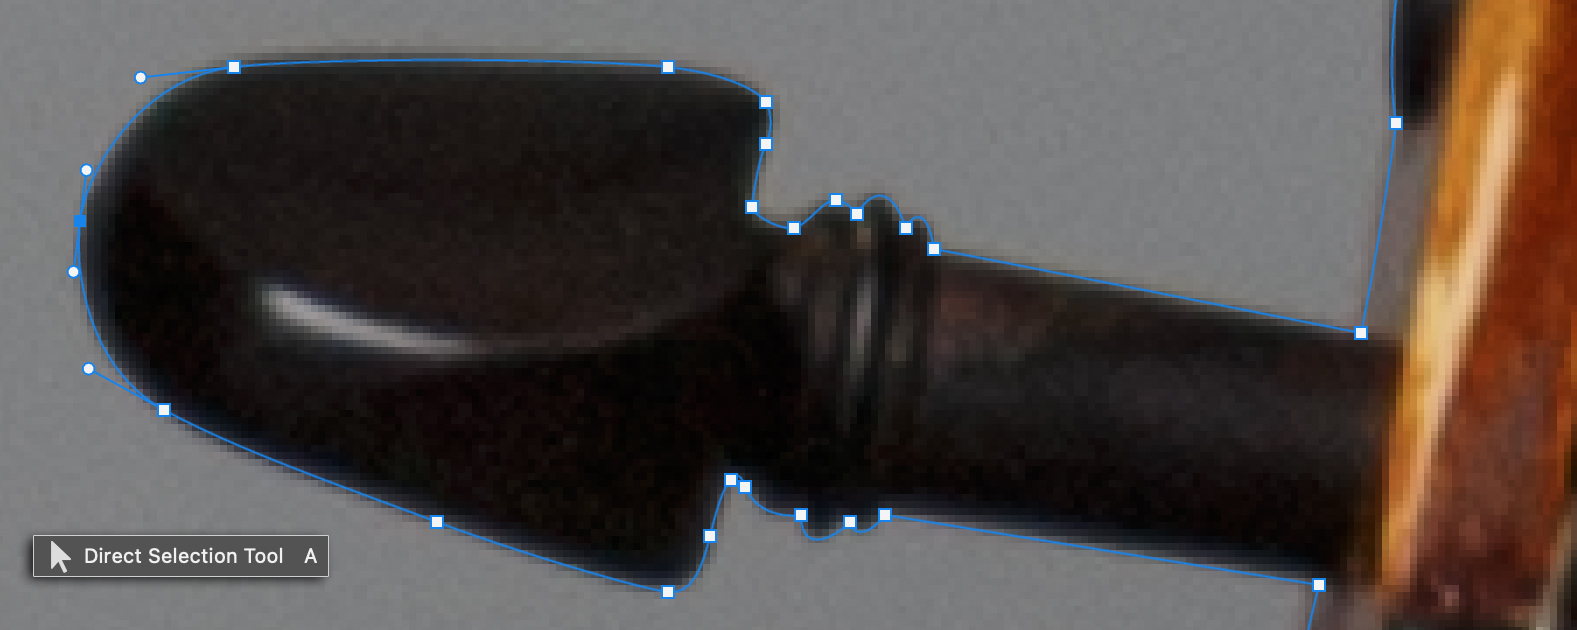
The Direct Selection Tool [above]: This tool is used to select points or path segments to make adjustments to them. The shortcut to access this tool when drawing paths is the CMD / CTRL key, which is a tremendous time saver because you can edit your points/paths as you create them.
Adjusting Straight Lines: To adjust a corner point you can use the Direct Selection Tool to select the point by clicking directly on the point you want to select, or click + drag over the point and move it to the desired location without affecting any of the other points. To select multiple points you can click + drag over the desired points, but if this is not possible due to their proximity to each other and other points that you do not want to select, you can use CMD / CTRL + click to add to the selection of points. You can also click directly on a path segment to move the line segment and the two points that are connected to it.
Adjusting Curves: To adjust a curve you begin by clicking on a curve-point which will show control handles as seen in Figure 6.3, then click one of the handles to adjust the curve. The handles are connected and move in sync if they were created with a click + drag movement. They will be separated if you clicked once, and then dragged from the point, or separated with the Convert Point Tool. Whether connected or not, a control handle can be moved to any angle, made longer or shorter, or converted to a cusp with the use of the Convert Point Tool. In addition, you can use the Direct Selection Tool to click + drag directly on a curve-path to adjust the curve for the segment that is selected. You can position the cursor anywhere on the curve which will automatically control the handles on both sides of the selected segment, but it will not move the path to a new location as performed when working with corner points.
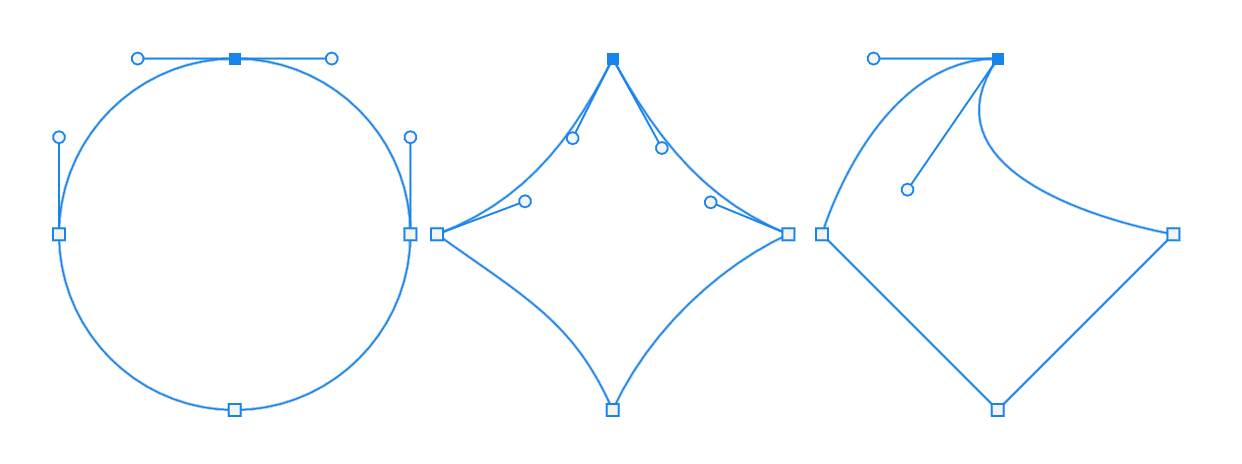
Creating a Cusp: A cusp is a change in the direction of the path. In Figure 6.8 the first path of a circle is continuous and has no breaks. The middle path has a cusp applied at all 4 points which was created by dragging the control handles towards the center with the Convert Point Tool. Another example of a cusp is in the third path on the far right; in this example only one of the curve control handles was dragged to the left with the Convert Point Tool. Although not apparent, the Convert Point Tool was also used in the path on the right to single-click on the lower three curved-points, which converted them to corner points. The same tool can also be used to click + drag on any of the points to convert them to curves, and then click + drag a handle to convert the point to a cusp. It is a very powerful tool and will come in very handy in your path workflow. The shortcut to switch to the Convert Point Tool is the OPT / ALT key.
Pen and Shape Options
The pen and shape tools are very versatile and can be used in various ways. I have already pointed out that they can be used to make paths that can then be made into selections, but they can also be used to create shapes that can be filled, stroked and continuously edited. They can also be used to create shapes as pixel-based objects that can not be edited with vector tools, and take on the same rules as raster objects.
The figures below show the Options bar for all three tool modes available for the pen and shape tools. Some of the options are the same for each tool type, so they may not all be labeled after the first figure.
| The Path [#2] option creates vector paths that will be in the Paths panel and can be toggled off by deselecting it in the panel. |
 |
* Not shown is Rounded Corners which allows you to key in the radius that you would like to use to round corners. This option is visible with the Shape Tools that produce corners. |
| The Shape [#1] option will create a New Shape Layer in the Layers panel that will use the fill and stroke colors and stroke size and shape selected prior to drawing the shape. |
 |
* Not shown is Rounded Corners which allows you to key in the radius that you would like to use to round corners. This option is visible with the Shape Tools that produce corners. |
| The Pixels {#1] option will create pixels in the shape that is drawn immediately on the current layer. This option uses the current Foreground Color to fill the drawn shape. |
 |
|
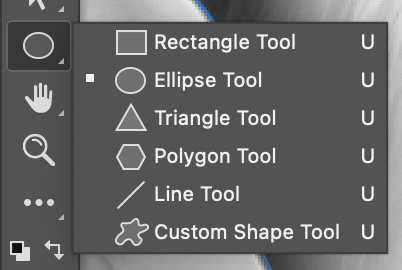
Shape Tools
Shape tools are additional tools that can be used to create predefined shapes that can also be created as Shapes, Paths or Pixels. You will also be able to edit the shapes and paths with the vector selection tools.
To use any of the shape tools you will simply select the shape that you want to create, and then click + drag to create the shape. The same shortcuts that are used with the Marquee selection tools apply to the shapes as well.
Shift + drag: Constrain all sides to create a perfect circle or square.
OPT / ALT + drag: Creates the shape from the center out.
OPT / ALT + Shift + drag: Creates a constrained shape from the center out.
Most of the shape tools are pretty straight forward and they behave as intended, however, you will also have the ability to choose the number of sides that you want when using the Polygon Tool, and can round the corners for the Rectangle, Triangle, and Polygon Tools through the Options Bar..
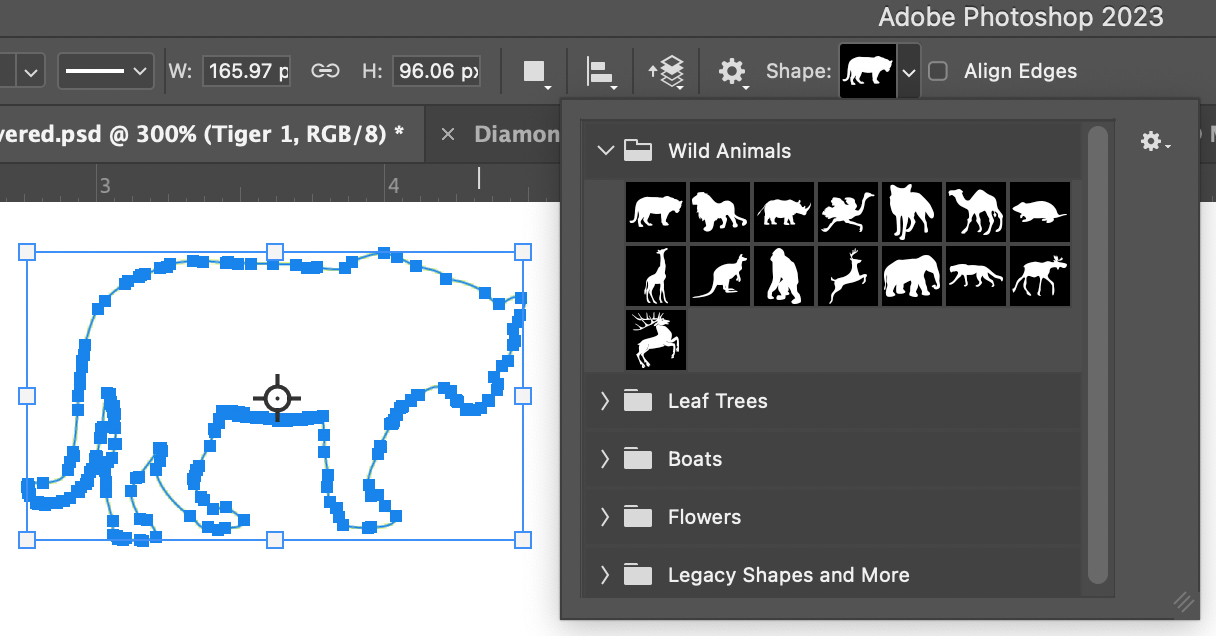
Custom Shape Tool
The Custom Shape Tool is a versatile tool that can be used to create predefined custom shapes or you can create your own. Figure 6.13 shows some of the custom shapes available in Ps. Please note that these shapes are merely outlines or an object and are not detailed. The points and paths can be edited when created as shapes or paths.
You can use the pen tool to draw freehand objects or you can trace an object to create your own custom shape. If you have a logo, or some other type of vector graphic from an application like Adobe Illustrator, you can also turn those into custom shapes to create patterns or just use as a creative option.
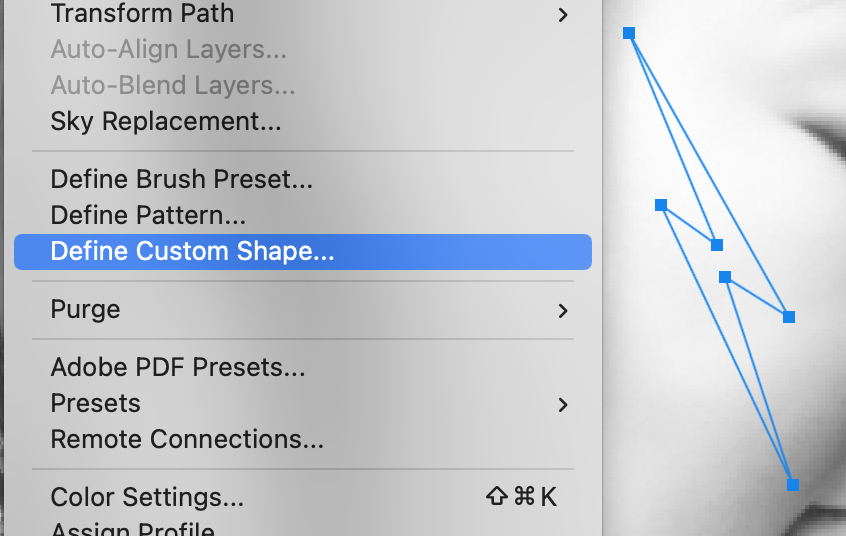 |
Step 1: Create a Shape or Path.
Step 2: Ensure the shape/path is active and choose Edit > Define Custom Shape from the Menu bar. This option will only be available when you have a live vector. |
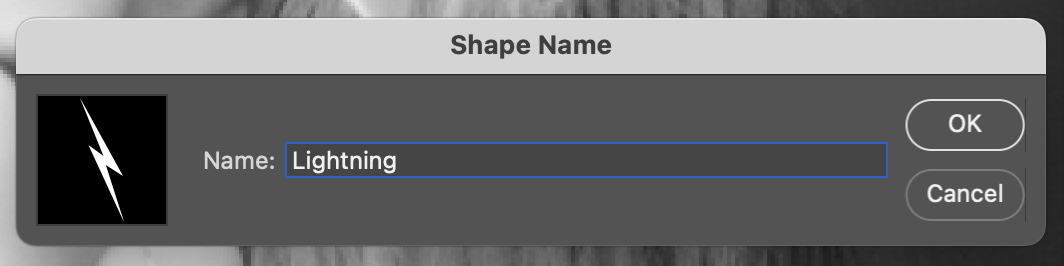 |
Step 3: Give the new shape a name. |
 |
You will now see the new shape at the bottom of the Shape options that you can select at any time. |
 |
Step 4: Using the Custom Shape Tool, click + drag the new shape onto your image.
After drawing the custom shape onto the face, it was then warped to better fit the curves [Transform Path > Warp], colored, and applied a Color Burn blend to the layer. |
Vector Masks
As you have already learned from this chapter, vectors can be created as Shapes [Shape Layers], Paths, or Pixels. Shapes and Paths can be made into selections that can then be used with Layer Masks, but they can also be used to make Vector Masks. A Vector Mask works in the same manner as a Layer Mask in that it can be made to Reveal All, Hide All, and can be used with the Current Path which is the one that is currently selected in the Paths panel.
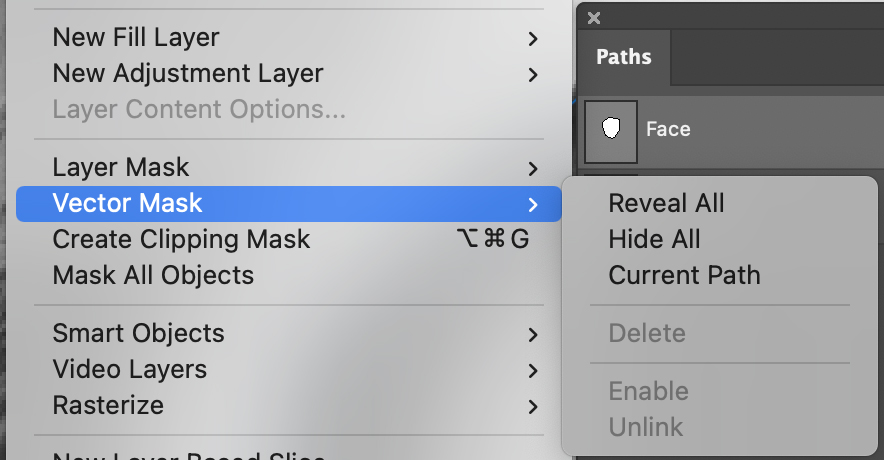
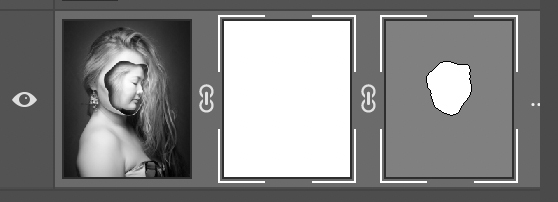
A vector mask was added to the image in Figure 6.15 below using the Current Path option. This option reveals the selection and hides everything around it. The points or paths can be edited with the Direct Selection tool and you will have a live view of the edits being made to the image, which is the main difference between a Vector Mask and a Layer Mask.
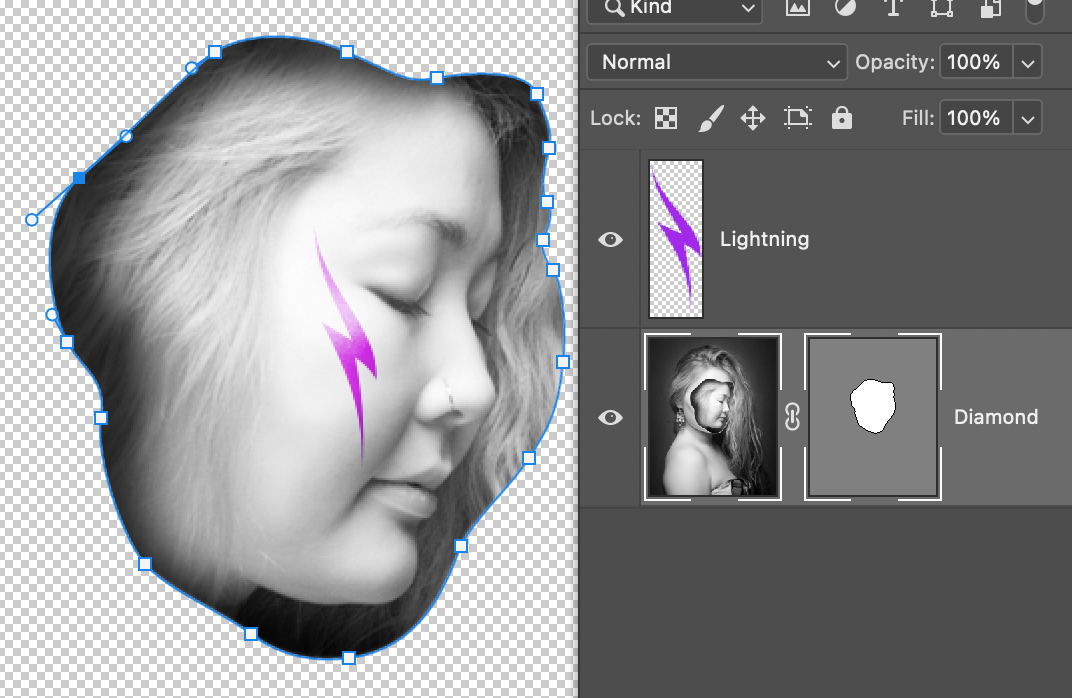
Both a Layer Mask and a Vector Mask can be used simultaneously on an image. If using the shortcut icon at the bottom of the Layers panel, the first time you click on it a Layer Mask will be produced, and if you click on it a second time a Vector Mask will be produced. Please not that Layer Masks originate with a white or black fill, while a Vector Mask will be seen as gray.