Structure: Specifies how closely the patch should reflect existing image patterns with values between 1 and 7. The higher the number [7], the tighter the patch adheres to existing image patterns. The lower the value [1], the patch adheres very loosely to the existing image patterns.
8 Portrait Retouching
In this chapter I will review some of the basic tools used for retouching that you have probably learned in a previous Photoshop class. I will also discuss some best practices in preparing your work and add some tips along the way. It is important for you to understand that there are various ways to retouch portraits, and some of the methods have changed over the years as Photoshop has evolved with the addition of new tools and new ways of using old tools or operations; not to mention third-party plugins designed specifically for retouching. You can easily find videos on how to perform these functions, but what I find to be important is to comprehend how those tools and functions work and how to evaluate an image.
Person Masking [AI]: Facial Edits
Clone Stamp for Repairing Hot Spots
Neural Filters and Additional Retouching Software
Start with a Plan
All projects should begin with a plan to assist in eliminating concerns of time and to provide a sense of order. It will be best to go into a project knowing what you would like to achieve before you begin instead of jumping right into the work. This practice will help to minimize or eliminate questioning whether you did enough work to a photo, and over time this will become easier and your workflow will become faster as a result.
 |
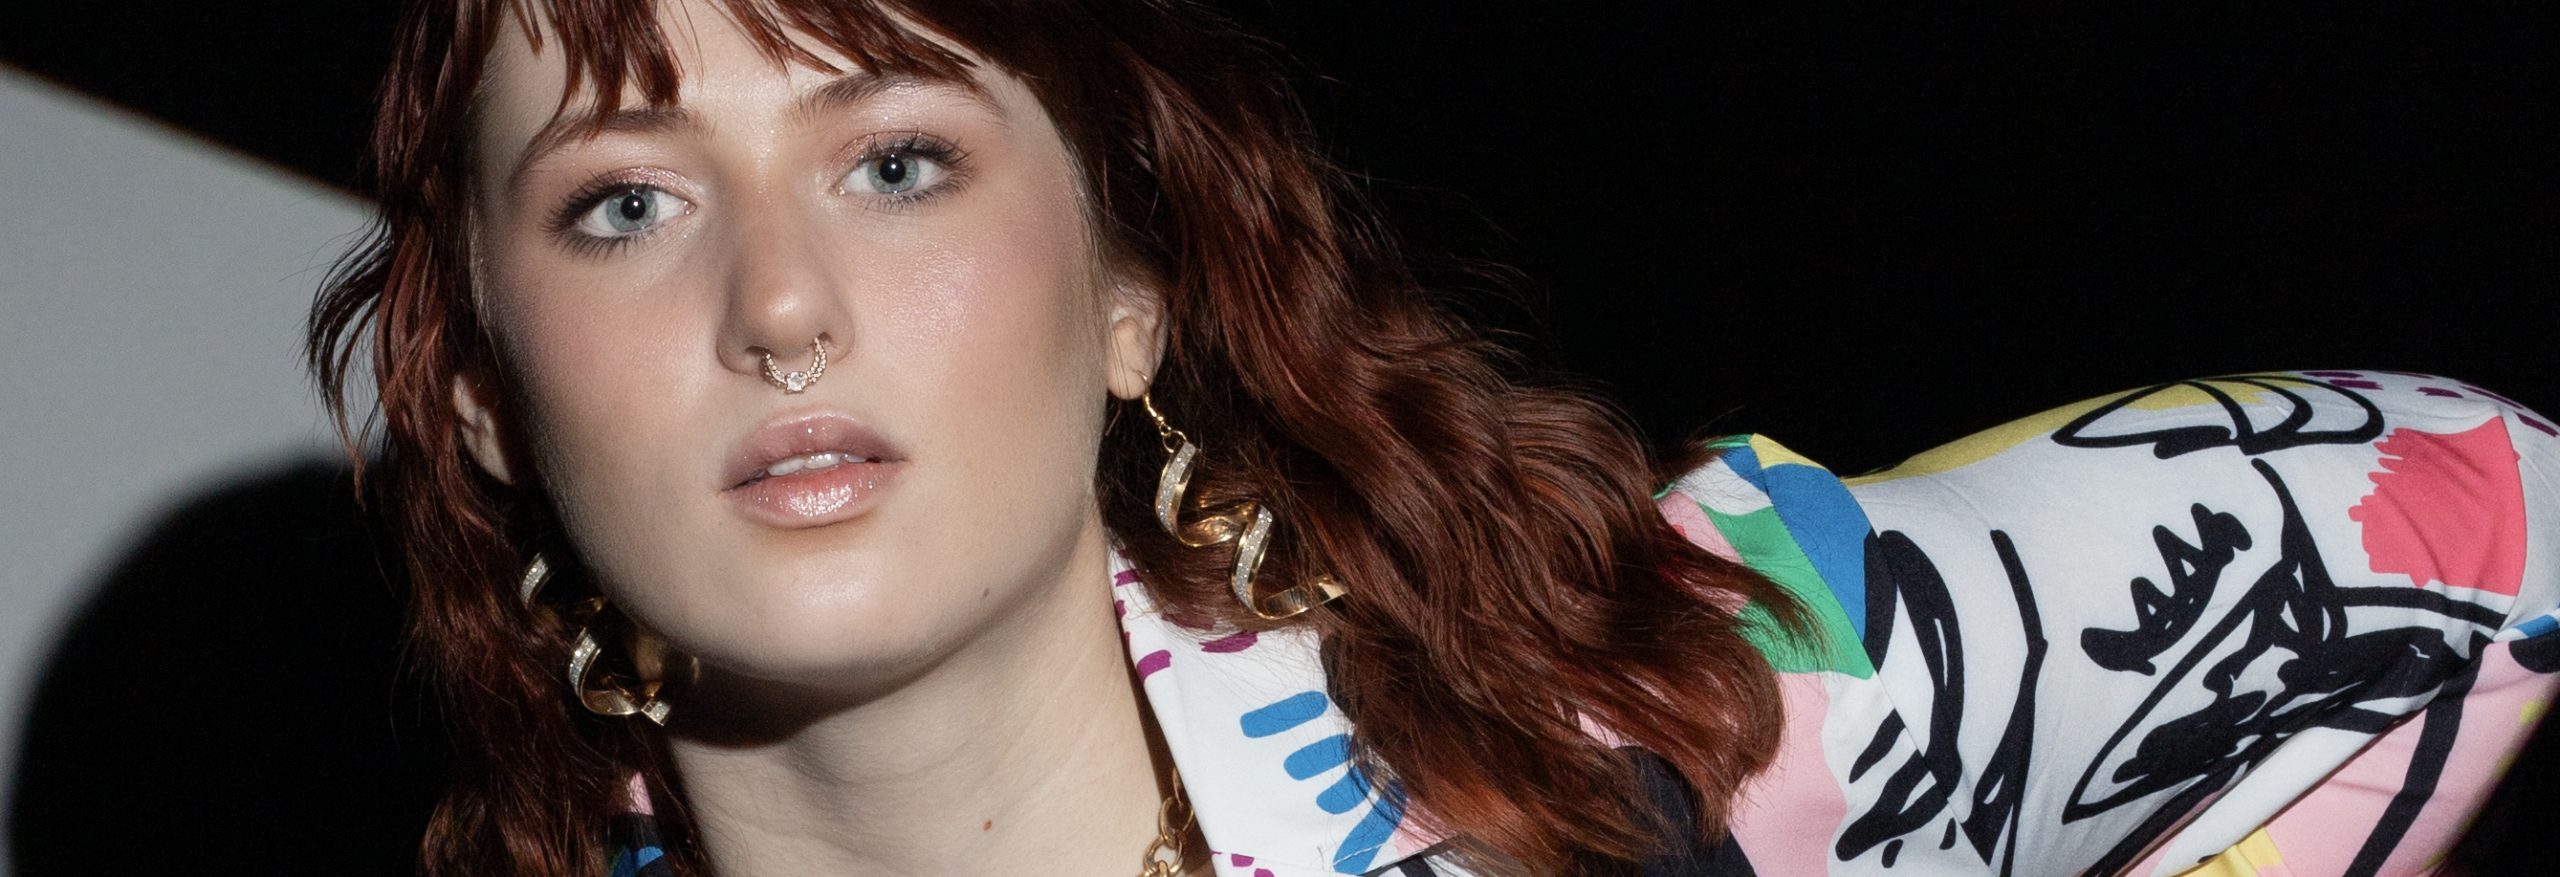
The image above depicts notations of the work that needs to be performed on it. This is just a starting point that does not have to be written on the photo as depicted. I find it helpful to add these notations on a separate layer in Photoshop, which I keep at the top of the layer stack in order to check my progress. I will turn this layer on to see what still needs to be worked on, and I will cross out the areas that have been completed. Having the notations assists in remembering what needs to be done, and can also be a road map of the order in which edits need to be completed.
When done carefully, retouching can take hours to complete a single image, so the more planning we account for on the front-end will help to eliminate waste on the back-end especially if you have many photos to retouch.
Tips:
Photographer: If you are the photographer or have control over the photography for the work you will be editing; try to get the exposure right when making the photos to avoid “fixing it later in PS”. Photoshop is a fabulous application, however, you can easily spend too much time unnecessarily editing images if they were not properly exposed and color-corrected during shooting. It can also be extremely helpful to have a good makeup artist on your production team.
Capture & Edit in RAW: When it comes to making adjustments having access to RAW files is going to provide you a wealth of tonal and color information which you will not have with JPGs to allow for the recovery of highlights or brighten shadow detail. It is also best to do as much work as possible in the RAW processing software whether that be CaptureOne, Lightroom, or Camera RAW, before taking it over to Photoshop for the final edits.
Lightroom has some great AI masking options of its own, where a generated AI mask can select face, skin, eyes, teeth, hair and clothing as separate masks, with a single click.
Smart Objects: Use Smart Objects for non-destructive editing, and always edit on separate layers in Ps.
The Setup
Always do your editing on a separate layer and never directly on the image in order to maintain a non-destructive workflow. Many people learn to duplicate their original or Background layer to do work on the duplicate layer; with the idea being that you have the original layer untouched in the instance that you need to reference it. However, doing this simply doubles the document size and may make PS sluggish; especially when working with images from high megapixel cameras. This is a result of duplicating every pixel in the image instead of only editing the areas you need to. Duplicating the original layer can also make it challenging to correct mistakes at a later time.
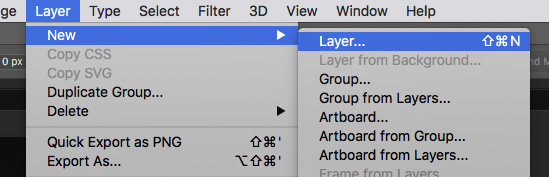
All of the tools that will be used in this chapter for retouching can be applied to a separate layer, so it will be important to start your work by creating a New Layer as shown below. There are many ways to create Layers, and this is just one of those methods. I recommend those who are new to Ps to learn where these options are instead of just learning shortcuts as mentioned in the Essential Shortcuts section of this book, because if you are not using the shortcuts frequently you will not remember them. As a reminder, shortcuts are always shown in the Menu bars to the right, so you have visual reminders should you ever forget one.
 |
The Tools
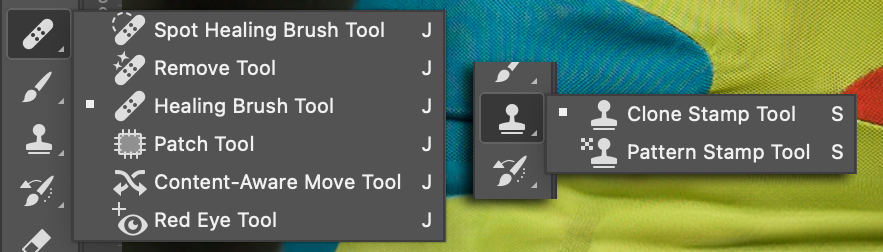
For most retouching projects you should be able to complete them with just a handful of basic tools, such as the options listed below. I primarily use the Healing Brush, Clone Stamp and Brush Tools in my professional retouching work for detailed edits. I choose these tools because they allow me the most control over editing my images, but you will come across other techniques that use some of the other tools shown below as alternate methods of retouching. No tool should be discredited and you may find that other tools work equally well for what you are trying to accomplish. You will quickly learn to use what works best for you as each one of us will have preferred methods of working; but what I find the most beneficial is to learn how a tool works and what it does. This comprehension will allow you to determine best practices for your own workflow and how to decipher video tutorials that you may watch because you will understand why a person suggests a specific tool.
Click this link for a great resource on some the tools available in PS.

Since we will be working on a separate layer to apply our edits we will need to set up our tools to work properly on the new layer. The Current Layer option is set to each tool as the Sample option by default, this means that it will sample pixels from the layer which is currently selected. The problem with this is that the new layer is blank and does not contain any pixels, so we must choose one of the other two options if we wish to add pixel information from other layers.
Current & Below: This option will sample pixels from the currently selected layer and any layer with pixels visible below it, and will apply newly created pixels to the currently selected layer.
All Layers: This option will sample visible pixels from layers below it as well as from layers above it, and will apply newly created pixels to the currently selected layer.
Tip:
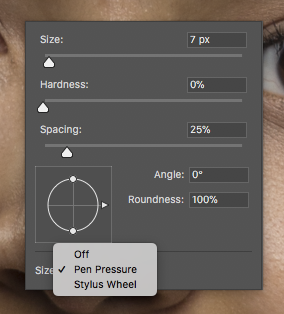
The Healing Brush and Clone Stamp are just a number of “brush” tools in PS. There are many factors that affect the response of these brushes, and I encourage you to learn these options. Most are found in the Options bar at the top of the application for each tool [see Figure 8.3 for the Clone Stamp options], but for convenience you can also right-click on your image with any brush tool selected for additional options.
For this reason I find the best response in retouching is done with a pen and tablet. I only use a pen when working in Photoshop and Illustrator because the pointer tracking is accurate and the response is much more natural than a mouse, trackpad or trackball. A tablet also allows for various degrees of pressure to adjust the weight and amount of the adjustment being made while painting. There are great tablets available at various price points from Wacom and Xencelabs., who are recognized leaders in tablets for photographers.
Skin Retouch
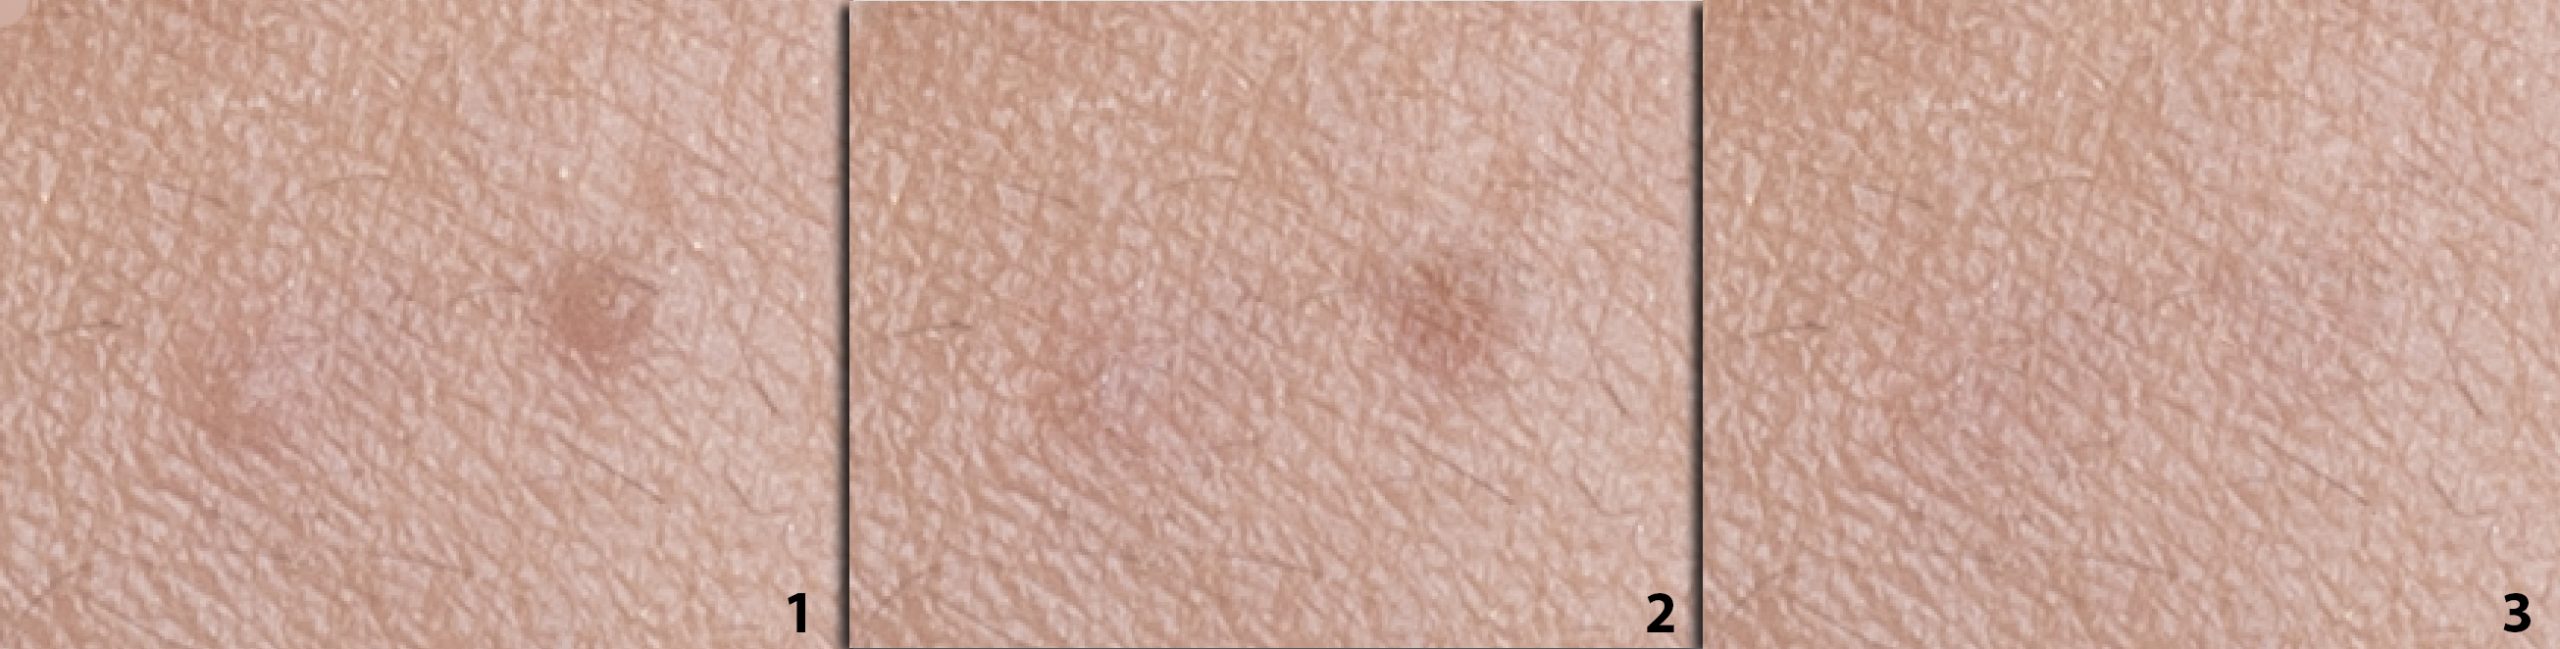
When we hear the words “skin retouch”; the first thing that may come to mind is skin softening. Softening of the skin needs to be performed after the skin has been retouched of blemishes, otherwise, those blemishes will still show through the blur used to soften the skin. I describe the texture of skin as having peaks and valleys which are three-dimensional, so when light sweeps across the skin the light reflects off of the peaks or the raised part of a blemish, while lines or wrinkles that sink-in are both good examples of a valley. Peaks and valleys will catch light and create shadows, which makes them stand out against the rest of the skin. A blemish, such as acne, is raised in such a manner that the skin texture is stretched and appears smoother than the rest of the surrounding area. So when we retouch, or soften skin, we are essentially trying to even out the peaks and valleys for consistency and retain texture from the surrounding areas without breaking the movement of the skin. Note how the skin moves in Figure 8.5 as depicted by the red lines. Understanding how the skin moves and what its texture looks like will assist greatly with retouching.
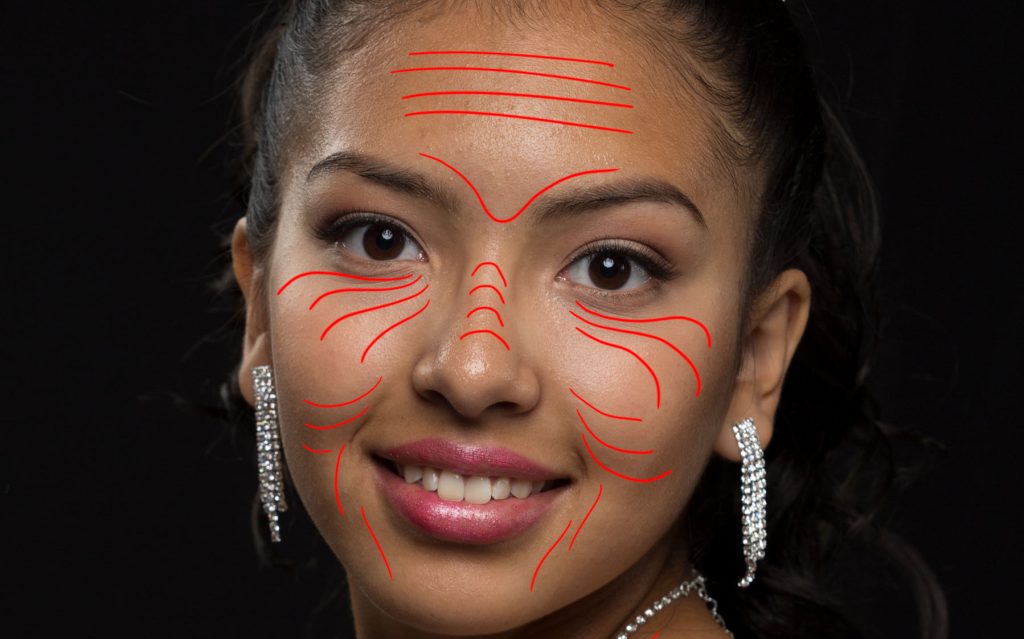
The red lines above depict the way that the skin moves, so you will want to move your brush in the same direction when sampling so you are moving “with the grain”. Failure to do so can disrupt the peaks, valleys and texture even further, which is why I prefer to use the aforementioned tools as they allow me to choose where I sample from versus having Ps choose for me.
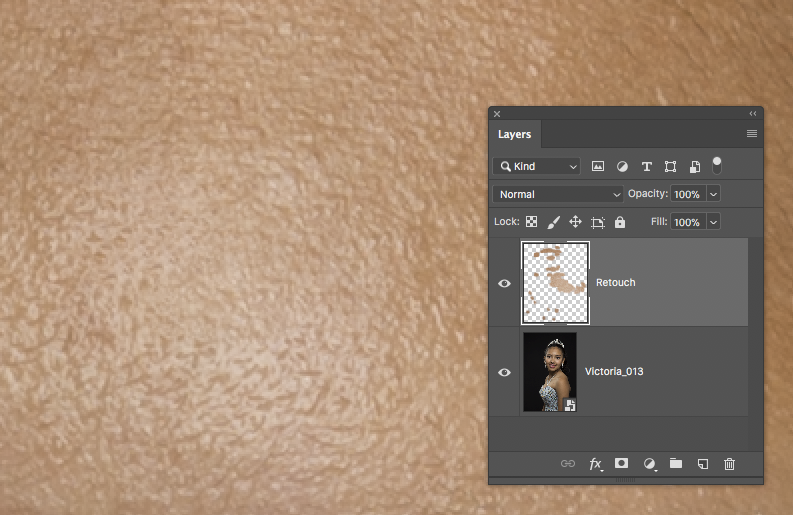
When ready to begin editing you should have one new layer above the original Background layer as shown above. I am using the Healing Brush for this edit as it blends texture from the sampled area [OPT / ALT + click] with the tone of the target area to help provide a smooth edit. You will also want to zoom in to your image for such detailed work. I recommend at least 200% magnification for starters, but this will also depend on the size of your photo and pixel information.
Tip:
When sampling, randomly select [OPT / Alt + click] surrounding areas while making small edits to avoid creating patterns that repeat. Avoid editing across a continuous large area, because this will result in repeating patterns when we prefer the adjustments appear random. Repetition of patterns makes any adjustment appear “photoshopped”.
Person Masking [AI]: Facial Edits
As with pretty much any operation in PS, there are many techniques we can use to edit the face to clean blemishes, whiten eye and teeth, enhance irises, etc. Ideally this would be accomplished in Photoshop, but some basic edits can now be accomplished directly in Adobe Camera Raw [ACR] or Lightroom. Since we are using a Smart Object in this example we have direct access to Camera Raw by double-clicking the Smart Object icon on the lower right of the image thumbnail circled in Figure 8.7.
![Double-clicking the Smart Object icon [circled] opens the image in Camera RAW for additional non-destructive editing.](https://cod.pressbooks.pub/app/uploads/sites/140/2023/01/brighteneyes.png)
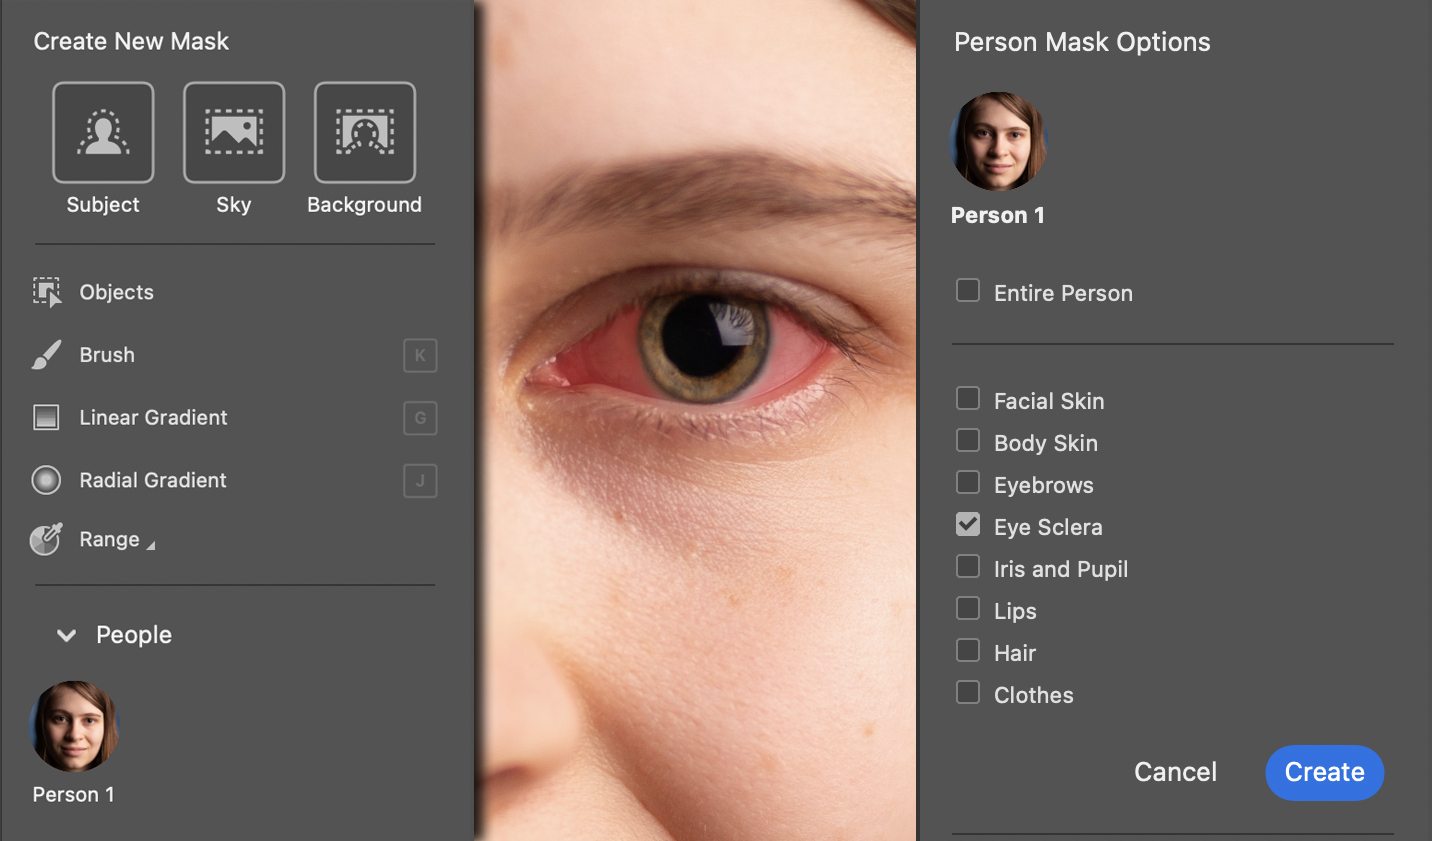
Camera Raw will launch and you will have access to all of the tools available in the application that you may have used in Lightroom prior to opening in Photoshop, and if you opened a file directly in PS. If you are not working with a Smart Object you can still use the following technique by choosing Filter > Camera Raw Filter… One of the latest AI options available in ACR or the Camera Raw Filter is the People/Person Mask, which can mask Facial Skin to Clothes as seen in Figure 8.8.
To use this option click on the “Person” icon in the circle under the People section [left], which will mask the entire person and create segmented masks for the individual sections showing on the list on the right in the screenshot below. You could essentially mask all of these segments and make individual adjustments for each of them.
Repairing Large Areas
The Patch Tool and Content-Aware Move Tools are two additional great tool to use to repair large areas, versus using a brush. For best results you will want to use the Content-Aware option with the Patch Tool while working on a separate layers to maintain a non-destructive workflow.
By default the Patch Tool is set to work with a Normal patch, this means that it only works directly on the layer with the pixels that are to be edited. In a non-destructive workflow we want to patch on a separate layer, but the option is not available to us and will not be until we change the Patch option to Content-Aware, as seen in Figure 8.9. Content-Aware is an intuitive way for PS to determine what it feels is the best pixel information from the layers above or below to repair or fill an area of an image.
By setting the Patch to Content-Aware the options for the tool change and we now have access to the Sample All Layers option.

Color: Entering a value between 0 and 10 will specify the extent to which you want Photoshop to apply algorithmic color-blending to the patch. If you enter 0, color blending is disabled. A Color value of 10 applies maximum color blending.
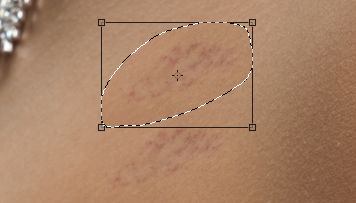
You can use this tool to patch large portions of skin discoloration or on a smaller scale to repair blemishes. The tool works much like a lasso tool in that it produces marching ants, which can then be moved to an area to sample from. Any tool that can create a selection can be utilized in the initial step, but you must switch to the Patch Tool in order to drag the selection to the source area from where you want to sample the pixels from. This will heal the area much like the Healing Brush but on a larger scale.
Be sure to check the box to Sample All Layers prior to making the selection or it will not work on the blank layer.
The Content-Aware Move Tool behaves in a similar fashion, but it moves the original selected pixels to another area of the image while repairing the area the sample is moved from with new pixels from the surrounding area of the image. The pixels that are moved are still active and visible, so you can press the Delete key to remove them while the repaired area remains. This will work perfectly if you are working on a separate layer.

Mode: Use the Move mode to place selected objects at different locations. Use the Extend mode to expand or contract objects.
Structure: Enter a value between 1 – 7 to specify how closely the patch should reflect existing image patterns. If you enter 7, the patch adheres very strongly to existing image patterns. If you enter 1, the patch adheres very loosely to the existing image patterns.
Color: Enter a value between 0 and 10 to specify the extent to which you want PS to apply color-blending to the patch. If you enter 0, color blending is disabled, but a value of 10 applies maximum color blending.
When you are ready to patch you will click and drag a selection around the area of skin, and then place the tool within the selection to move it to a sample area. The selection will have a Transformation box around it, so you can apply basic transformation adjustments to it while it is still selected. When you are ready to apply the patch, simply double-click inside the selection or hit the Return / Enter key on the keyboard. The target area will be patched with the sample area, and the marching ants will remain, as you have moved the pixels to be patch from one area to another. Press the Delete / Backspace key while the selection is still active to permanently delete the original pixels.
Tip:
The Content Aware Move Tool is a fabulous tool for patching or expanding large areas, however, as with other tools, you may find that you need to still do some tweaking after. The best results will be achieved from an area that is equal in size of clean pixels. If you are too close to a light or dark area, those areas can adversely affect the final result. Think about the patch as a whole, and look at how well it worked for you.
If you find that the tool made a great adjustment on 80% of the area, but not all, consider fixing that 20% with one of the other tools, versus trying to do it over and over again, or working with smaller adjustments. This is a great way to think about most of your editing.
Also keep in mind that the adjustments that you make are on a separate layer, so you can add a Layer Mask to the layer to erase errant pixels.
Clone Stamp for Repairing Hot Spots
I will assume that you already know how to use the Clone Stamp Tool, which is another great tool for retouching photos, as it samples information from one area [source] and clones it pixel-by-pixel to another [target]. It is also for this reason why one may choose not to use this tool, because it does not take into account tonal information as the Healing Brush does. When you are cloning pixel information you may find tonal mismatches that occur abruptly and will require additional editing, but it is still a very handy tool for cloning texture with the Frequency Separation technique or to even out tone, as described below.
Changing the blending mode of the Clone Stamp is a very useful way to control this tool for use in retouching. Do you recall when I mentioned that skin is a series of peaks and valleys, and that the idea to retouching is to smooth those areas out? Well, that is exactly what we will do with the Clone Stamp Tool.
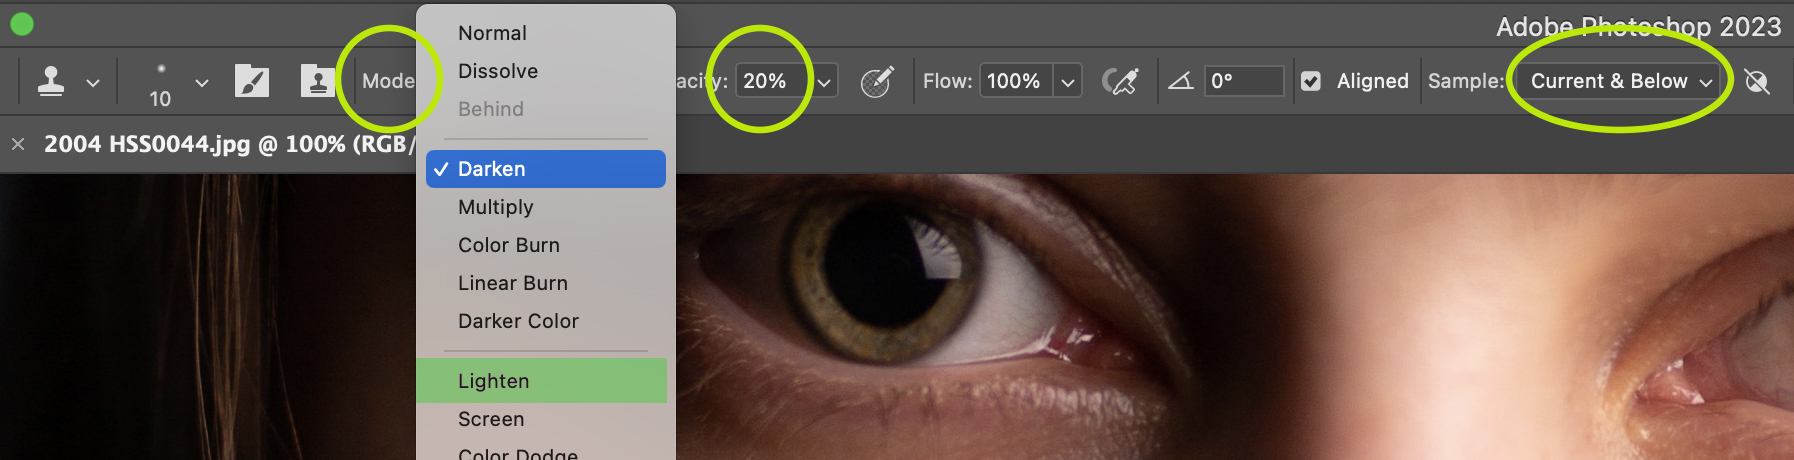
Begin by setting up the Clone Stamp brush to darken or lighten pixels while cloning sample information. The Darken blend mode, selected from Mode in the Options Bar, will allows you to darken pixels that are lighter than the source area selected with an OPT / ALT + click. The Lighten mode, also selectable from the Mode menu, will lighten pixels that darker than the selected source area. Therefore, using this technique will allow you to darken or lighten areas of an image to assist in evening out tone.
When using this technique you may also want to lower the brush Opacity to 20% or below, and set the Sample option to Current & Below.
OPT / ALT – click on the area you want to sample from, and then click-drag over the highlight area. You should see a little of the darker tone applying to the target area, and that is key to only do a little at a time.
Why not just lower the brush opacity and paint over the area? You can, however, you would be affecting all of the pixels in the target area. By changing the blend mode to Darken you will only darken any pixel which is lighter than the pixels you have sampled. It is a great concept!
Skin is naturally oily, and no matter how much preparation is put into keeping skin clear during a shoot, you may still find that the oils create “hot spots” on a face which may attract unwanted attention. Fortunately there is a simple way to tone down these hot spots to even the skin out.
This method also works reverse, where you can set the Blend to Lighten and then paint over dark pixels where the tool will lighten any pixel darker that the sampled area.
![Using the Clone Stamp to edit the original [left] by using the Darken blend mode to darken the light tones of skin blemishes [middle], and then using the Lighten mode on the darker tones [right]](https://cod.pressbooks.pub/app/uploads/sites/140/2023/01/clonestamp2.jpg)
Dark and light pixels = Peaks and Valleys. Get it. 🙂 In the example in Figure 8.13 I am demonstrating how to use the clone stamp with blend modes to disguise blemishes by evening the tones. I am not trying to remove them completely, because I would use other techniques to perform this task, but you can see a big difference from the original to the after while still maintaining texture.
Additional Retouching Software
You are now ready to tackle your own photos using the basic techniques described above, but keep in mind what I mentioned to you at the beginning…..good retouching takes time. I also pointed out that we find we do not have enough time to do everything that we want to do with our photos. For those occasions there are additional software options to manage those tasks, and they are becoming more powerful with each version as some are starting to integrate AI technology of their own. Like everything else however, these applications may not perform miracles on every photograph, but it is important to know what is available to you so you can determine what works best for your workflow.
Neural Filters
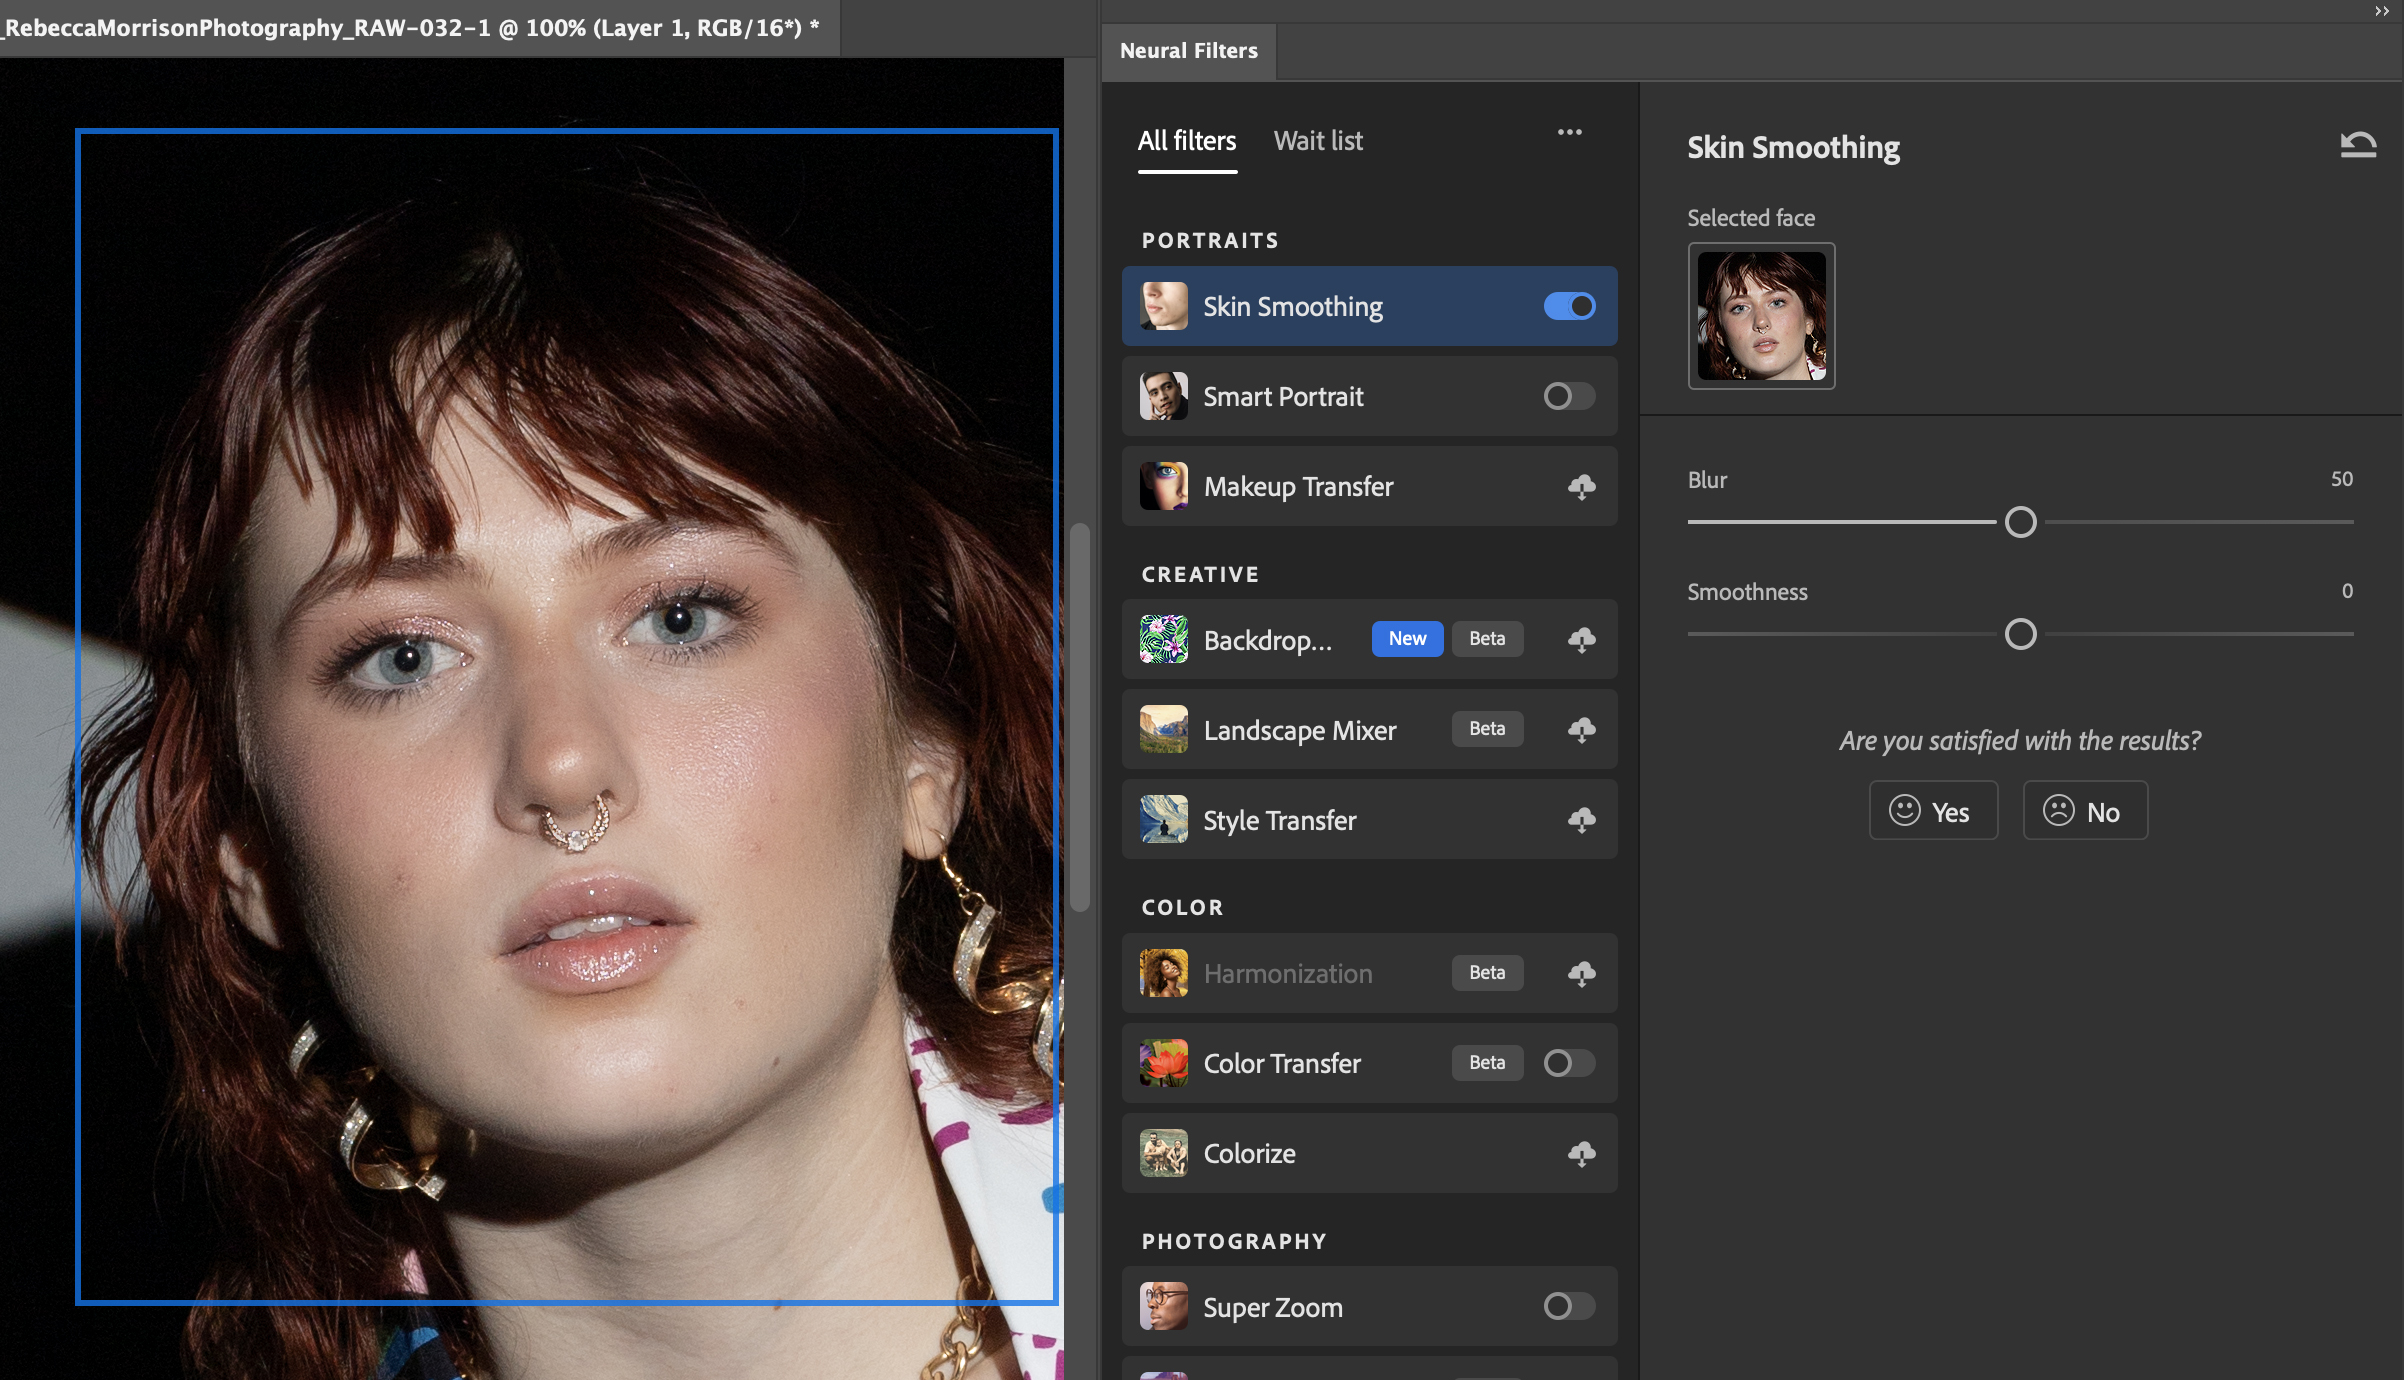
Adobe has added AI filters that can be found under the Neural Filters listing; Filters > Neural Filters … There are filters for various types of effects, but for this chapter there are three current options for Beauty Retouching, that may be useful for your editing needs. You can choose how you want to apply the results to your photo with the default being as a Smart Filter for Smart Objects, but you can also apply the reults as a New Layer, New Layer Masked, or as a New Document.
To get started with these filters you must first click on the cloud icon to the right of the filter name to download it from the cloud. This will make the filter available for use after you activate it by clicking the switch that has replaced the cloud icon. You are now ready to begin experimenting with the filters.
Third Party Plug-Ins
These are some of the best Photoshop & Lightroom plug-ins to assist in speeding up your workflow, so you can get back to being a photographer.
How-To: Frequency Separation
Frequency Separation is probably the most popular portrait retouching technique being used by photographers for skin softening. It is a very simple process, that uses high [details] and low [soft] frequencies of a photograph to produce the results of softening the skin while maintaining texture.
Prior to starting this technique you will want to manage the larger blemishes by using some of the techniques listed above, but this step can also be applied after FS has been performed. The reason is that Frequency Separation will soften skin but it will also leave behind the larger blemishes. Once you learn it and practice using it, you will be able to best determine which workflow works best for you and the types of photos you may want to use one or the other on.
The Low layer softens and affects color, while the High layer maintains details and since it will not hold color after applied, you can use it to remove blemishes.

Step 1: Apply any tonal, color corrections or basic retouching on separate layers.
Step 2: Flatten the Image. Normally I would not ask anyone to flatten an image to allow for changes to existing edits, but for this technique it is just easier to work with a flattened image. There are workarounds to keep the layers, but for this demo let’s just flatten the image, which will rename the layer Background.
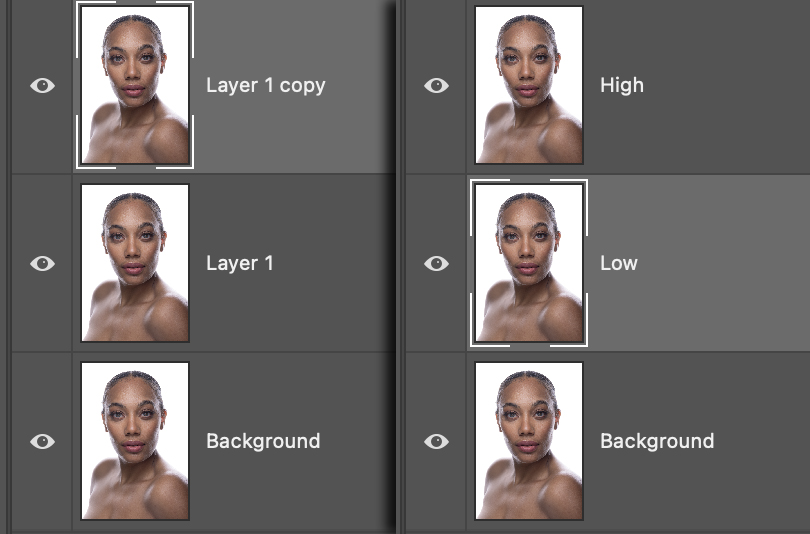
Step 3: Duplicate the Background layer twice, renaming Layer 1 Low, and Layer 1 copy High as seen on the right below.
Step 4: Blur the Low layer. In this step you are going to use a blur filter of your choice to soften the image slightly, that is only enough to soften details. In order to see the results you must first turn off the High layers visibility [eye]. Do not use the Radius value that is shown in the image below, because that number is arbitrary based on resolution and image size so you may end up using a lower or higher value than the one shown. Some of the blur options to choose from are Gaussian Blur, Live Gaussian Blur, Smart or Surface Blur. Experiment with them to determine which one works best for you.

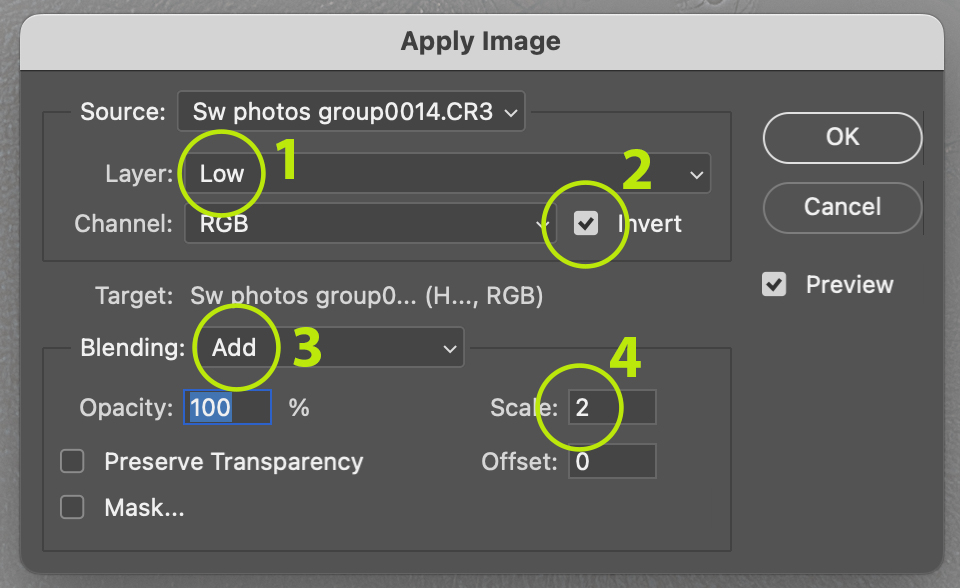
Step 5: Apply Image on High layer. Prior to performing this step you must turn off the visibility of the Low layer and turn on the High layer. Choose Image > Apply Image… and use the following settings for each of the bit depths of the photos that you may use. The Apply Image option blends two layers together, in this case it will be blending the High and the Low layers together with a resulting 50% gray image.
16-bit image settings:
|
 |
 |
8-bit image settings:
|
Step 6: Set the Blend Mode to Linear Light. Turn the visibility back on for the Low layer and then change the layer’s blend mode to Linear Light. This blend mode is a contrast blend and will seemingly remove all 50% gray in the layer. The result of the High and Low layers at this point should make the image appear as if there were no additional layers outside of the Background layer.
Step 7: Blur the Low layer in sections. Target the Low layer, select the Lasso Tool, and set its Feather in the Options Bar to an appropriate value that will produce a soft edge. You do not need a high value for this. Think about how the skin moves as illustrated at the start of this section, and make small selections to do a little at a time. When the selection is created, blur the selected area with one of the blur options listed in Step 4. Repeat this step as you select additional areas of the face and/or body.

Notice in the image above that the blemishes are still visible, and that is why you may want to remove the blemishes first, although you can use the High layer to also remove them as seen below.
- Normal section after FS has been applied.
- Targeted the High layer and used the Healing Brush to add texture to the blemish areas. This results in colored spots with textures that were not originally there.
- Targeted the Low layer and used the Healing Brush to remove the color spots that were left behind from the previous step.
Continue adding the blur and targeting the individual layers to get the results that you desire.
