7 Advanced Compositing Concepts
Advanced Compositing Concepts
Clipping Masks
A Clipping Mask lets you use the contents of a layer to mask the layers above it without the need for a selection. The contents of the base layer [layer below] determine the masking. This type of mask is best used with composite images where objects are on individual layers.
You can use multiple layers in a clipping mask, but they must be successive layers. The name of the base layer in the mask is underlined, and the thumbnails for the overlying layers are indented. The overlying layers display a clipping mask icon of an arrow pointing to the layer below that it is clipped to. You can also use the Layer Mask to erase elements of the overlying layers without the need to make selections. You can also use a Clipping Mask on a Group of layers.
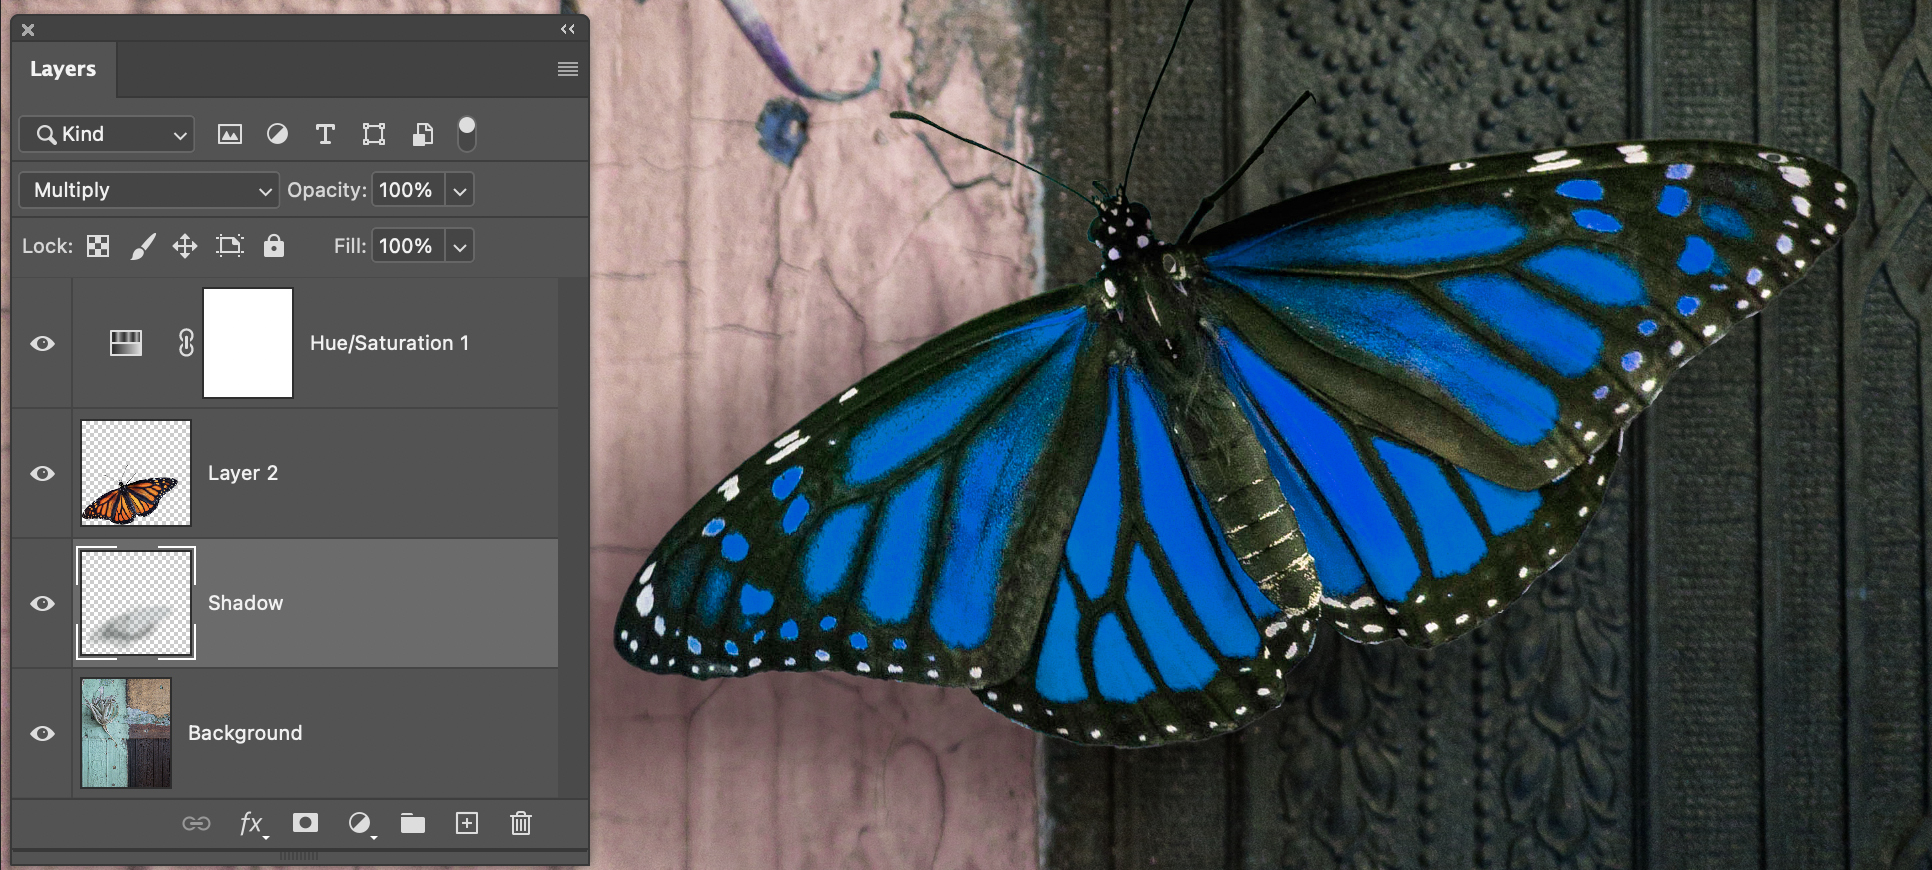
When an Adjustment Layer is added to an image without the use of a selection it affects everything underneath it. In the example above, a Hue/Saturation adjustment layer was added to the top of the layer stack so it affects all color of the layers below it evenly.
My goal for this image is to change the color of the Monarch without affecting the colors on the rest of the image as seen in Figure 7.1. In order to accomplish this I can either make a selection before I add an adjustment layer, or I can add an Adjustment Layer and then clip it to the layer below. I find using Clipping Masks easier and more efficient, because they retain the transparency of the layer they are clipped to, which includes blur from depth-of-field or effects. I also prefer this method versus making a selection first, because if you stack adjustment layers, any soft edges will continue to feather and produce halos making Clipping Masks more accurate.
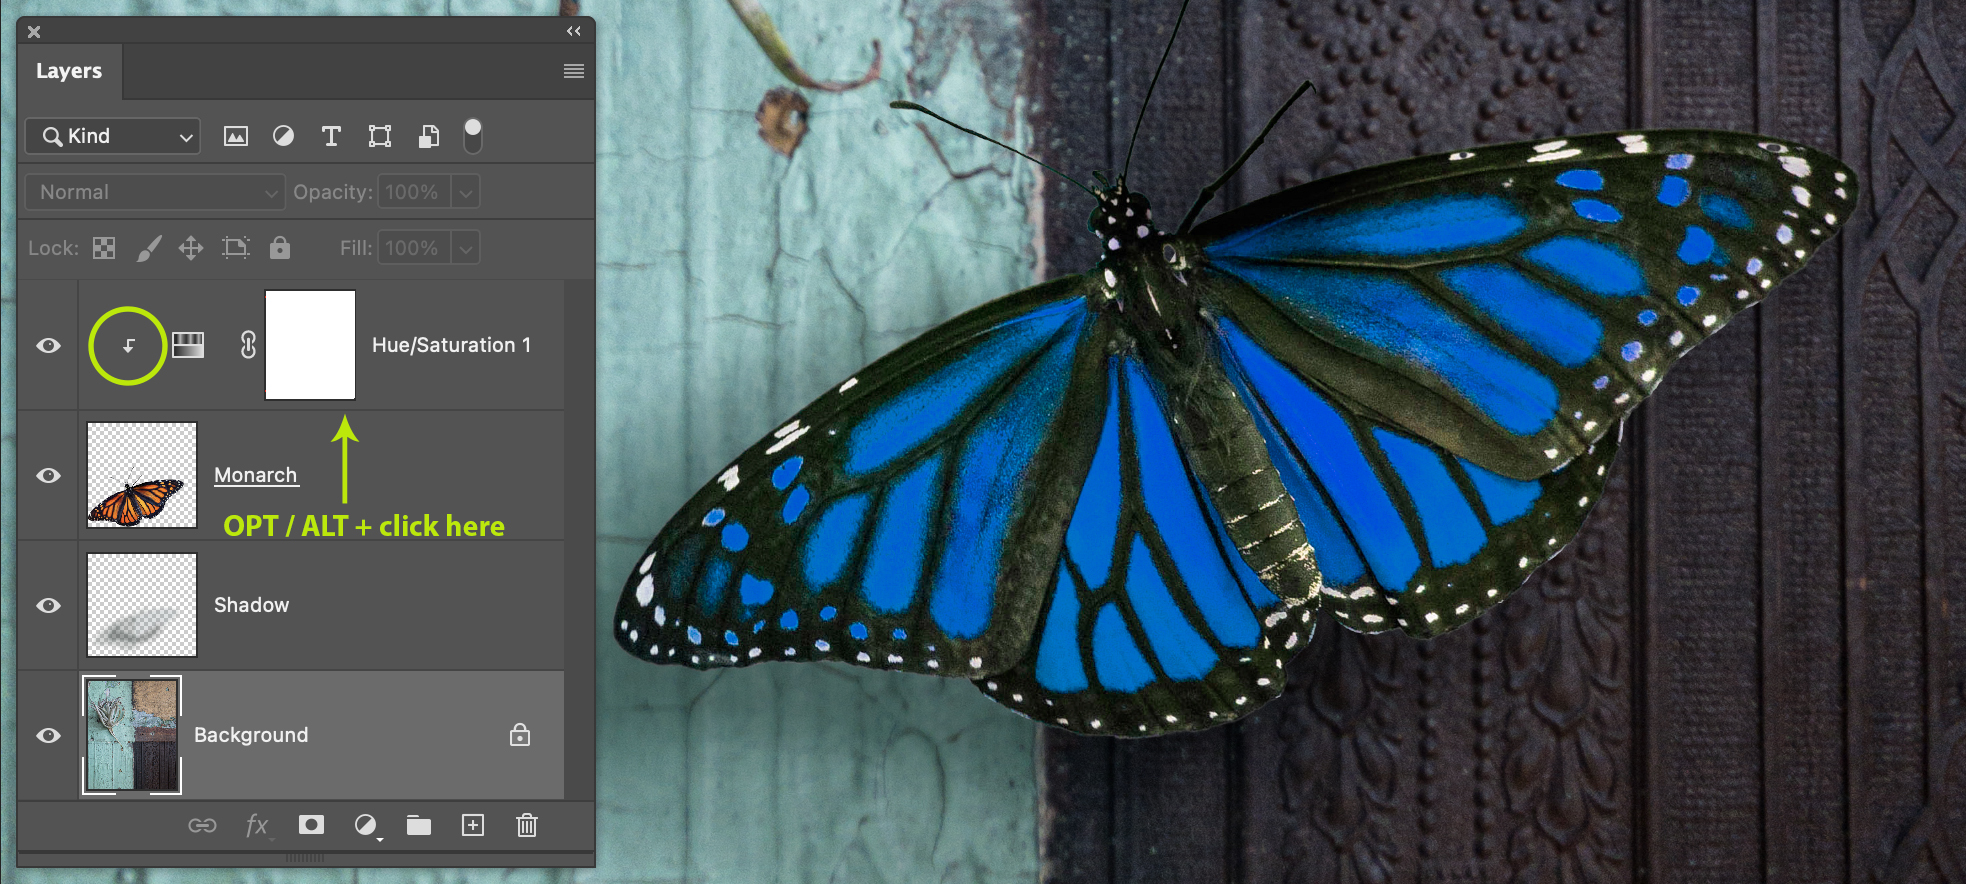
There are a few different ways to add a Clipping Mask to a layer; you can choose Layer > Create Clipping Mask, OPT / ALT + click between the two layers that you want to clip together, right-click on the layer to be clipped and choose Create Clipping Mask, or you can add a New Layer and check Use Previous Layer to Create Clipping Mask.
When a Clipping Mask is applied you will see an arrow on the clipped layer [circled], and the layer icons will be indented to the right..
The OPT / ALT + click between layers shortcut can be used to create and release a clipping mask.
In Figure 7.2 the Hue/Saturation Adjustment Layer is clipped to the Monarch layer, so the adjustment only applies to the butterfly but not to the rest of the image as seen in 7.1, without the aid of a selection.
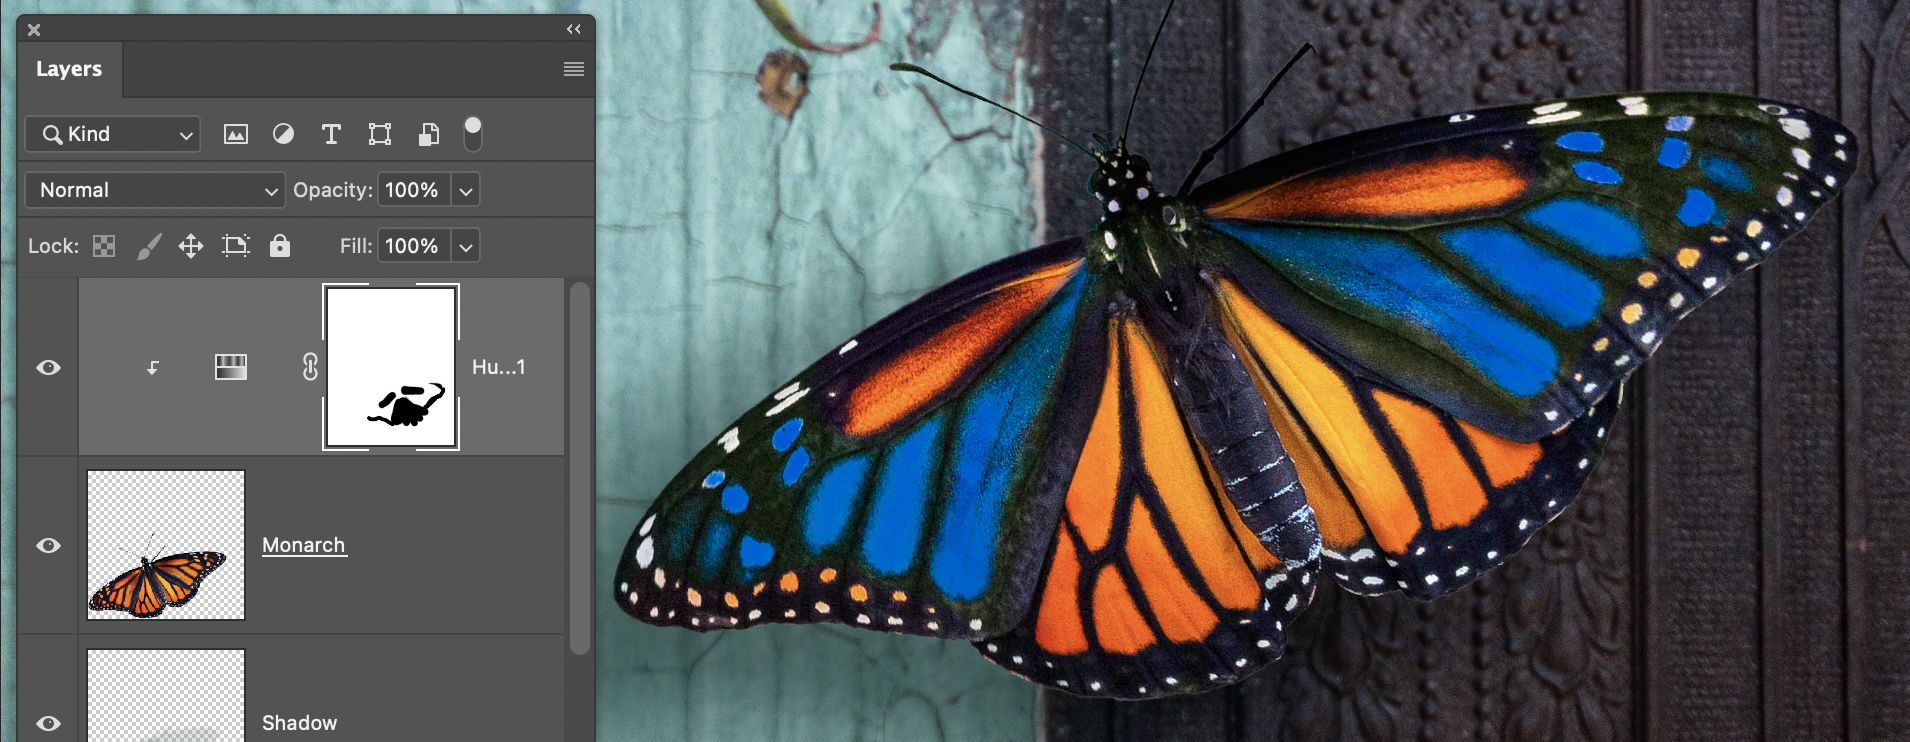
A selection was not necessary when creating the Clipping Mask, and the Layer Mask can still be utilized with or without a selection as well and any edits will still only be applied to the butterfly layer.
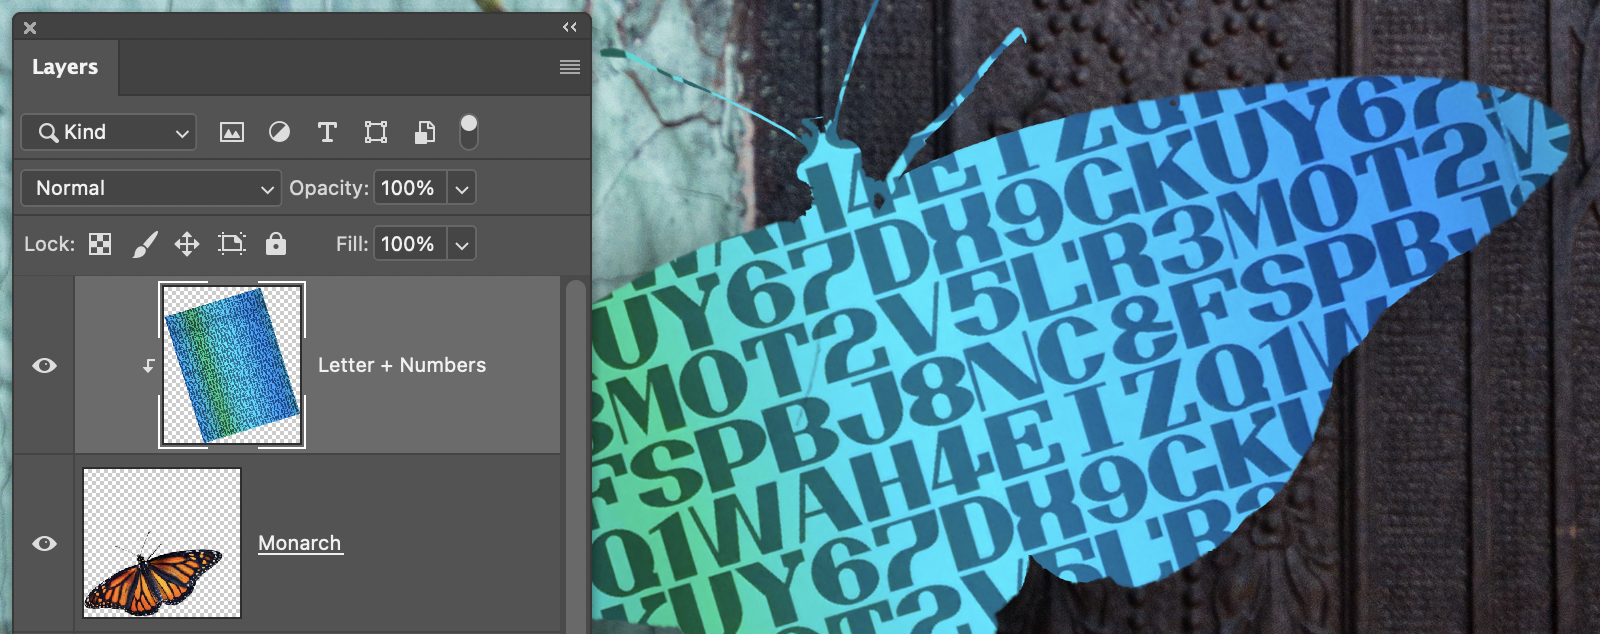
In addition to Adjustment Layers being used as clipping masks, raster and vector-based images can also be used. In the example above a raster image is added above the Monarch layer and clipped to it. The layer can further be blended with Blend Modes or Opacity changes to interact with the image below.
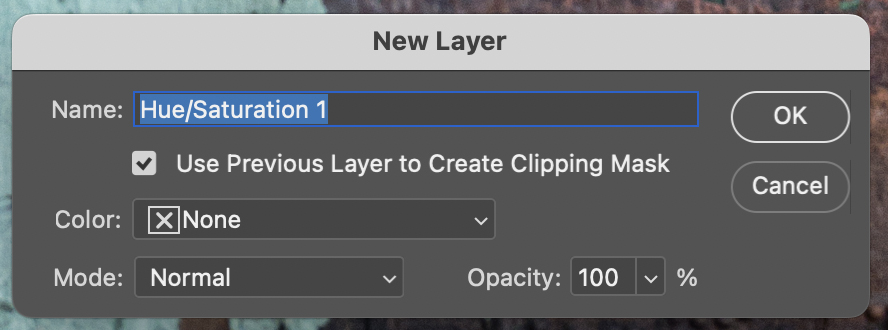
Checking the Use Previous Layer to Create Clipping Mask is another way to add a Clipping Mask for any type of New Layer. This option can immediately be used with blend modes and opacity adjustments.
Blending Modes
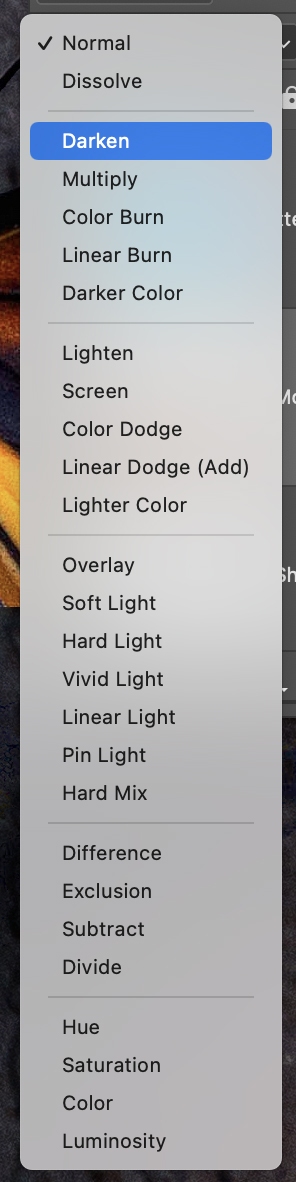
The Blending Mode of a layer decides how pixels blend in an image from a layer to the layers below. You can use blending modes to create special effects in your images in a single click. By default, the blending mode of a layer is set to Normal, while a Group is set to Pass Through, which means that the group has no blending properties of its own.
When you choose a different blending mode for a group, you effectively change the order in which the image components are put together. All of the layers in the group are put together first. The composite group is then treated as a single image and blended with the rest of the image using the selected blending mode.
Blending Modes can also be used with painting and editing tools such as the Brush Tool, Healing Brush and more. The blending options are selected in the Options bar for the tool you are working with. They control how pixels in the image are affected by a painting or editing tool.
Blending Modes come in very handy for compositing, and having an understanding of them can be extremely helpful as described in Figure 7.6 below. I encourage students to experiment with Blending Modes to combine images together versus simply lowering the Opacity of a layer. My justification for this is that lowering the opacity of a layer will visually flatten an image and minimize the importance of contrast.
| Blending Mode Descriptions | |
 |
Key:
*Not all Blending Modes will be available with painting and editing tools, and some of those will have different names. __________________________ Normal Blending Modes Normal: This is the default layer mode. Dissolve: This option does not blend pixels. Dissolve only reveals the pixels below when the layer’s Opacity or Fill is reduced. Dissolve shows either the blend color or the base color – never a blend of two. No anti-aliasing is used, and the result will look grainy and harsh. __________________________ Darkening Blending Modes Darken: Compares the colors of the blending layer and the base layers, and keeps the darker colors. Multiply: Multiplies the colors of the blending layer and the base layers, resulting in a darker color. This mode is useful for coloring shadows. Color Burn: This mode is named after the film development technique of “burning” or overexposing prints to make the colors darker. This mode darkens the colors and increases the contrast of the base colors, then blends the colors of the blending layer. Linear Burn: Blends the colors of the blending layer by darkening the colors of the base layers. Darker Color: This mode is very similar to Darken, but it does not blend pixels. It only compares the base and blend colors, and keeps the darkest of the two. __________________________ Lighten Blending Modes Lighten: Compares the base colors and the colors of the blending layer, and keeps the lighter color. Screen: Inverts the base colors and multiplies with the colors of the blending layer. This creates the opposite effect of the Multiply mode. The resulting colors will be brighter than the original colors. Color Dodge: Lightens the colors of the base layers and reduces the contrast. This results in saturated mid-tones. Linear Dodge [Add]: Looks at the color information in each channel and brightens the base color to reflect the blend color by increasing the brightness. Blending with black produces no change. Lighter Color: This mode is very similar to Lighten. This Blending Mode does not blend pixels. It only compares the base and blend colors, and it keeps the brightest of the two. __________________________ Contrast Blending Modes Overlay: This mode behaves like Screen in bright areas, and like Multiply in darker areas. The bright areas will look brighter and the dark areas will look darker. Soft Light: The effect depends on the density of the superimposed color. Using bright colors on the blending layer will create a brighter effect like the dodge modes, while dark colors will create darker color like the burn modes. Any color placed above white areas will appear white. Hard Light: Combines the Multiply and Screen using the brightness values of the Blend layer to make its calculations. Vivid Light: Vivid Light is an extreme version of Overlay and Soft Light. Anything darker than 50% gray is darkened, and anything lighter than 50% gray is lightened. Linear Light: Uses a combination Linear Dodge [Add] on lighter pixels and a Linear Burn on darker pixels. Pin Light: Pin Light is an extreme Blending Mode that performs a Darken and Lighten blend simultaneously. It can result in patches or blotches and completely removes all mid-tones.. Hard Mix: Adds the red, green and blue channel values of the blend color to the RGB values of the base color. If the resulting sum for a channel is 255 or greater, it receives a value of 255; if less than 255, a value of 0. Therefore, all blended pixels have red, green, and blue channel values of either 0 or 255. This changes all pixels to primary additive colors (red, green, or blue), white, or black. __________________________ Inversion Blending Modes Difference: Looks at the color information in each channel and subtracts either the blend color from the base color or the base color from the blend color, depending on which has the greater brightness value. Blending with white inverts the base color values; blending with black produces no change. Exclusion: Similar to Difference. Blending with white inverts the base color values, while blending with black produces no change. However, Blending with 50% gray produces 50% gray. Subtract: Looks at the color information in each channel and subtracts the blend color from the base color. In 8- and 16-bit images, any resulting negative values are clipped to zero. Divide: Looks at the color information in each channel and divides the blend color from the base color. With Divide, all colors are turned into a percentage. Blending with the same color results in white because any number divided by itself is 1, or 100%. __________________________ Component Blending Modes Hue: Creates a result color with the luminance and saturation of the base color and the hue of the blend color. Hue will not apply a change if the base layer is a neutral gray. Saturation: Creates a result color with the luminance and hue of the base color and the saturation of the blend color. Painting with this mode in an area with no (0) saturation (gray) causes no change. Color: Creates a result color with the luminance of the base color and the hue and saturation of the blend color. This preserves the gray levels in the image and is useful for coloring monochrome images and for tinting color images. Luminosity: Creates a result color with the hue and saturation of the base color and the luminance of the blend color. This mode creates the inverse effect of Color mode.
|
Layer Styles
Layer Styles allow you to apply different effects, such as shadows, glows, and bevels to objects on layers to change the appearance of its contents in a non-destructive manner.
Layer effects are linked to the layer contents. When you move or edit the contents of the layer, the same effects are applied to the modified contents. Say, if you apply a drop shadow to a text layer and then add new text, the shadow is added automatically to the new text.
A layer style is one or more effects applied to a layer or layer group. You can apply any preset styles in Photoshop or create your custom style using the Layer Style dialog box.
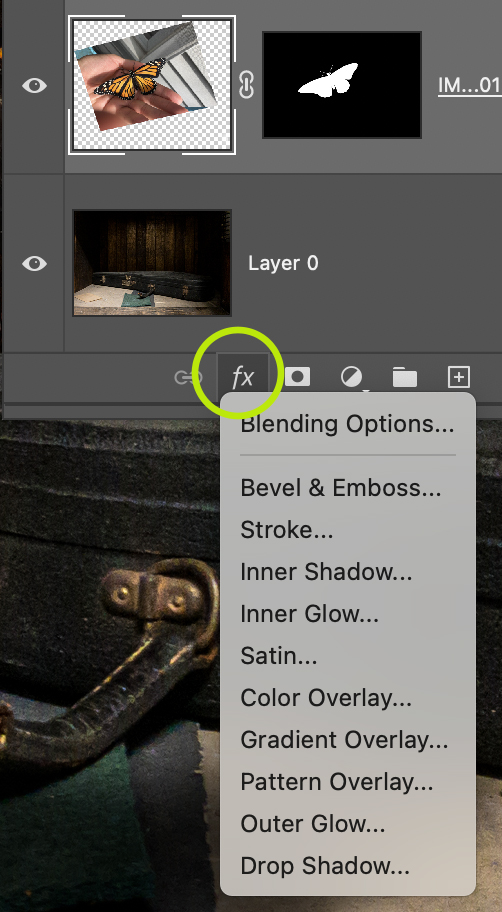
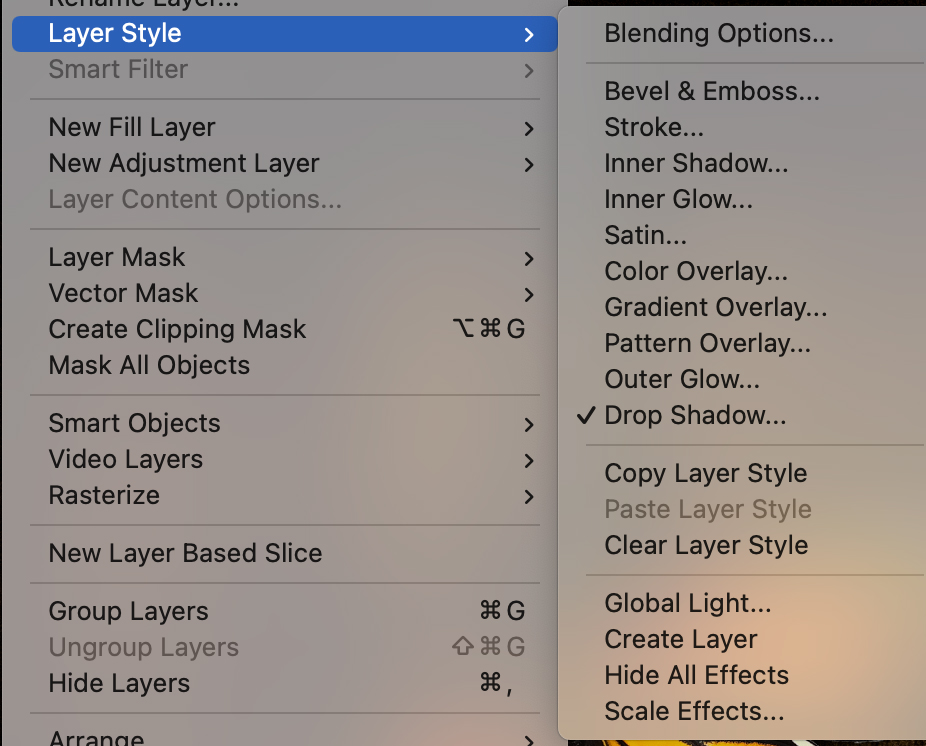
Layer Styles can be applied from the Menu bar; Layer > Layer Style, or they can be applied using the shortcut [fx] icon [Figure 7.6] at the bottom of the Layers panel to any pixel or vector-based layer. You can also double-click on a layer to open the Layer Style dialog box, and then choose the desired style[s]. Many versions ago styles used to be called Layer Effects, hence the fx shortcut.
To apply a Layer Style to a layer, begin by choosing the layer that you want to apply the style to and then use one of the methods listed above to choose the desired effect. When you do so a dialog box will appear with the selected style highlighted and the options available for that style as seen in Figure 7.7 below. You can add additional styles to a layer by checking one of the boxes on the left for the additional desired style. If you check a box the options will not automatically show because the style name will not be highlighted for the newly added effect, so be sure that you pay close attention to the options.
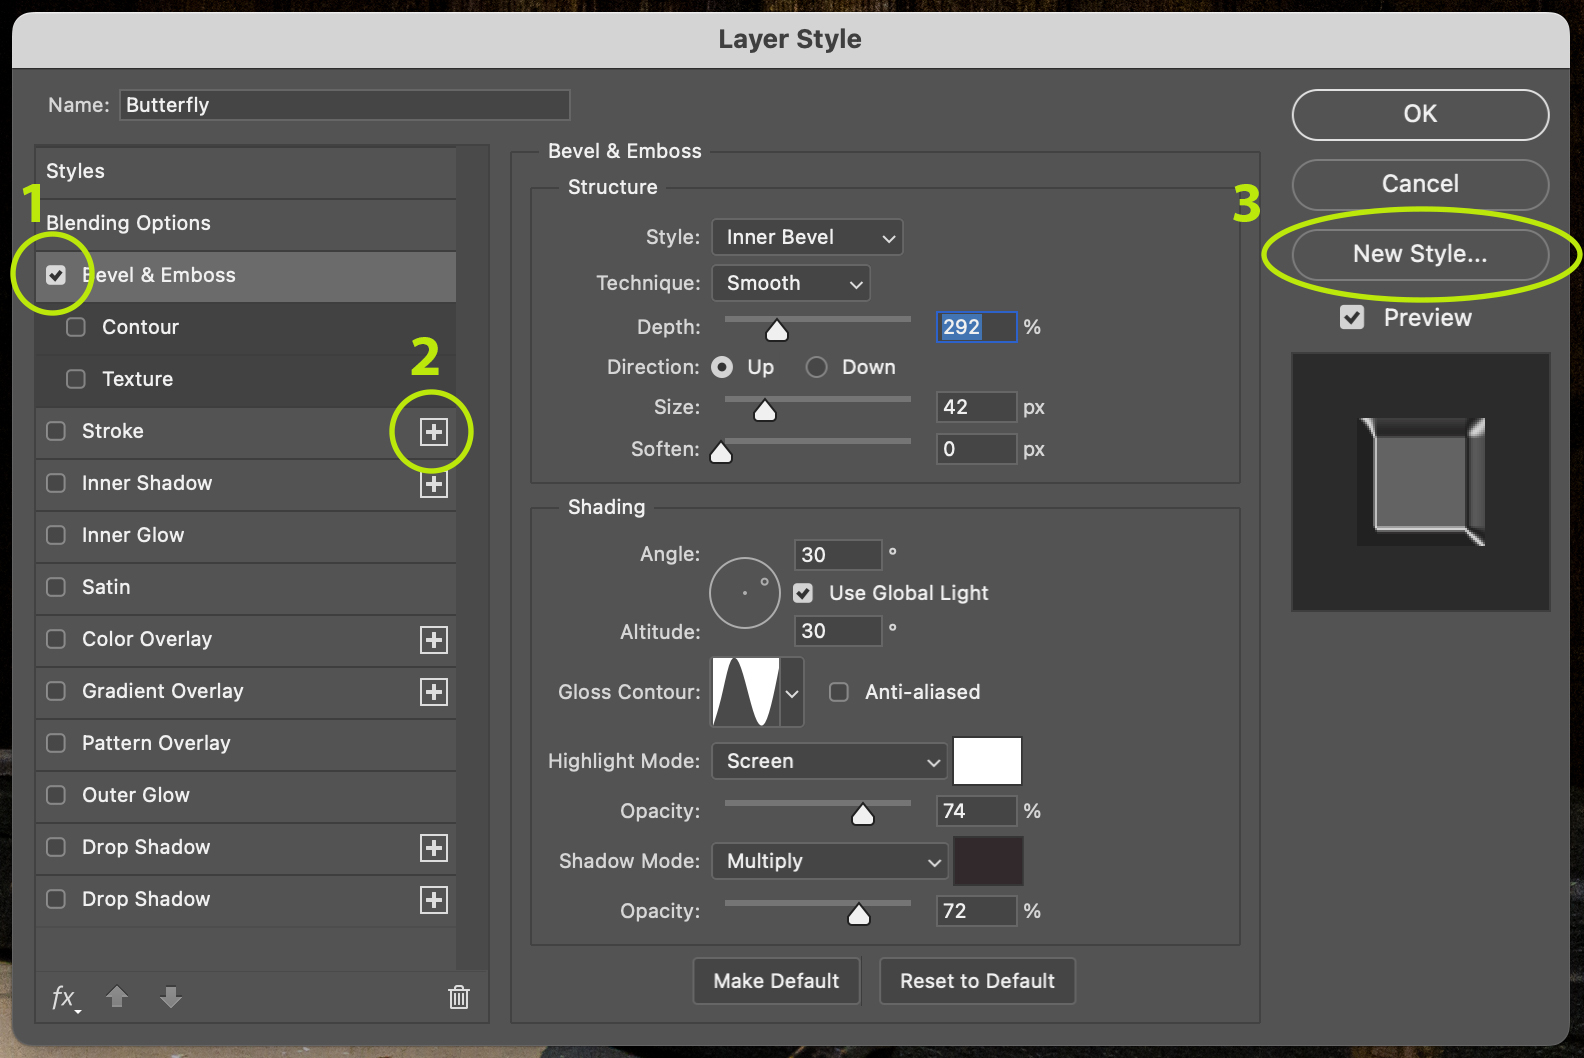
The Layer Style Dialog Box
- Styles: The available styles will appear on the left side of the dialog box and can be added, or stacked with other styles by checking the boxes on the far left.
- Duplicate Styles: You can duplicate the styles that have a [+] symbol on the right to stack styles with multiple variations,.
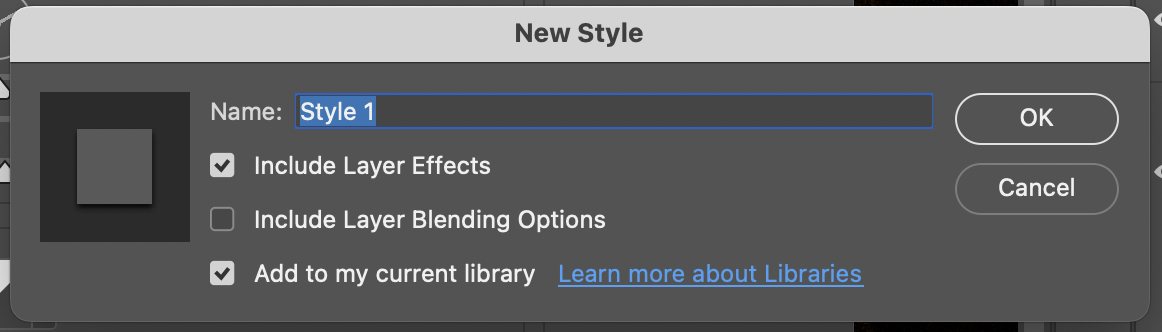
- New Style: You can save [Figure 7.8 & 7.9] the currently selected style to your Library for repeatable results on other images.
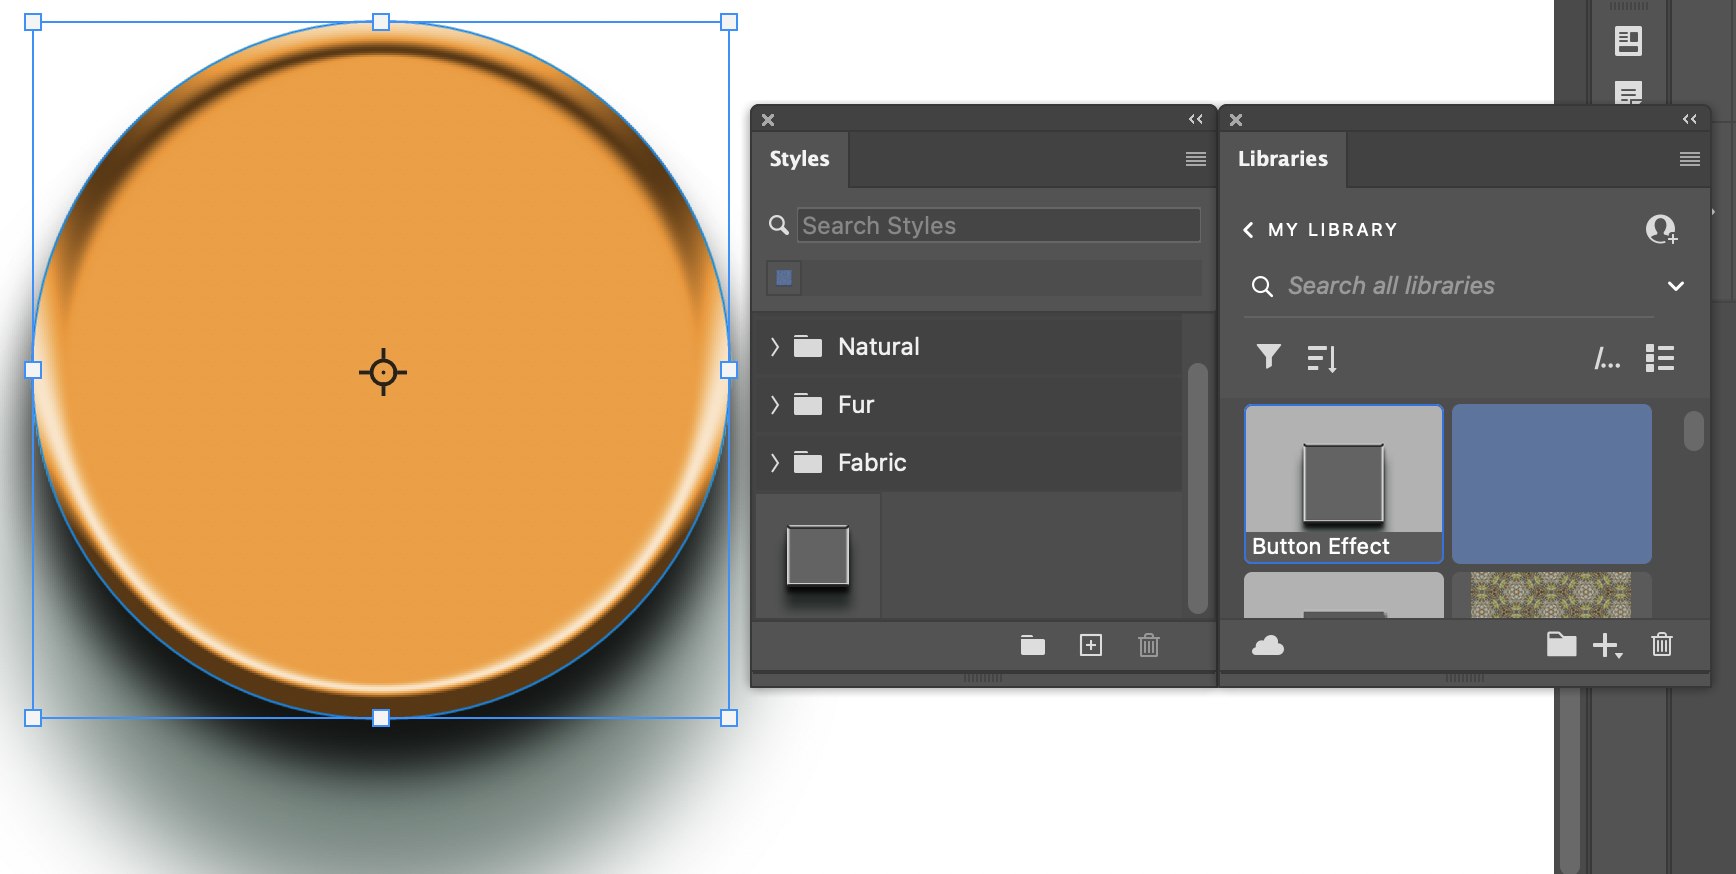
When you Create a new Style it will be available as a Preset in the Styles and Libraries panel [Window > Styles / Libraries], and can be applied to other image layers with a single click. A style of a Bevel and Emboss and two Drop Shadows was saved and named “Button Effect”. It is now available in the Styles and Libraries panels. To apply this same style to another image. or layer, I just need to select the desired layer and then click on one of the saved Presets .
As a reminder, Libraries are saved to the cloud and may be available in other Adobe apps that have compatible effect options
In addition to saving Styles; you can copy, hide, scale and turn them into their own layers [Create Layer] for additional creative effects. The menu in Figure 7.10 is accessible from the Layer menu, and from a right-click on the layer style applied to a layer.
A shortcut to copying a Layer Style is OPT / ALT + drag the fx style icon from one layer to another.
Advanced Blending Options
Blending Options is one of the selectable options available in the Layer Style dialog box, and are a great way to visually blend or combine layers together. They are capable of making creative composites in a single click, but are easily overlooked.
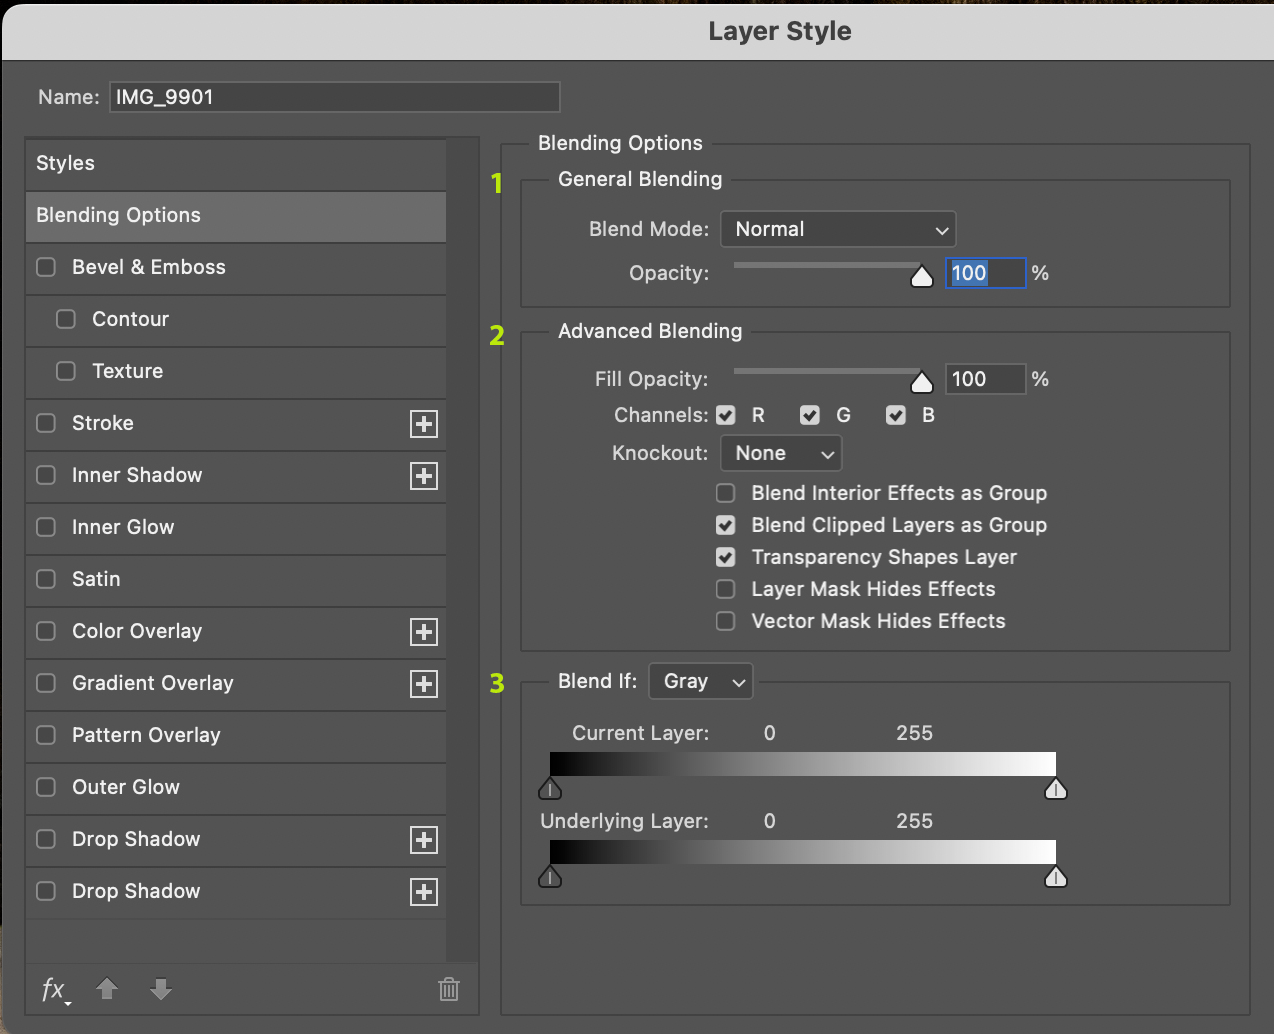
Blending Options are broken up into three-sections: General, Advanced and Blend If.
1] General Blending: These options are the same Blend Modes and Opacity that are found in the Layers panel. A change to one or both of these options here will be reflected in the. Layers panel for the selected layer. Changes to these setting in the Layers panel will also be reflected here.
2] Advanced Blending:
- Fill Opacity: Similar to the General Blending options, this option is also found in the Layers panel. The Fill Opacity affects the opacity of the pixels or vectors only, but does not affect the opacity of any applied Layer Styles. Unlike the Opacity slider which affects the opacity of pixels, vectors, and styles.
- Channels: You can restrict blending effects to a specified channel when you blend a layer or group. By default, all channels are included. For example, you can choose to exclude the Red channel from blending; in a composite image by unchecking it so only the information in the green and blue channels is affected.
- Knockout: There are three Knockout options None [default], Shallow, and Deep. Choose Shallow to knock. out to the first possible stopping point such as the first layer after a layer group, or the base layer of the clipping mask. Choose Deep to knock out to the Background layer. If there is no Background layer, it will know out to transparency.
- Transparency Shapes Layers restricts layer effects and knockouts to opaque areas of the layer. Deselecting this option, which is always selected by default, applies these effects throughout the layer.
- Layer Mask Hides Effects is used to restrict layer effects to the area defined by the layer mask.
- Vector Mask Hides Effects restricts layer effects to the area defined by the vector mask.
3] Blend If: This option allows you to blend based on colors within the layer, and there are four options to choose from: Gray, Red, Green and Blue. Choose Gray to specify a blending range for all channels. Choose a color option of Red, Green, or Blue to specify a blending range for those individual color channels.
- Current Layer: Adjustments made will affect the blending of the Shadows and/or Highlights of the currently selected layer.
- Underlying Layer: Adjustments made will affect the blending of the Shadows and/or Highlights of the layer under the currently selected layer.
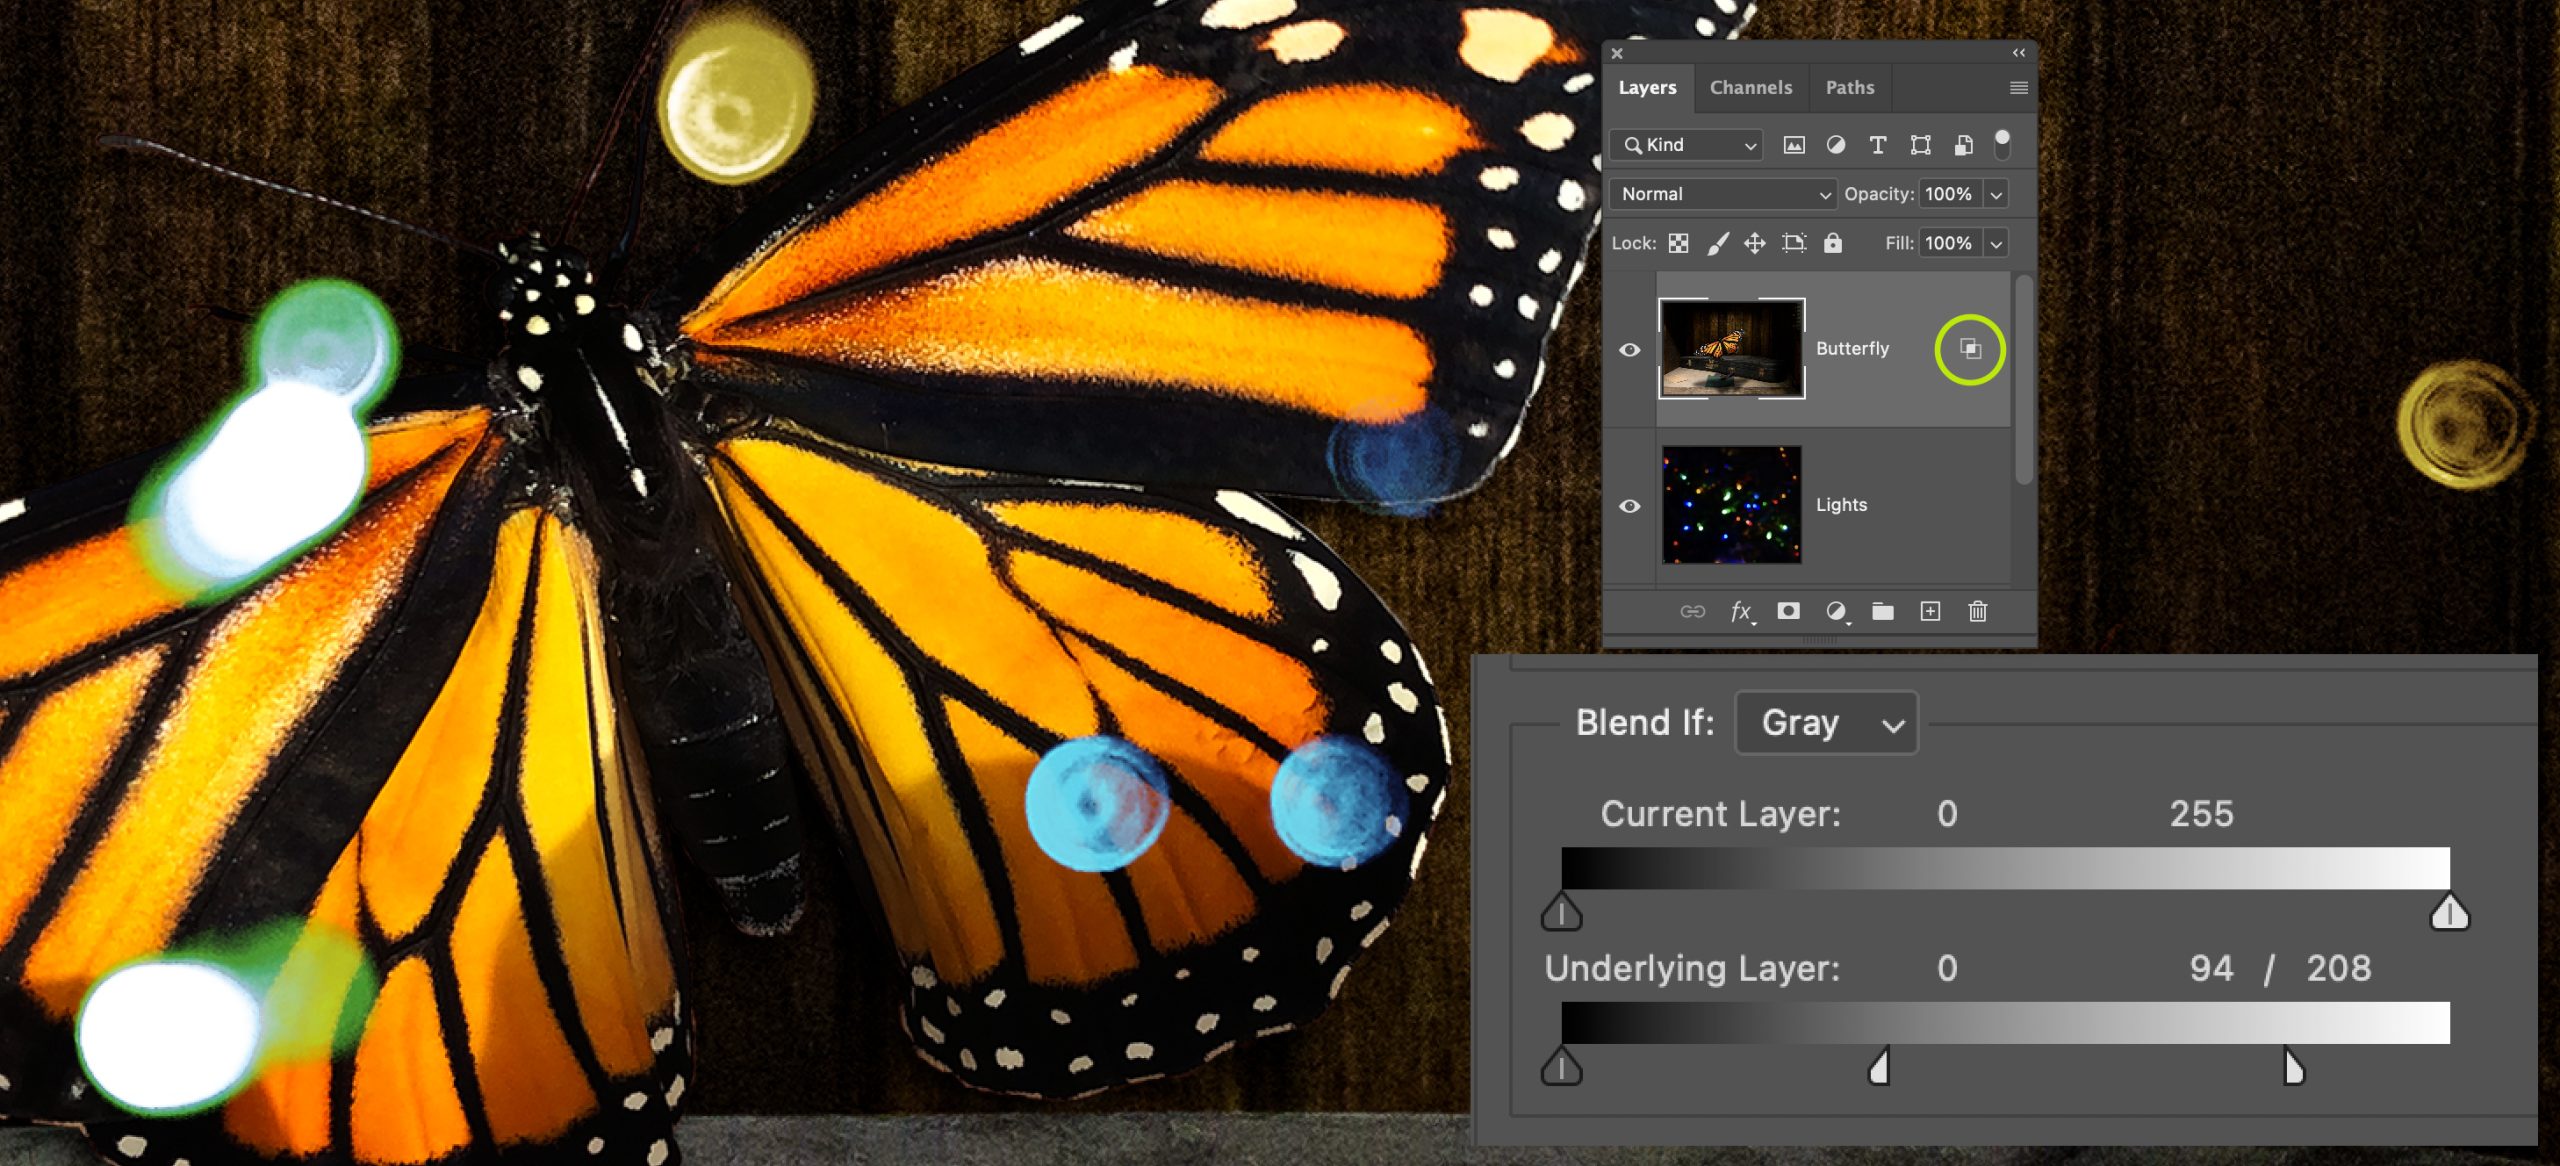
Blend If
Adjustments are made to the tonal range from 0 [blacks/shadows] – 255 [whites/highlights] for the Current or Underlying layers. Drag an arrow left or right to remove shadow or highlight pixels from a layer to reveal the layer[s] below [Current Layer] or bring shadow or highlight pixels forward [Underlying Layer]. The value that an arrow is dragged to, designates the amount the tonal range will erase or reveal. The arrow slider can be split to make finer blends between a transitioning range of tones by separating an arrow. Use the OPT / ALT key and drag either the left or right half of an arrow. to separate it as seen in Figure 7.12 below..
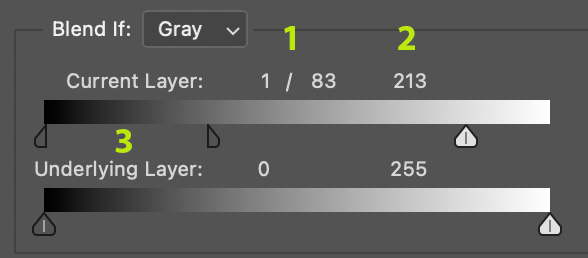
- The Blacks / Shadows arrow is separated producing two values 1 / 83. The value on the left [1] indicates the tones that are visually erased, and the value on the right [83] is the transitional range that works like a gradient to produce a smoother blend.
- The Whites / Highlights arrow is moved towards the left to the 213 position indicating that all pixels from 213 to 255 have been visually erased.
- The OPT / ALT key was used to drag the right half of the arrow further away to create a smoother blend. Note the thin line between each arrow.
Current Layer Blend
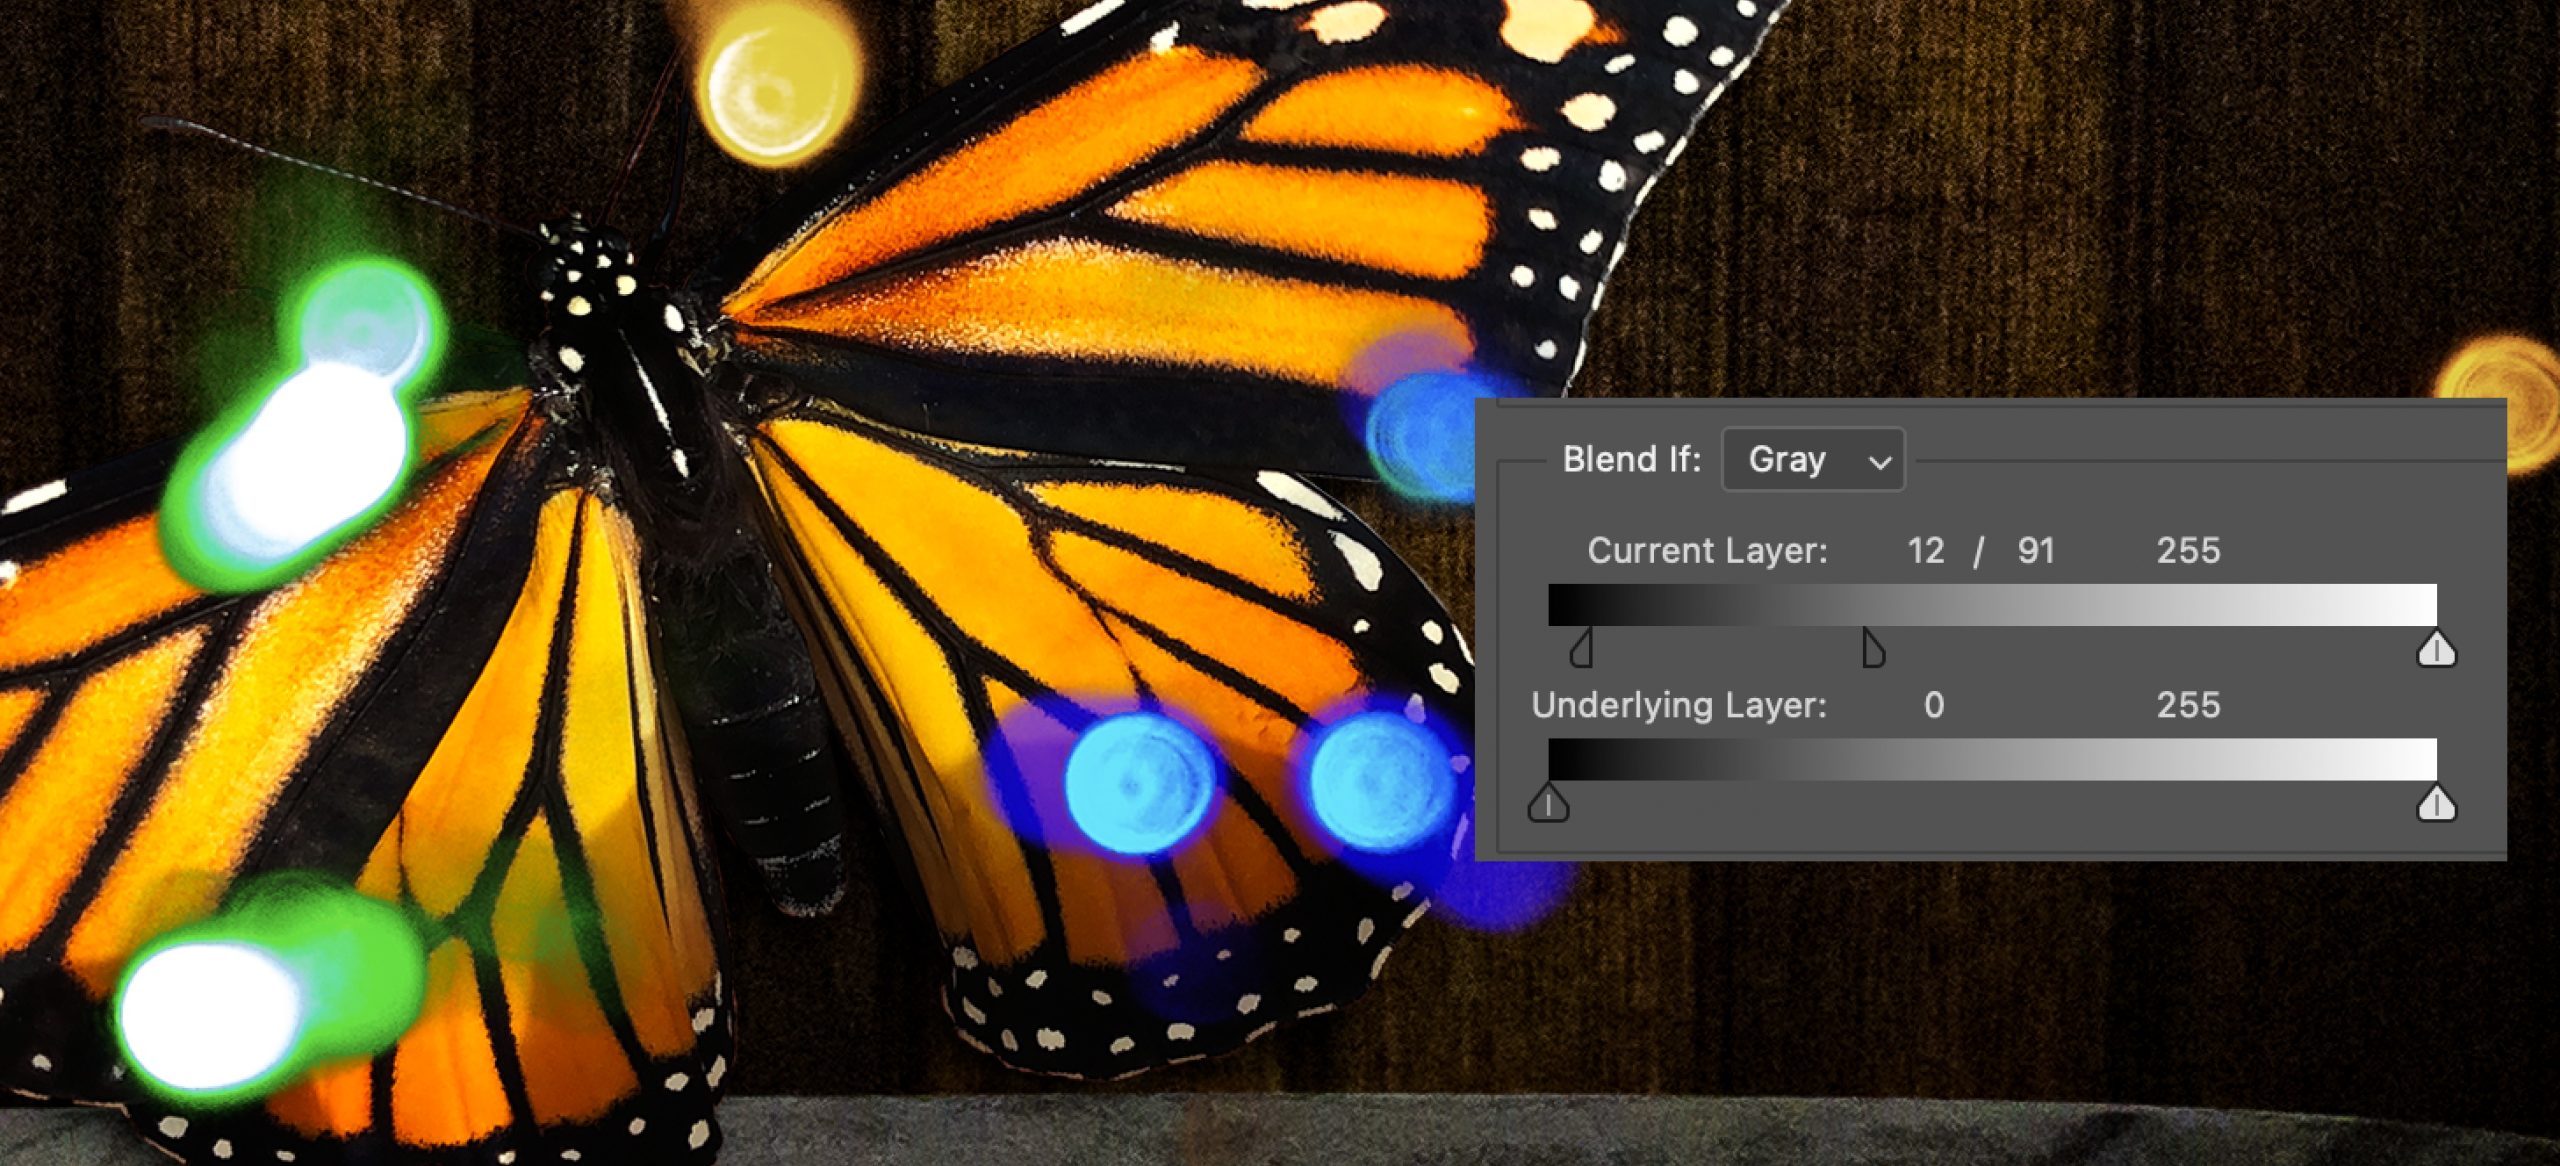
In Figure 7.13 is an example of the Current Layer option being used to remove black pixels from a photo of holiday lights against a black background. The Blacks slider was moved to the 12 value indicating that any pixels between 0 – 12 in value will be visually erased. Notice how pixelated the black edges around the color lights appears because not all of the pixels have been hidden. I could try to resolve this concern by moving the slider further to the right, but I’m keeping it here so you can see the edges. I want a smoother transition between so I will use the OPT / ALT key to separate the arrow and push the right half further to the right to erase more without the need of making selections or masking.
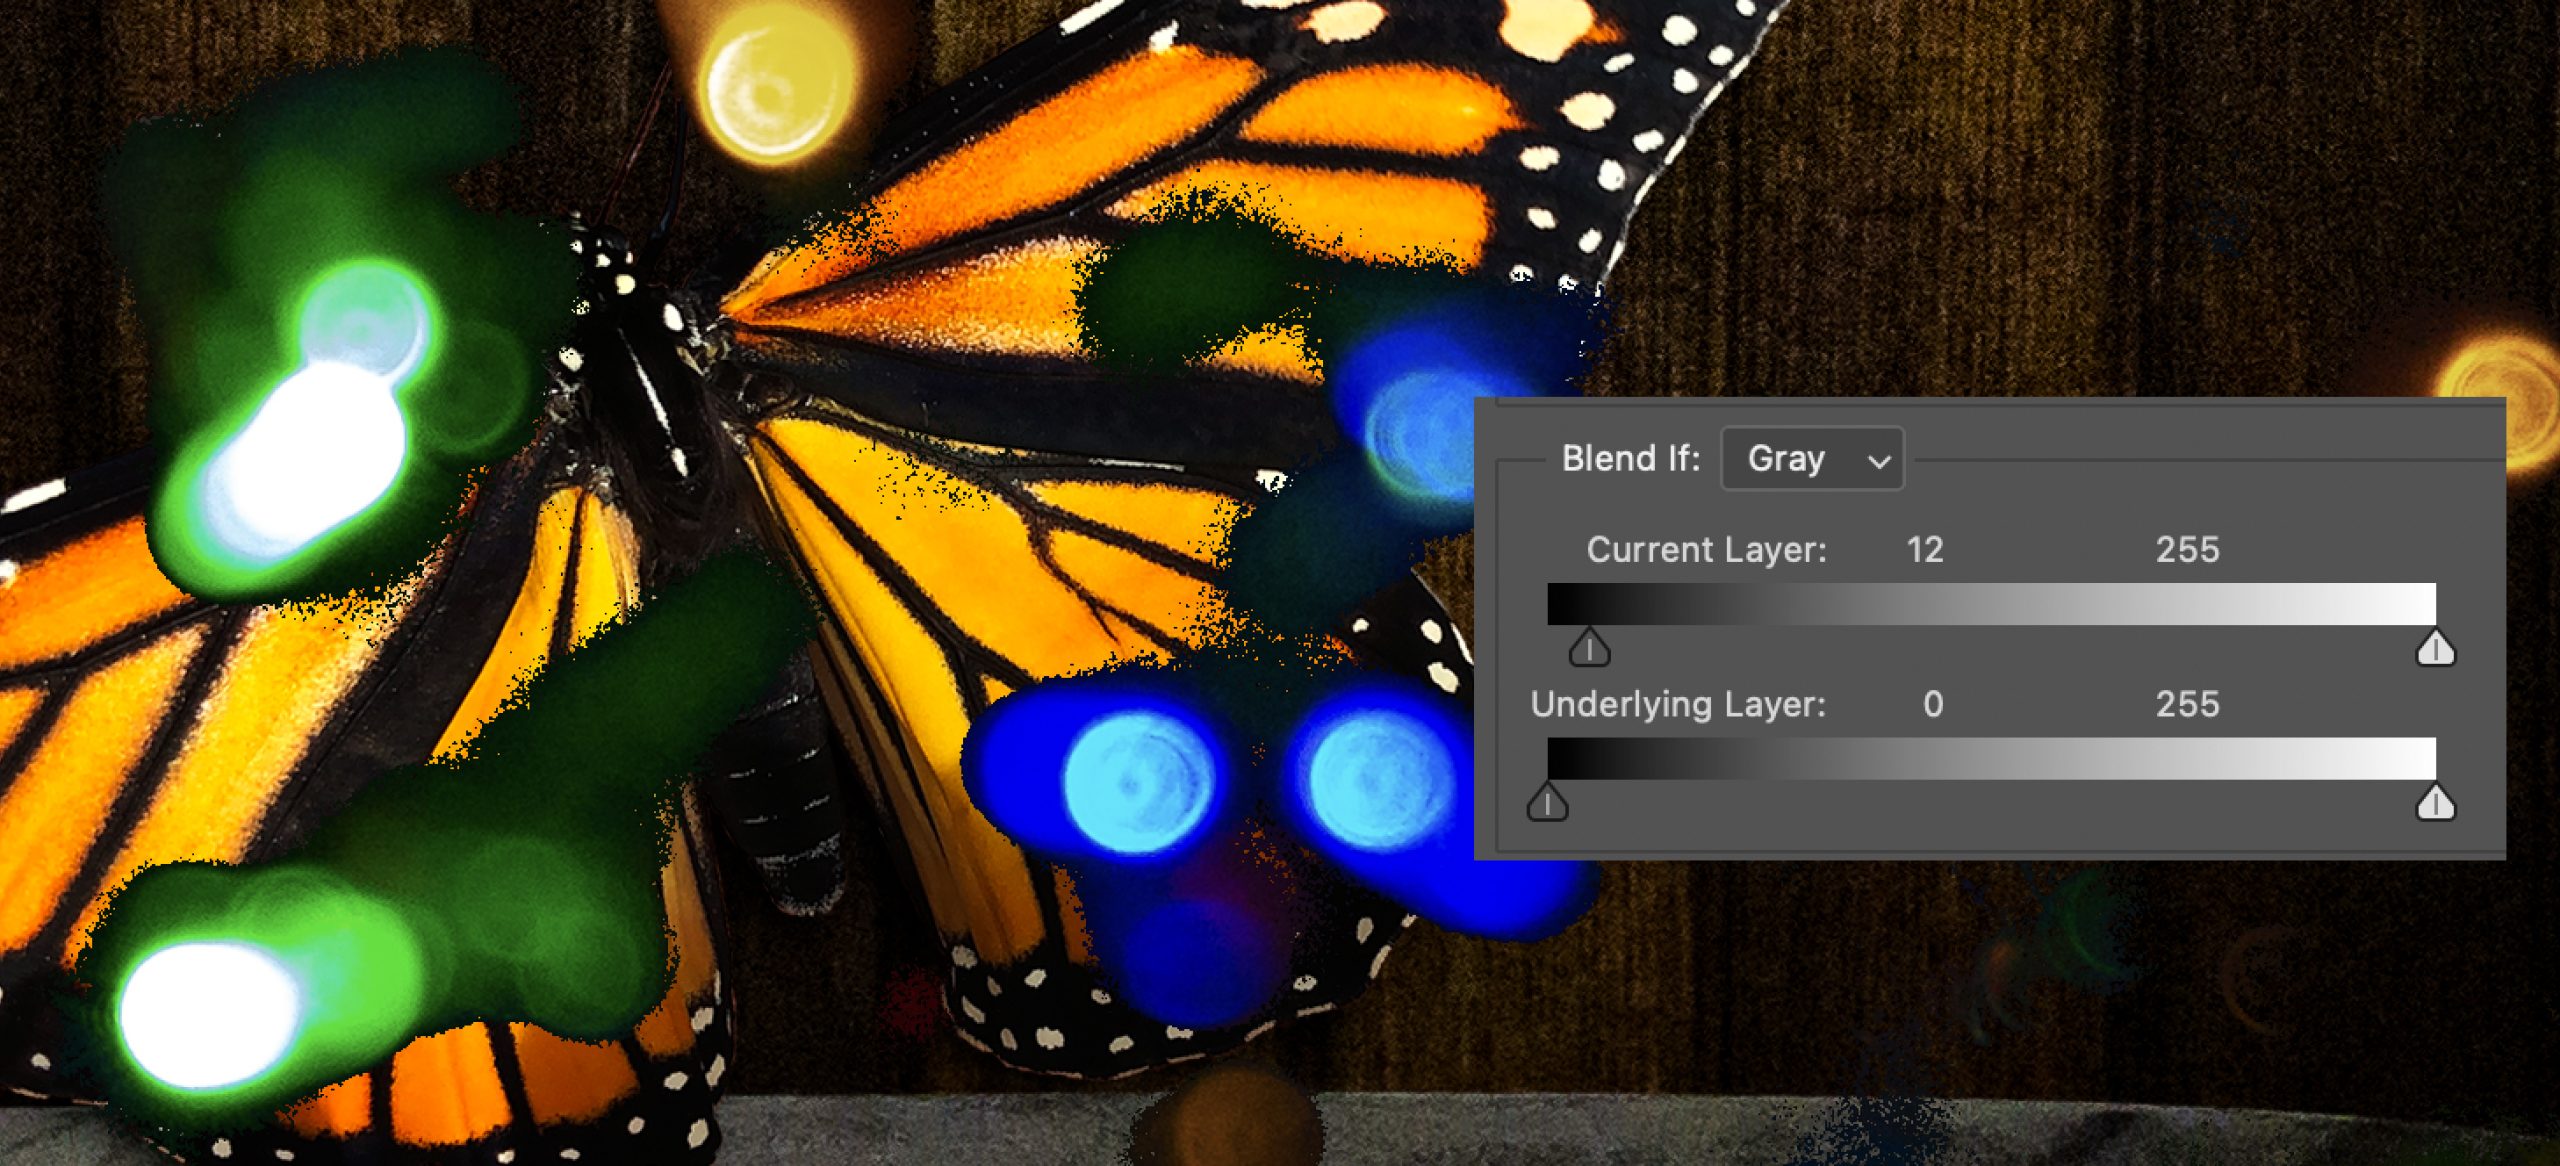
In the FIgure 7.14 the arrow was Blacks arrow was split leaving the left half at the 12 position, but moving the right half to the 91 value, which then. hides more of the black pixels and simultaneously creates a smoother blend.
On the reverse, you can also use the Underlying Layer sliders to bring pixels from the layer below the selected layer forward as seen in Figure 7.15. The layer order was switched so the lights were placed behind the Butterfly layer only to demonstrate how this option works.. The Whites/Highlights slider was then dragged to the 208 value, separated with the OPT / ALT key, and the left half was moved to the 94 value.
Regardless of how you approach this technique, you will know that the Blend If option was used because the layer with the adjustment will have an icon of two overlapping squares [circled below] on the right side of the layer.