3 Masking Concepts
In my years of teaching Photoshop I have always said to students that if they think of Ps in black & white it will really help them to simplify this complex application. This statement originates from a time when I started working in Ps with version 2.0 which predated Layers that were introduced years later in v3. Back in those days you had to copy and paste from one image into another and precisely place the image where you needed it to be; and if you needed to layer effects like adding a drop shadow, that would need to be added before the second image were pasted in place. Did I mention that there was also only one Undo?! The History panel was not added until version 4. In addition to this calculated way of working I had relied heavily on Channels for various operations such as making selections, masking and color correcting, as Color management was not introduced into Ps until v5.
That was a brief history of Photoshop but how does it relate to thinking of Ps in b&w to master it? The answer is Channels. Photoshop’s individual [RGB] color Channels, are shown by default in black & white although you could change them to display in their respective RGB or CMYK color through Preferences, but an understanding of how they work may have an impact on mastering masking.
You have probably learned how to use Layer Masks to make local edits with Adjustment Layers, masks with Pixel Layers to create composites, and were probably taught the associated phrase of White Reveals, Black Conceals. This phrase translates directly to Channels and this section will dive deeper into these concepts to help you better understand masking and fine tuning selections.
Layer Masks
I will begin this section with a brief review of Layer Masks, as there are various ways to create and use layer masks in Photoshop from making local adjustments, or compositing layers, and this section will be a refresher on some of the techniques that you may have previously learned.
Layer Masks with Adjustment Layers
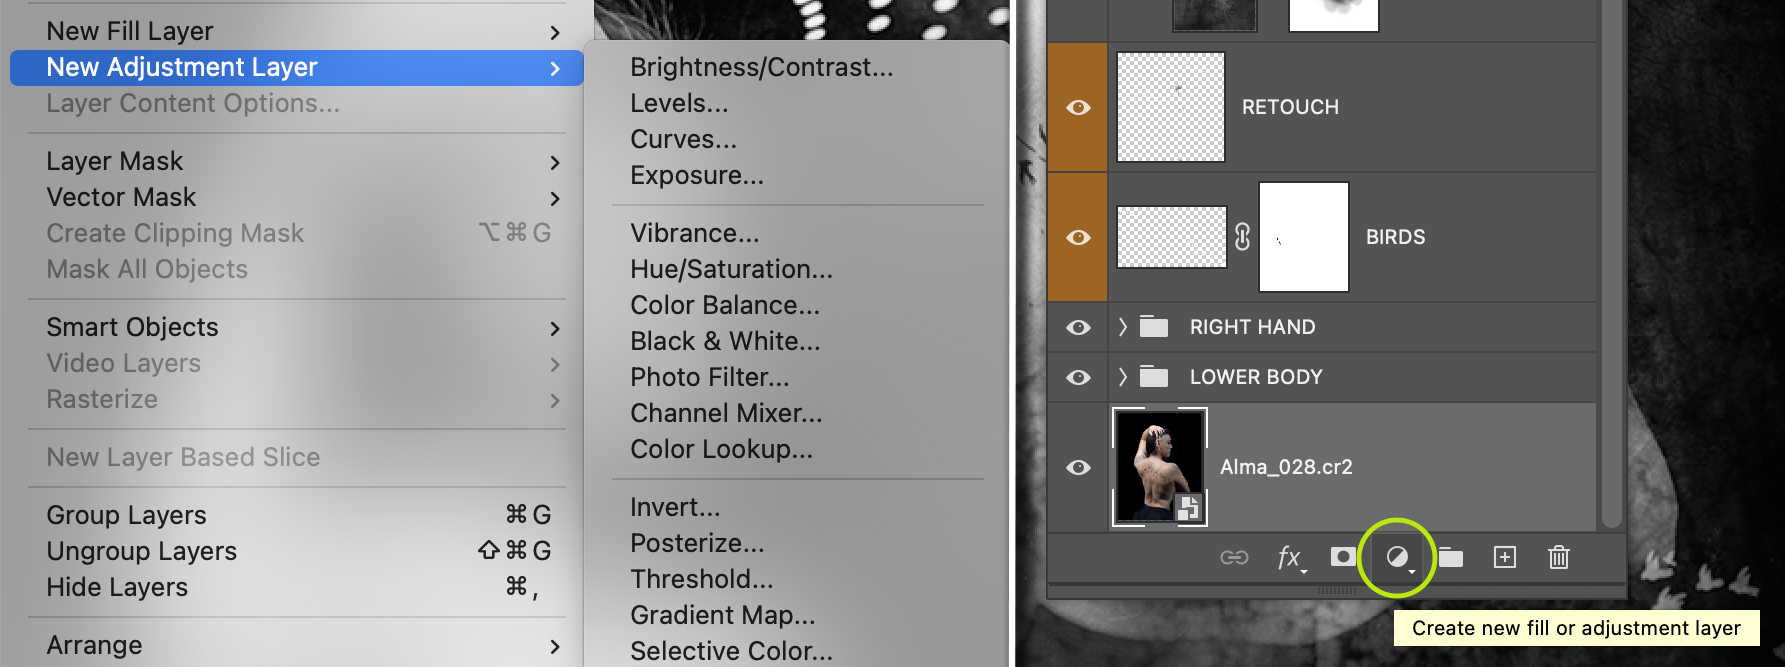
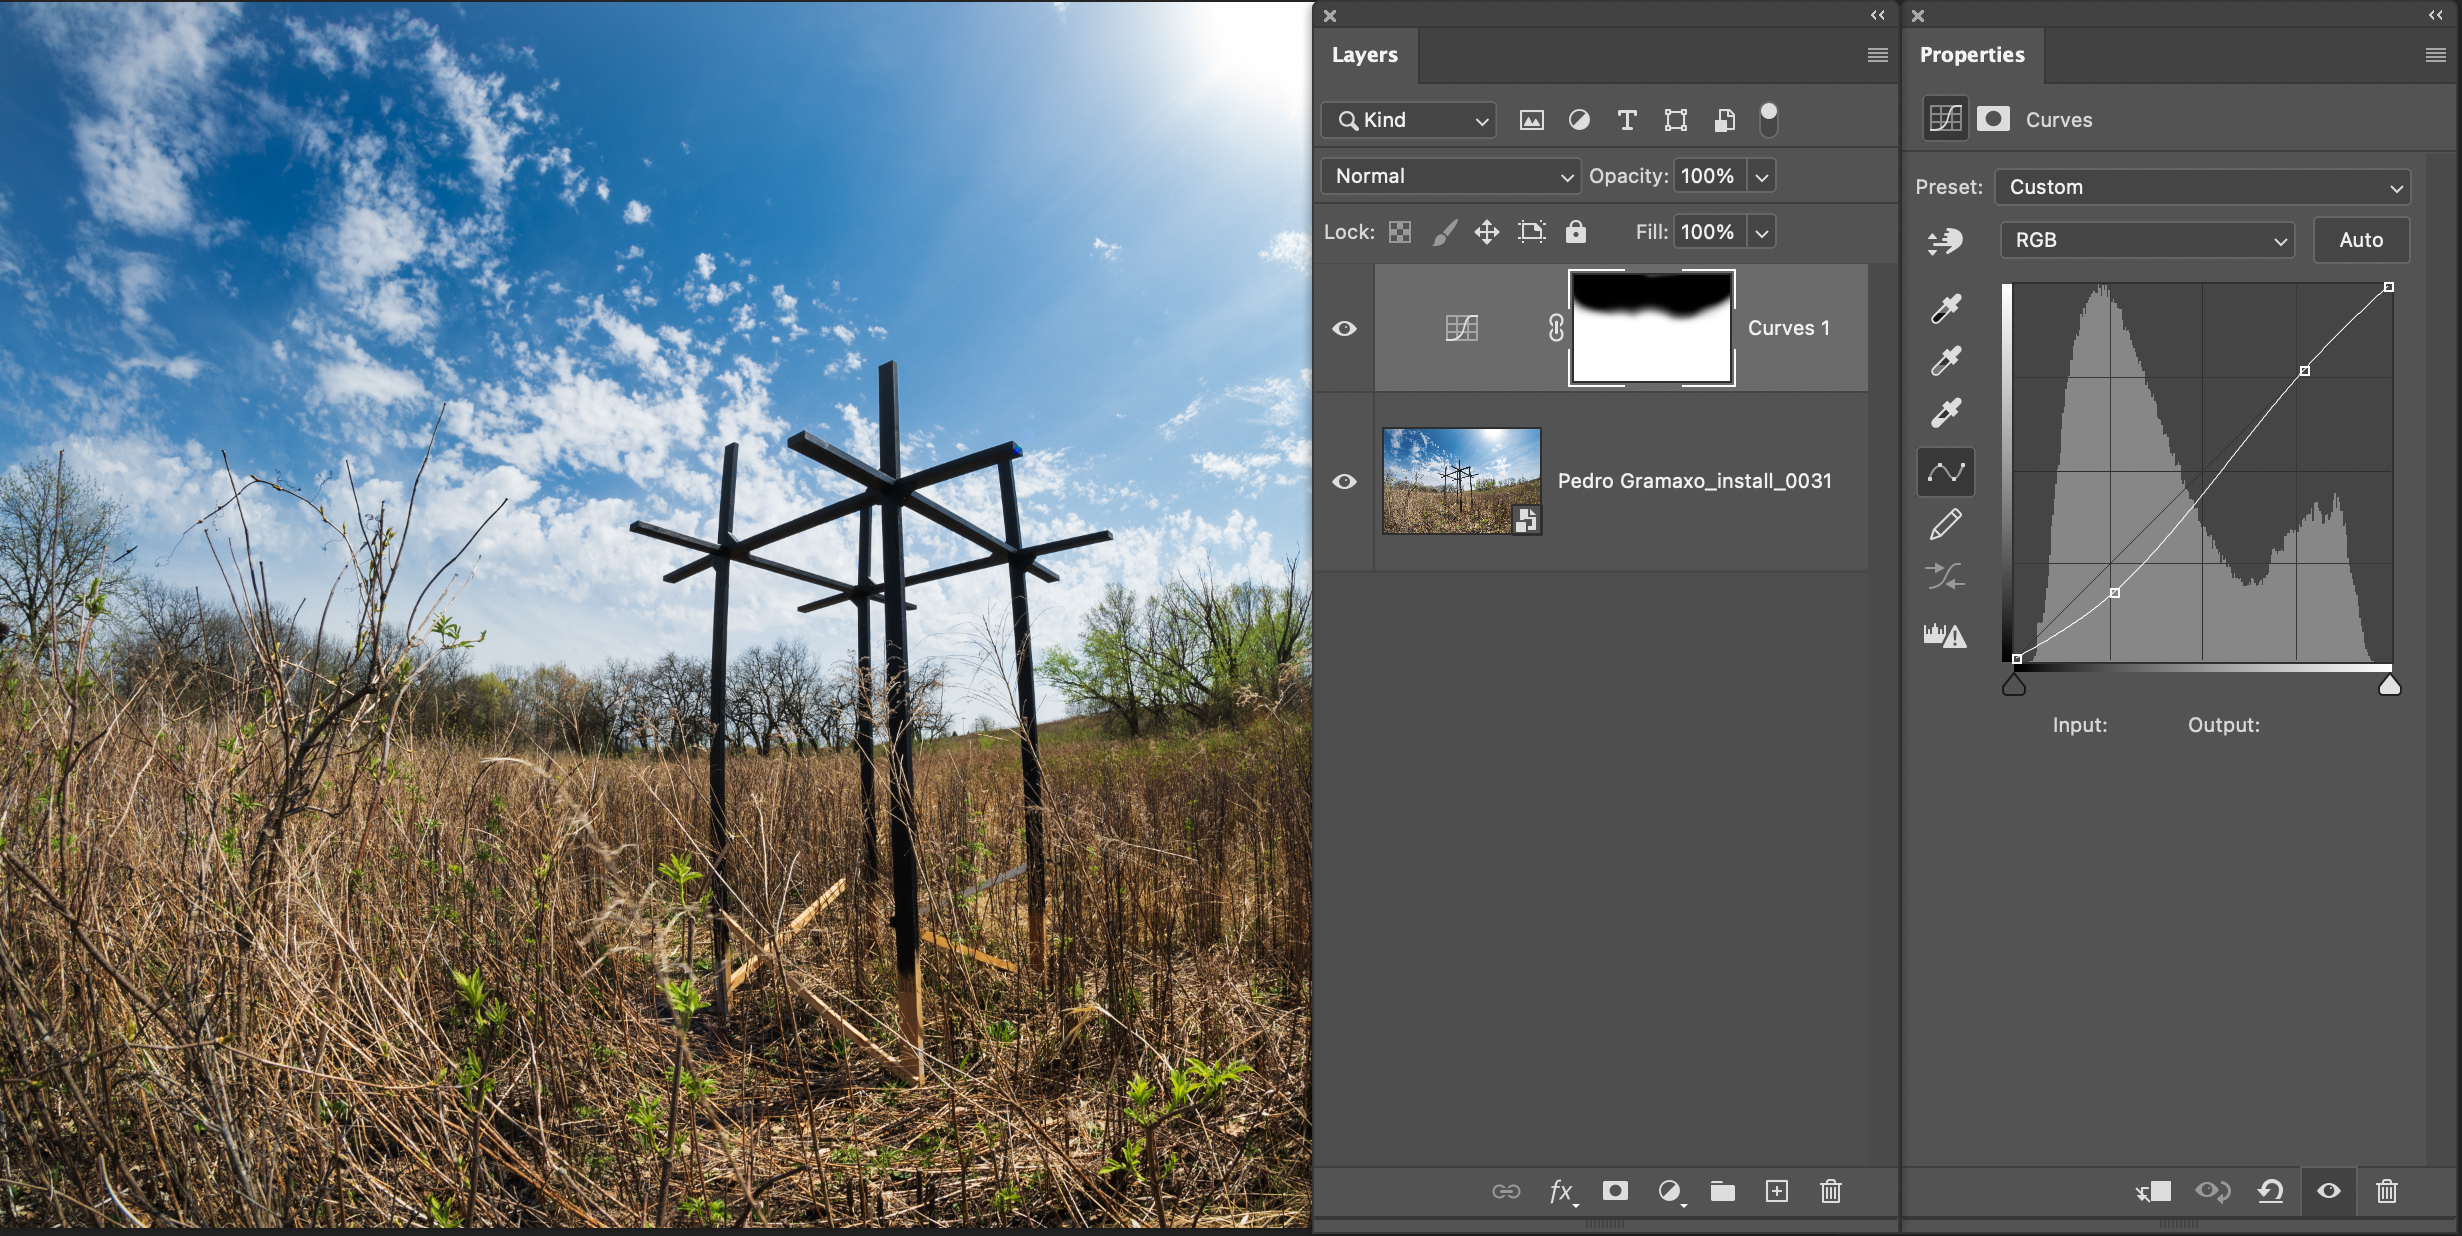
Adjustment Layers can be added via the Layer menu or from the shortcut located at the bottom of the Layers panel as shown in Figure 3.2. The shortcut on the Layers panel includes both the New Fill Layer, as well as the New Adjustment Layer options which are a separate line items in the Layer menu.
When you add a new fill or adjustment layer to an image a Layer Mask will automatically be created to allow you to make local adjustments to a photo as seen Figure 3.3. The mask is a solid white color by default [White Reveals], which shows the areas that are affected by the adjustment, or the areas where the adjustment is revealed. You can use any painting, or selection tool with a fill that allows you to add black to the mask [Black Conceals], which will hide, or erase the adjustment. The benefit of the layer mask is that you are not making a permanent adjustment, so you can use any of the tools that allow you to add colors to paint or fill a white area with black, or a black area with white, and you can paint over the areas while varying the tool opacity if necessary to get the exact look you are going for.
In contrast to the default white mask, you can fill the mask with black using the Paint Bucket Tool [G] to erase the entire adjustment, and then paint with white to apply the adjustment only to the areas that you desire. You can use the fill shortcuts of OPT / ALT + Delete to fill with the Foreground Color or CMD / CTRL + Delete to fill with the Background Color, or you can use the Invert command [CMD / CTRL + I] or the Invert button in the Properties panel for the Mask as described below. The default colors are black for the Foreground and white for the Background, but you can also use the X key to switch them which comes in handy when painting masks and you want to alternate between the two colors.
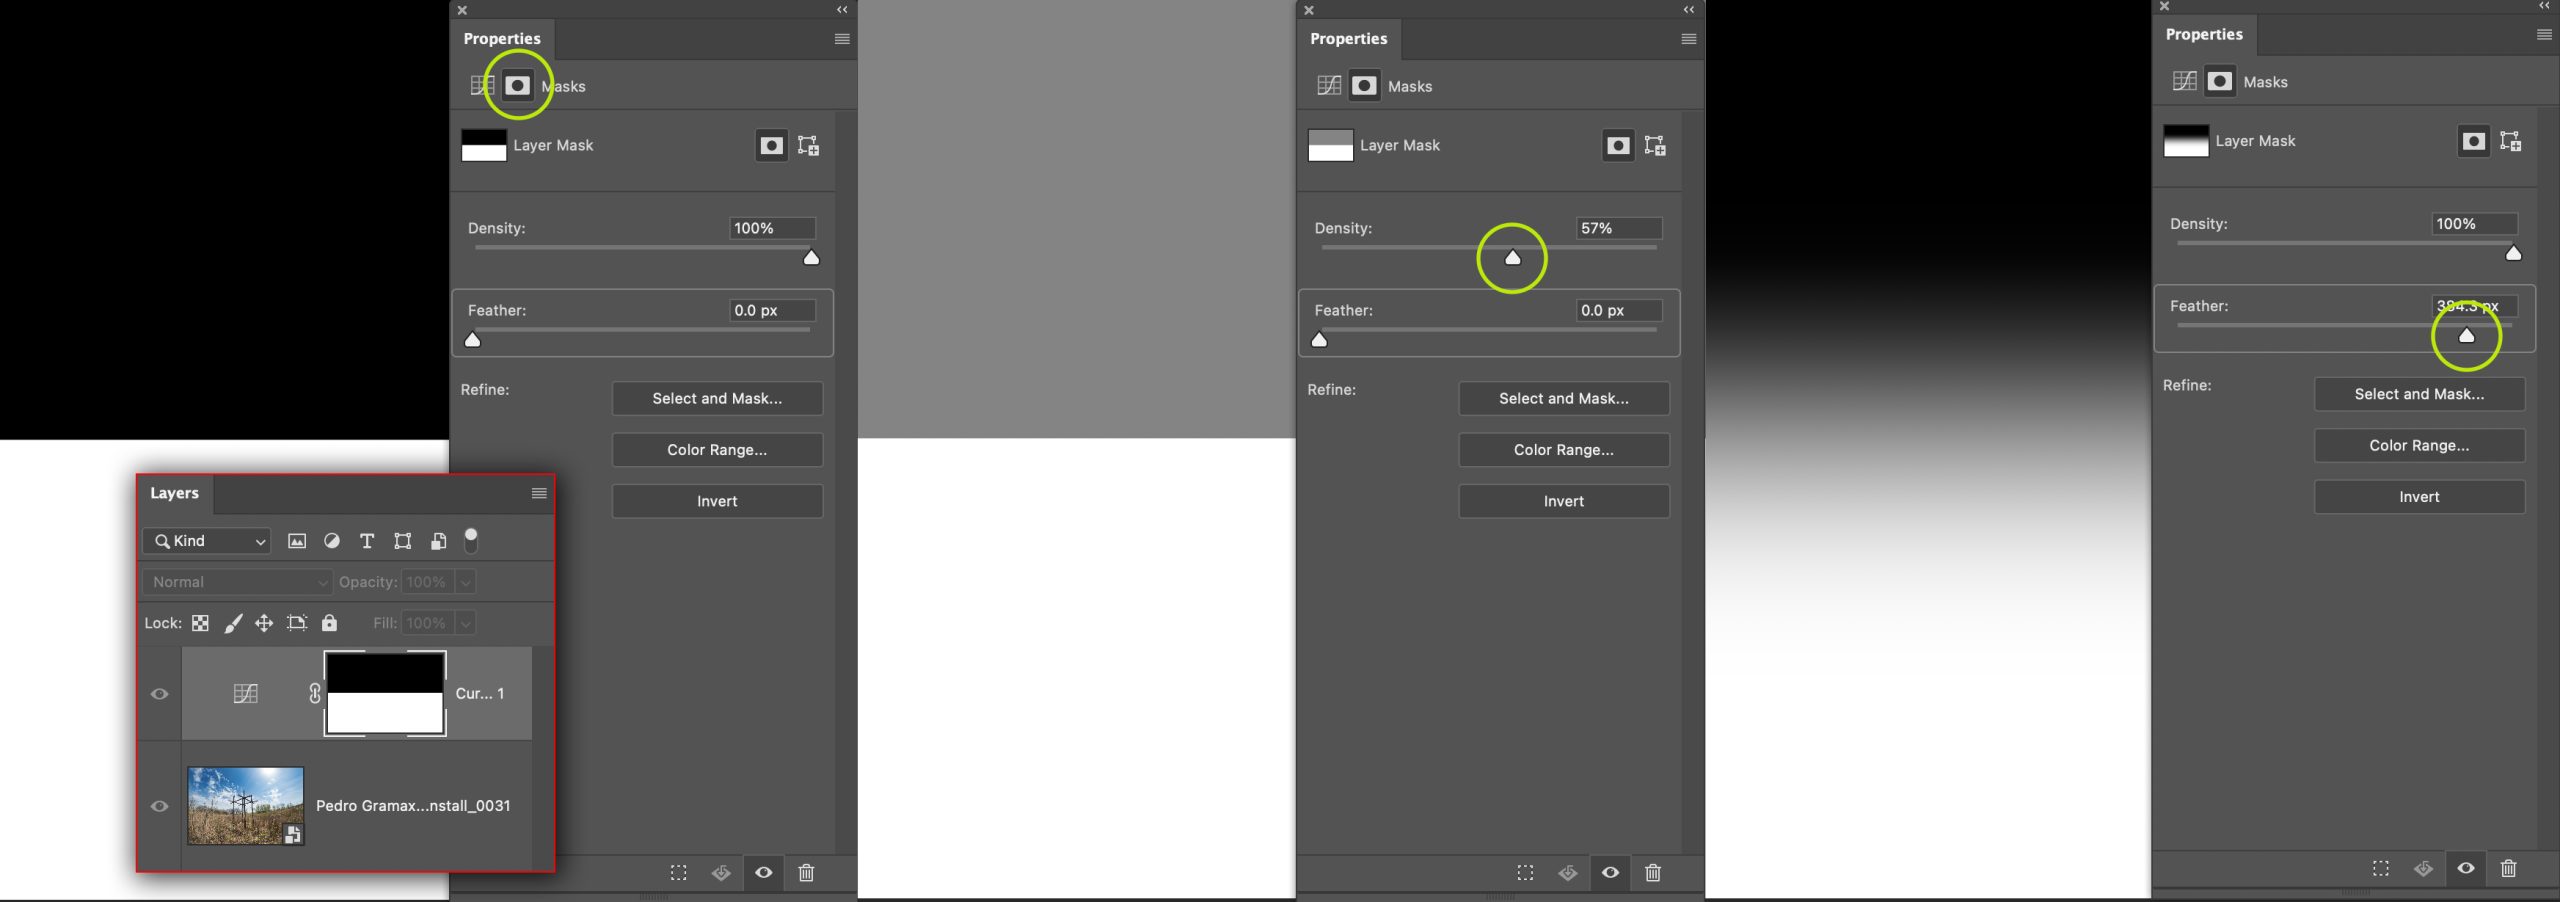
The use of white or black on a mask is the most extreme uses of the two colors and are the most direct to reveal or hide adjustments, but it is also important to understand that gray values between these two also play an important role as they can be used to create a gradient or smooth transition between the two colors. The Gradient Tool [G] will create smoother transitions with greater distances between black and white, the selection tools will create hard edges but you can either feather the selection or apply a blur to smooth them, and you can decrease the feathering of a brush to soften its edges. Alternately, you can use the Feather slider in the mask Properties panel to soften the edges as seen in Figure 3.4.
The Mask Properties Panel
When working with an Adjustment Layer you can use the Properties panel to toggle views between the adjustment and the mask by clicking one of the two icons on the upper left under the word Properties. The Density slider will affect all tones other than white. The Feather slider will soften the edges of any tones other than white. The Select and Mask refinement button will open the Select and Mask window to allow for additional adjustments to the mask. The Color Range button will open the Color Range dialog box for additional adjustments. The Invert button will swap light for dark tones, or will change white to black and so on. You can also Load Selection from Mask, Apply Mask, Disable / Enable Mask, or Delete Mask using the icons at the bottom of the Properties panel.
Layer Masks with Pixel Layers
In addition to using Layer Masks with Adjustment Layers to add local, or global, adjustments, you can also add masks to Pixel Layers to erase portions of an image without permanently erasing pixels. This is magical when it comes to a non-destructive workflow because you can “erase” pixels, but then bring them back at any point in the workflow. This also happens to be the only way to remove pixels with a Smart Object Layer while retaining all editing functions.
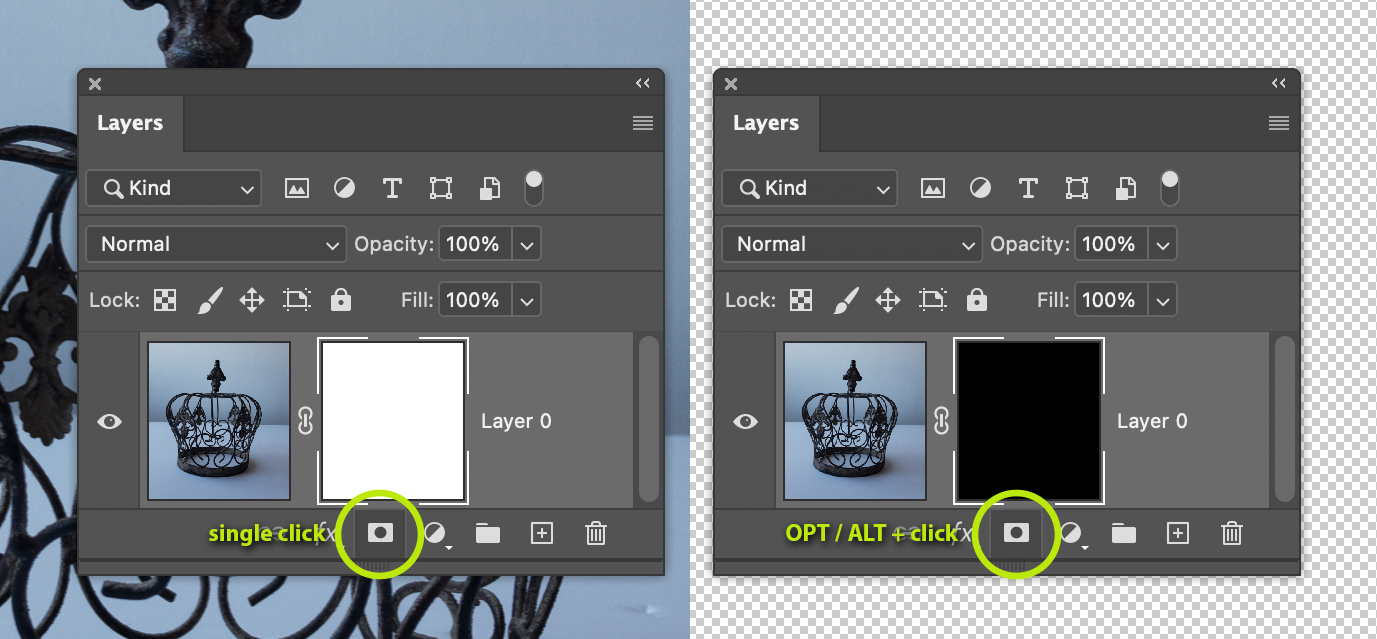
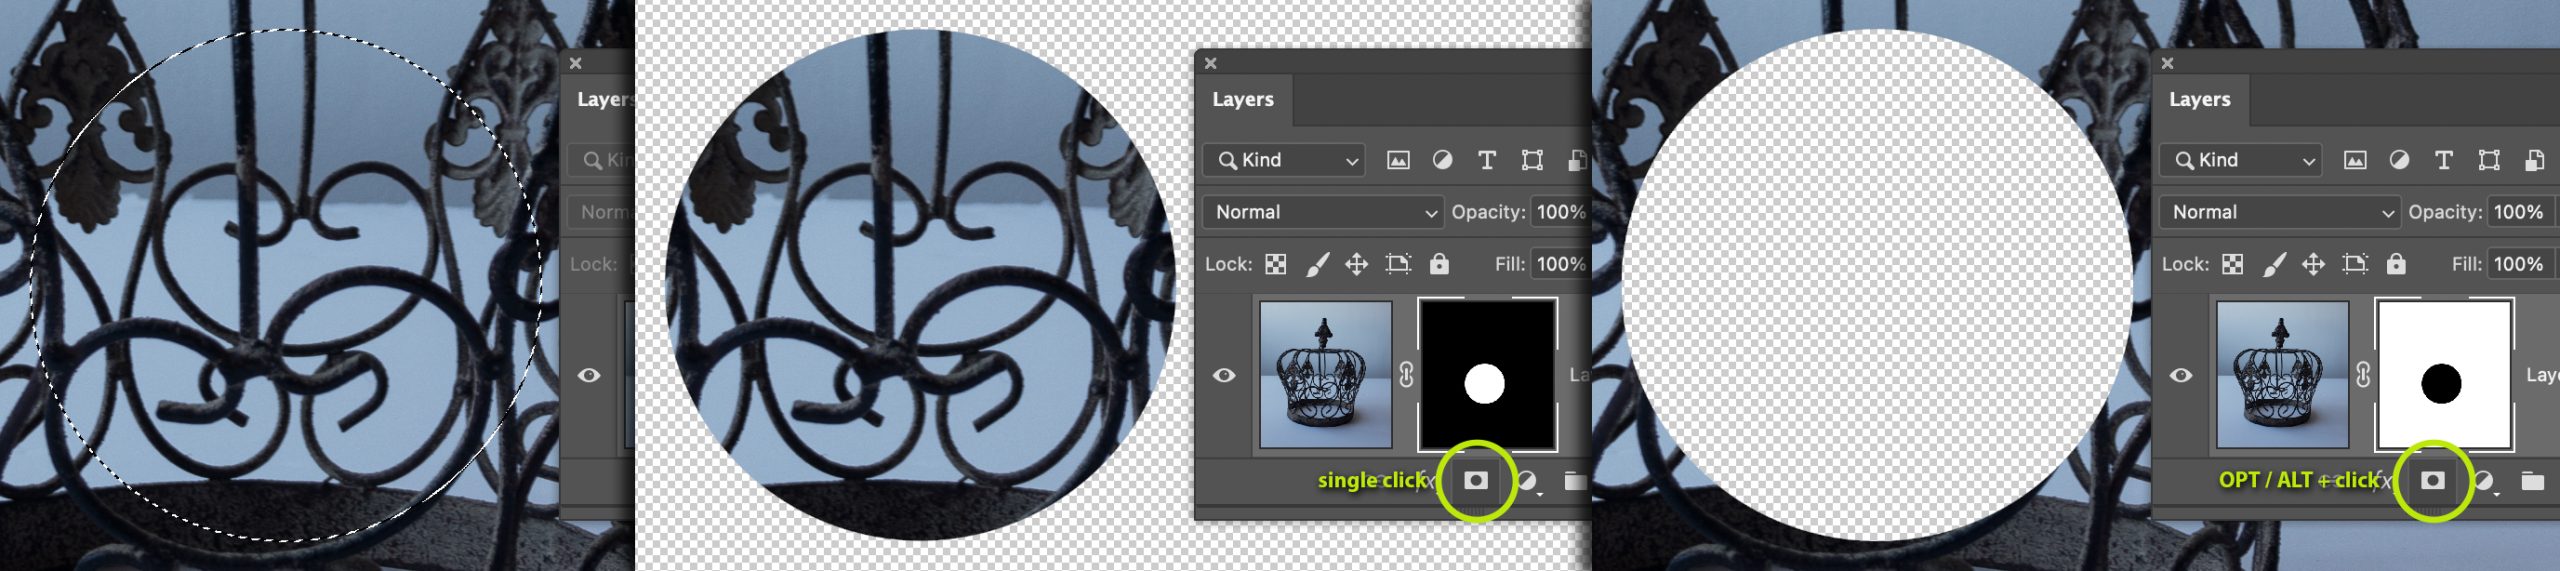
To add a Layer Mask to a Pixel Layer; start by selecting the layer in the Layers panel, and then either choosing Layer > Layer Mask > Reveal All or Hide All, or click on the shortcut at the bottom of the Layers panel as seen in Figure 3.5.

A single-click when using the shortcut icon will add a Reveal All mask, or a mask filled with white that will reveal the entire image. Holding down the ALT / OPT key while clicking on the shortcut will add a Hide All mask, or a mask filled with black that will make the image pixels transparent, as seen in Figure 3.6.
Do not be concerned if you accidentally chose the wrong option, because you can always use the Invert button in the Mask Properties to switch the hidden [black] and revealed [white] areas, or you can also use the Invert shortcut of CMD / CTRL + I [Image > Adjustments > Invert].
Adding Layer Masks with Selections
If you create a Selection before you add a Layer Mask to a Pixel Layer you can also choose to Reveal Selection or Hide Selection from the Layer menu or use the shortcut on the Layers panel as seen below.
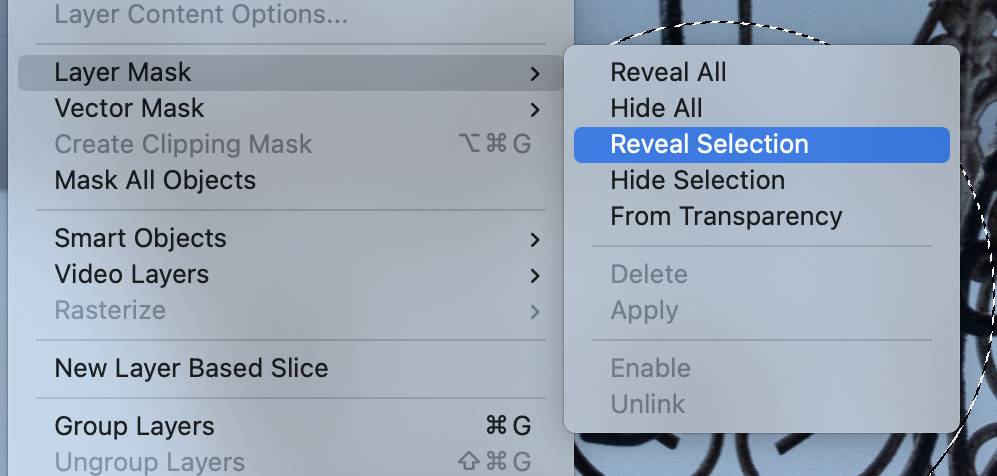
Reveal Selection will show the selected area while hiding everything outside of the selection, while the Hide Selection will hide the selected area and show everything else. The From Transparency option will create a mask based on any transparent areas [checkerboard] within the image layer.
You can also use the shortcut key with a selection created with any tool or operation that creates selections. Single-clicking the Add Layer Mask icon with a selection will reveal the pixels within the selection. Holding down the OPT / ALT key prior to pressing the shortcut key will hide the pixels within the selection.
You can also use the same Invert shortcuts to switch the colors if you feel that you added the wrong mask. These shortcuts are tremendous timesavers because they prevent you undoing a mask and then redoing it again.
It is very important that you pay attention when working with Layer Masks on Pixel Layers because the default thumbnail is always the Layer thumbnail when switching between layers. If you are working on a composite image made of multiple pixel layers and you find yourself bouncing back and forth between them; each time you click on a layer with a mask on it the default thumbnail selected is always the Layer or Adjustment Thumbnail. If you grab the Paintbrush and start painting on a layer thumbnail you are actually covering the existing pixels with the Foreground Color regardless if you can see the area or if it has already been masked. If you want to add or subtract from the layer mask, you need to be sure that you are on the Layer Mask Thumbnail, which is accomplished by clicking on it. The same holds true for Adjustment Layers, so when you click on an adjustment layer it selects the Adjustment Layer Thumbnail and shows the adjustment options in the Properties panel. To make adjustments to the mask you need to click on the Layer Mask Thumbnail.
Note: Pay close attention to the thumbnail corners because the highlighted corners indicate the thumbnail that is currently selected.
Here are some great time saving shortcuts to use when working with Layer Masks. You will catch on to these quickly because if you use Photoshop there is a good chance that you use the masking features quite frequently. If you are using a pen and tablet you can set up shortcut keys to perform some of this work.
OPT / ALT + I : Invert – switches black pixels to white and white to black.
OPT / ALT + click on mask : Displays the layer mask in the image area.
OPT / ALT + drag mask to a different layer : Create a duplicate of the mask on the desired layer.
SHIFT + click on mask : Temporarily disables the mask. Shift + click on the mask again to re-enable it.
CMD / CTRL + click on mask : Loads the mask as a Selection.
Right-click on mask : Presents a context menu of mask options.
D : Sets the Foreground and Background Colors to their default black & white colors. When on the Image thumbnail the Foreground = Black / Background = White, and when on the Mask thumbnail the Foreground = White / Background = Black.
X : Switch Foreground and Background Colors. Tap X to switch colors, which is especially great when brushing on a mask.
OPT / ALT + Delete : Fill with Foreground Color. FIlls the mask or selection with the current Foreground color.
CMD / CTRL + Delete : Fill with Background Color. FIlls the mask or selection with the current Background color.
CTRL + OPT [Mac] with Paintbrush : Scrub left to right to change brush size and up or down to change the brush hardness.
CTRL + ALT + Right-click [PC] with Paintbrush : Scrub left to right to change brush Size or up or down to change the brush Hardness.
Left Bracket key : Increase Brush size.
Right Bracket key : Decrease Brush size.
1 through 0 : Changes the Opacity when using the Paintbrush, or changes the Flow when using the Airbrush.
Channels
Photoshop’s Color Channels are grayscale images that store color information, Alpha Channels store selections as grayscale images, and Spot Color Channels store channels for additional inks often used by graphic designers.
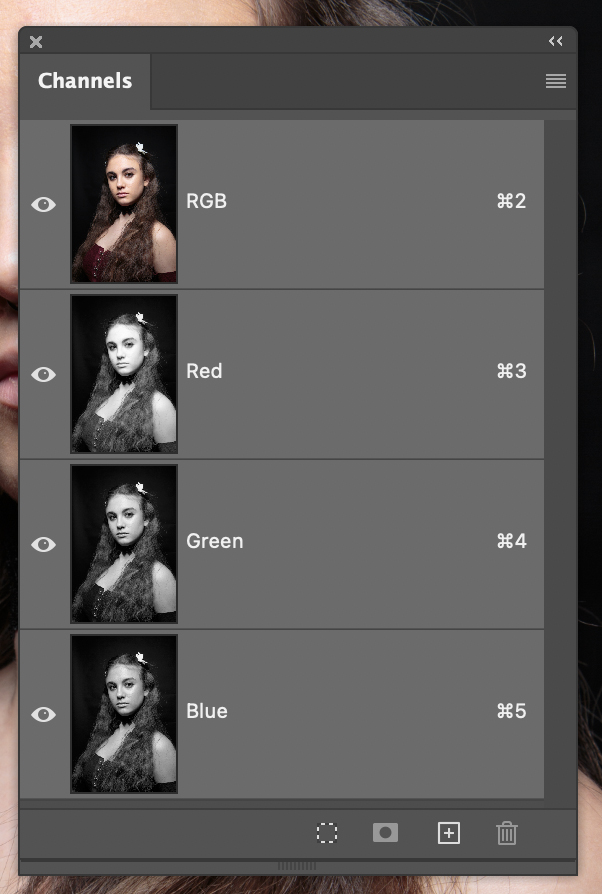
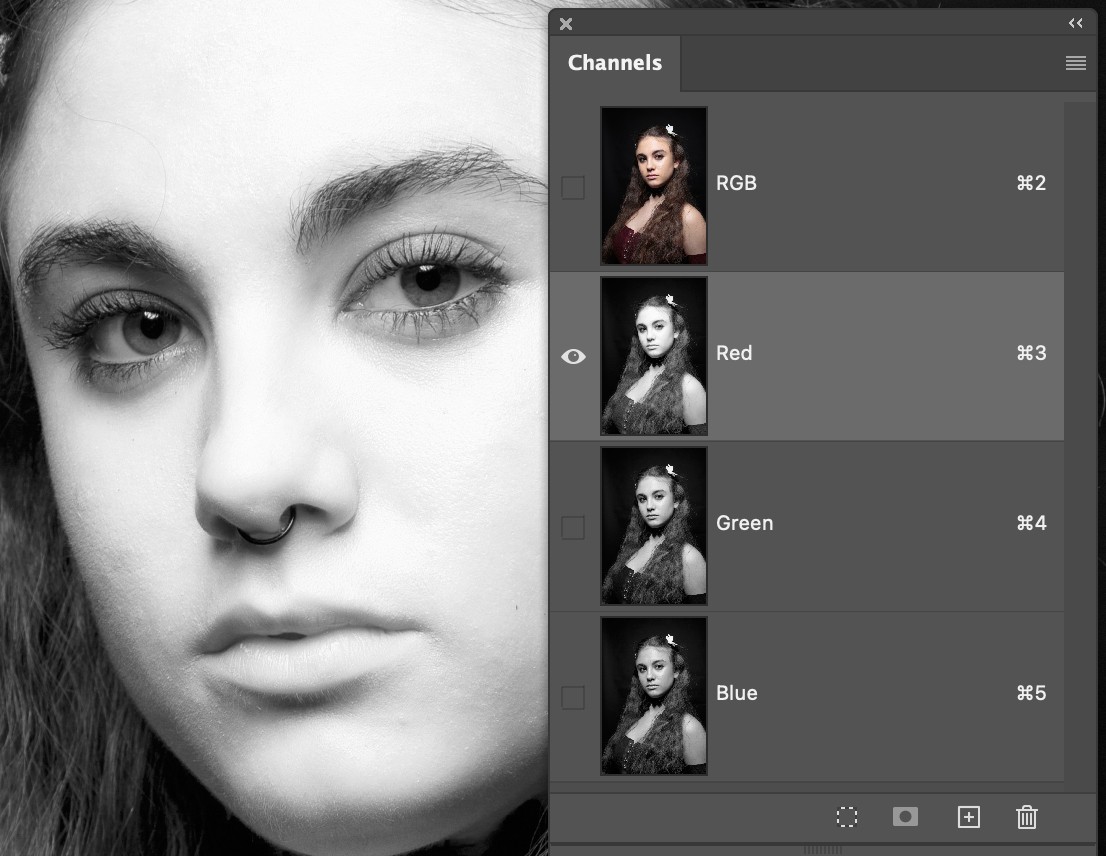
Color Channels: Color channels are automatically created when a photo is opened in Ps and display a composite RGB channel and individual grayscale channels of Red, Green and Blue, with their shortcuts shown on the right. All of the color channels are selected by default when an image is opened because we use the composite RGB channel to edit our photos. You will notice that the visibility [eye] is on for all channels as an indicator that all are selected. The individual RGB channels represent the colors associated with the displayed primary R/G/B channels and their complimentary colors, so selecting and editing any one of these channels will alter the colors in the photo per the complimentary colors listed below.
Complementary Colors per Channel:
Red / Cyan
Green / Magenta
Blue / Yellow
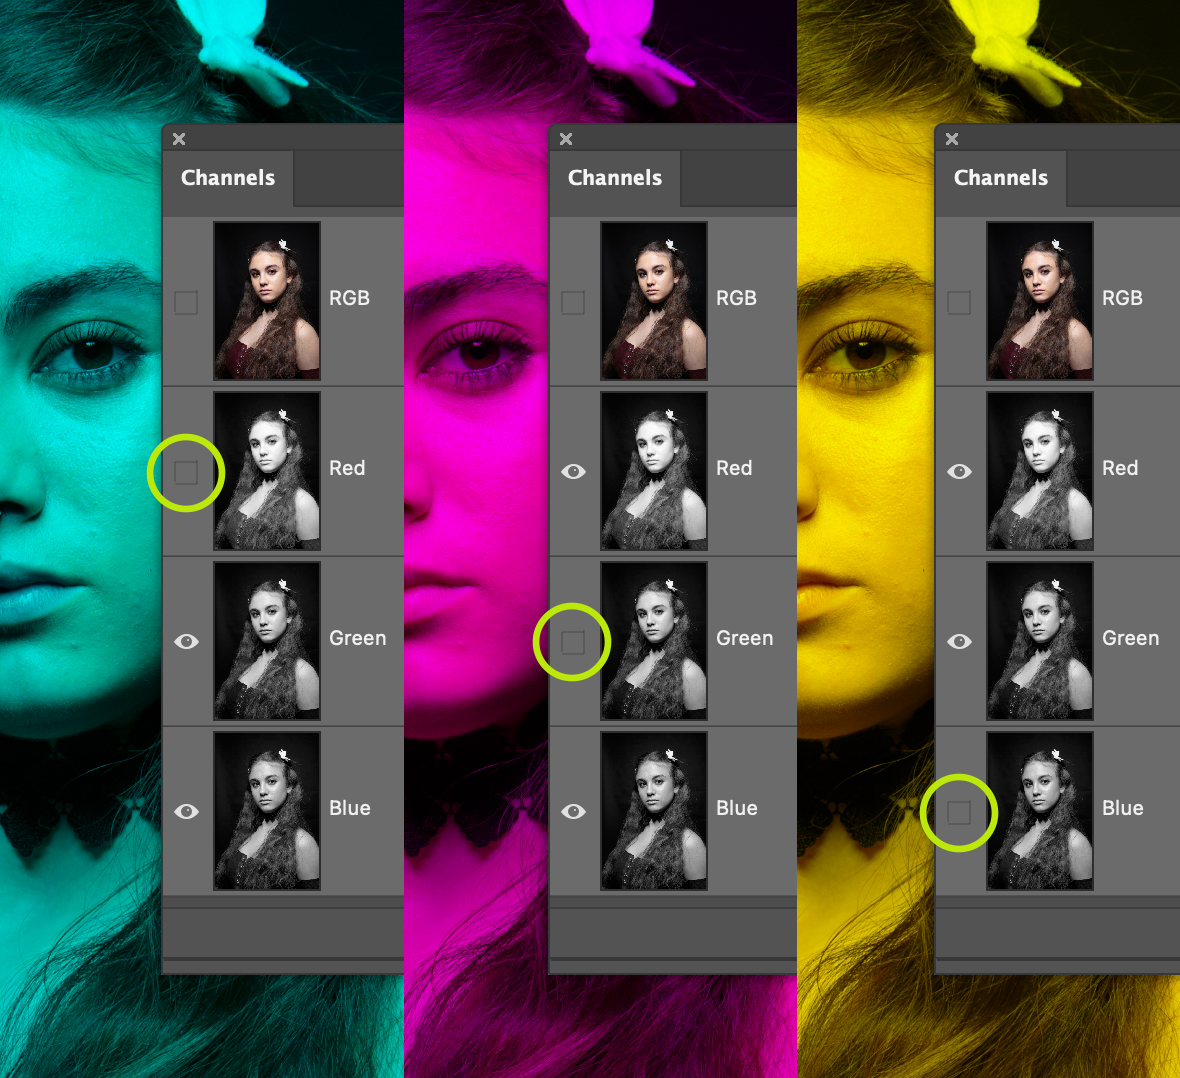
Channels behave a bit different than Layers in that you do not want to click on the visibility icon [eye] to disable a channel like you would turn off a layer, because it will display the image in the complementary color of the channel selected as seen in Figure 3.11. Be warned, if you are just being introduced to channels this can be very confusing and really throw you off when editing, so the goal is to get back to a point where all four channels are visible and the image is back in the original color. Click on the RGB composite channel to enable all channels.
Clicking on the name of an individual color channel will display the image in the grayscale version of the channel selected. This channel can be used to create a Grayscale photo [copy/paste] or mixed with other channels for color grading or to enhance a grayscale image by using the Channel Mixer as an Adjustment Layer or directly on the image from the Image > Adjustments > Channel Mixer menu.
In much older versions of Photoshop, channels were also used in advanced retouching techniques. The theory was that you could remove blemishes by cloning/healing directly on the green channel, because in addition to holding color the channels also exhibit texture so by smoothing the texture on a channel you are theoretically removing it on the image as well. This concept is actually the foundation for the Frequency Separation technique that is very popular amongst photographers and retouchers today. I use channels in the classroom to demonstrate this concept so students can better understand of how this technique works and is one example of thinking of Photoshop in black and white. Another is with saving and working with selections as alpha channels.
Alpha Channels store Saved Selections as grayscale images that are created when you choose Select > Save Selection from the menu for future use. You may be familiar with some of the various tools and techniques used to create selections but I will detail more of those in future sections of this book so that we can take a look at what an alpha channel is, and how you can use them to your advantage. Alpha Channels are automatically saved with PSD and TIFF files, but do not save with JPGs.
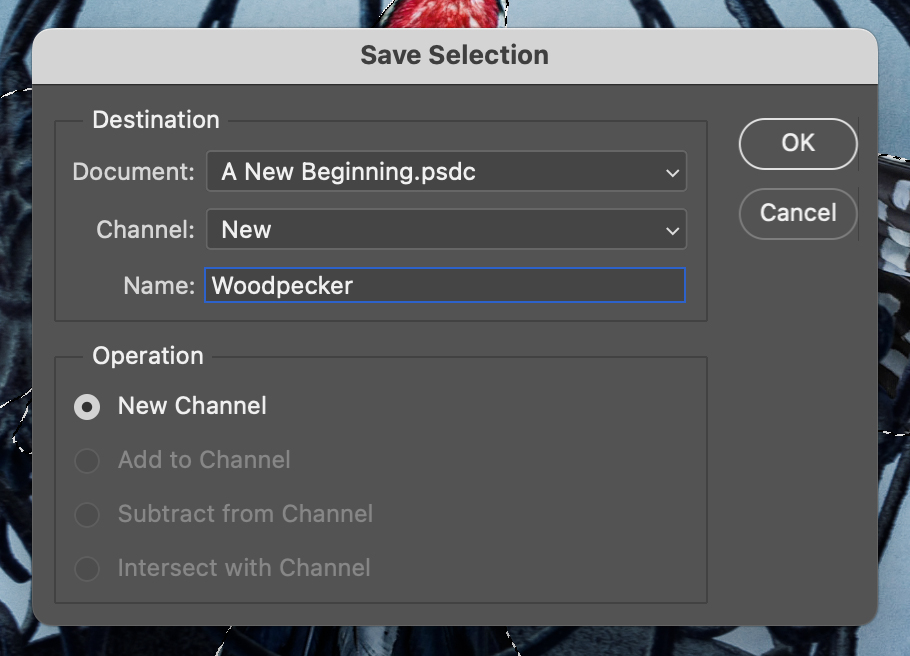
To create an Alpha Channel you must first use any of the selection methods to create a selection [marching ants] on a portion of your image and then choose Select > Save Selection from the menu bar at the top of the application. A dialog box will open with options for you to choose from for Destination and Operation as seen in Figure 3.14.
Destination and Operation
Document: The default setting is to save the selection to the current image, but you can choose to create a New image that will make an image in the same physical size and will consist of a grayscale image of the mask only. If you have other images open with the same physical dimensions, you will also have the option to save the selection to one of them, but if the dimensions are not exact they will not show as an option in the list.
Channel: A New channel is selected as the default for this operation, which will create a new Alpha Channel for the selection as seen in Figure 3.13. If you have existing alpha channels in your image you will have the option of choosing one of those channels as the destination to save the current one to. Saving to another channel will make the Operation options available.
Name: This field is intentionally left blank so you could fill it in with a descriptive name for the selection to make it easier for you to recognize what it is. If you purposely or accidentally leave this field blank, Photoshop will autofill it with Alpha 1 with the numbering increasing with each new and unnamed selection. Similar to Layers, you can always double-click an alpha channel name to rename.
Operation: The New Channel is selected as the default and the other three options are grayed out. This is a result of the Channel: New option being selected. As mentioned in the Channel section above, if you have additional alpha channels and choose one of them as the Channel instead of New, the remaining options of Add to, Subtract from, and Intersect With will become available to further manipulate the existing channel.

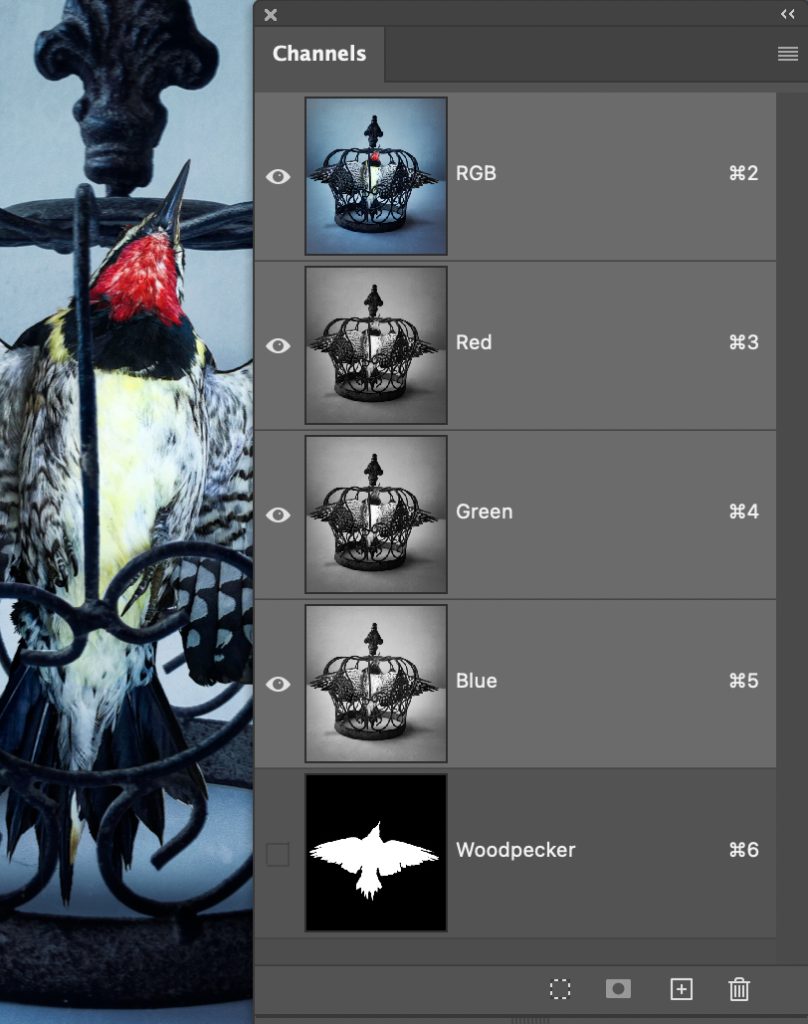
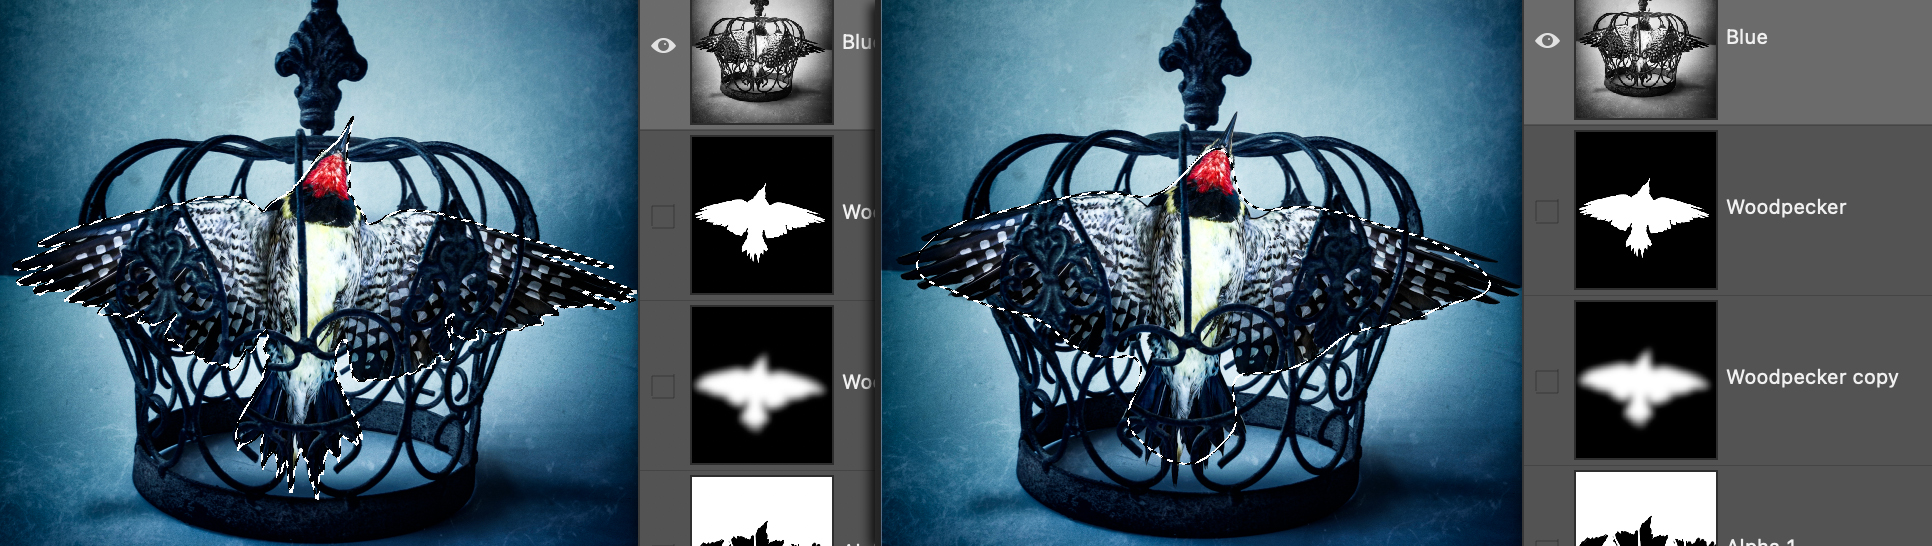
Figure 3.15 is shown with two saved selections as Alpha Channels, do they look sort of familiar? Saved selections resemble Layer Masks, because they are very similar to each other in how they function.
With an Alpha Channel the area that is not selected is shown in black and is referred to as being masked, which means that it can not be edited, while the white area is actual selection. Note the two different masked areas of the alpha channels in Figure 3.15. The woodpecker is the selected object in the Woodpecker channel, while the inverse or background are the selected area in Alpha 1. This is easy to grasp when the selections are simple like in the Woodpecker channel, but they become much more complex when various areas are selected with a mix of hard and soft edges and various tones.
With Layer Masks the white areas are revealed, but if the same mask were an alpha channel it would be the selected area, so if you stop to think about it they are actually one in the same. In addition, a mask can be saved as a selection and a selection can be made into a mask. Keep in mind the Layer Mask menu items of Reveal Selection and Hide Selection when a selection is created before the mask is applied. In my opinion, one of the most useful functions of working with either layer masks or alpha channels is that you can continuously edit them by painting or applying effects to them with the main difference being that the Layer Mask applies immediate edits, while the Alpha Channel is just a selection awaiting to be used.
A saved selection can be reloaded at any point by choosing Select > Load Selection from the menu, using the Load Channel as Selection shortcut at the bottom of the Channels panel, or holding the CMD / CTRL + click on channel,
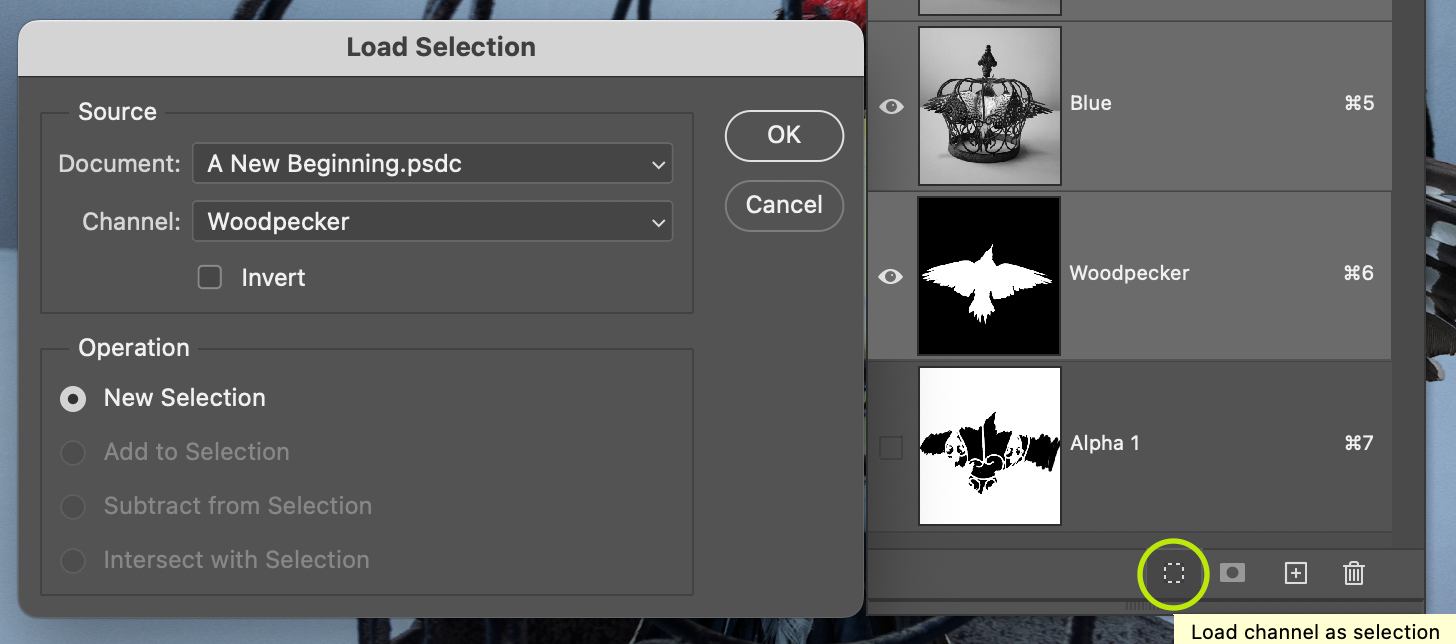
Using the Select > Load Selection option brings up a dialog box with options to choose how to load the channel.
Source and Operation
Document: Use this option to choose the image to load the selection from. The default location is the current document, but you will be able to see any additional documents that have the same physical dimensions and that also have Alpha Channels. If a document does not meet both requirements then it will not appear in the dropdown menu.
Channel: You can choose one of the Alpha Channels in the current document or another document to load.
Invert: This option will invert the selection when you click OK. If you forget to invert the selection as you load it, you can also invert it after it has been loaded by choosing Select > Inverse, or use the shortcut of SHIFT + CMD / CTRL + I.
Operation: The New Selection radio button is chosen by default, but if you already have a selection applied in your document the Add to Selection, Subtract from Selection and Intersect with Selection options will become available.
___________________
Working with Tones in Channels
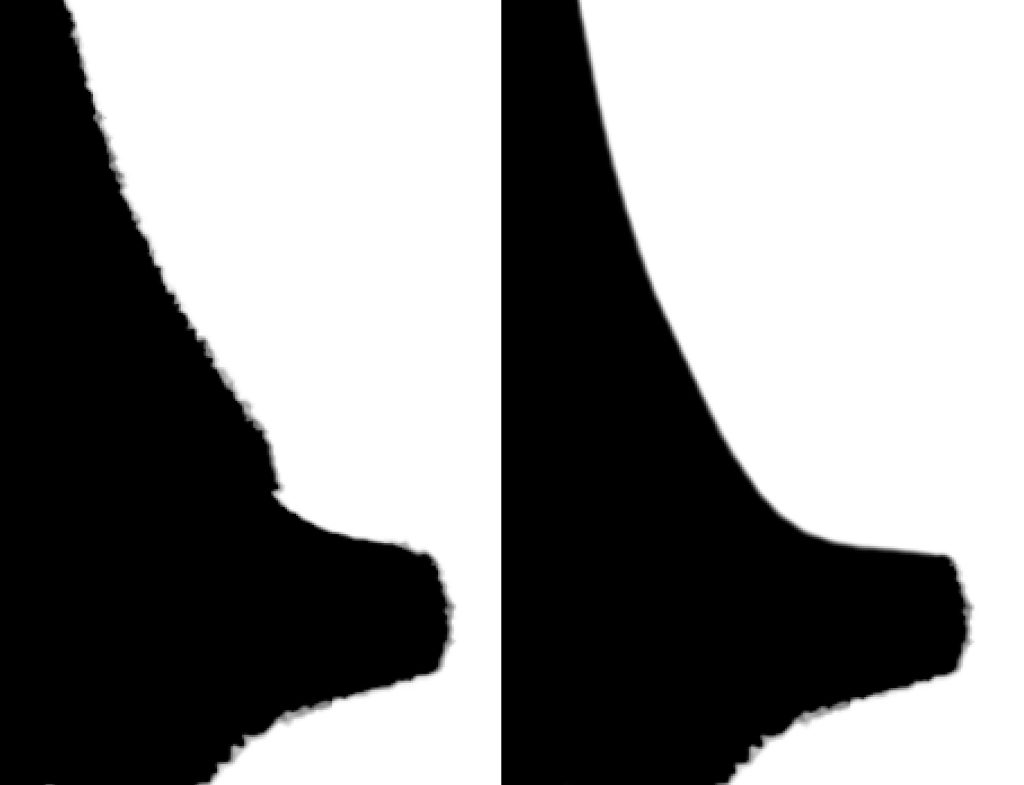
When you load a selection it will show as marching ants in the active image, but the marching ants may also appear to be a different shape than how you see the alpha channel, and that is because Photoshop only creates selections for tones that are 50% or brighter. You will not see the ants for any tones that measure 51% gray or higher/darker. These tones can result from objects of various tonalities [shades], or from gradients as seen in the examples below. The Woodpecker alpha channel was duplicated by dragging it onto the Create New Channel shortcut icon at the bottom of the Channels panel, but you can also right-click on the channel, or click on the hamburger on the upper-right to choose Duplicate Channel. A Gaussian Blur filter effect was applied to the duplicate channel which created a gradient around the selection similar to a brush effect with a Hardness value of 0 [zero]. The softer the edge of a selection or brush, the smoother the transition, which is a great tip to use when creating composite images.
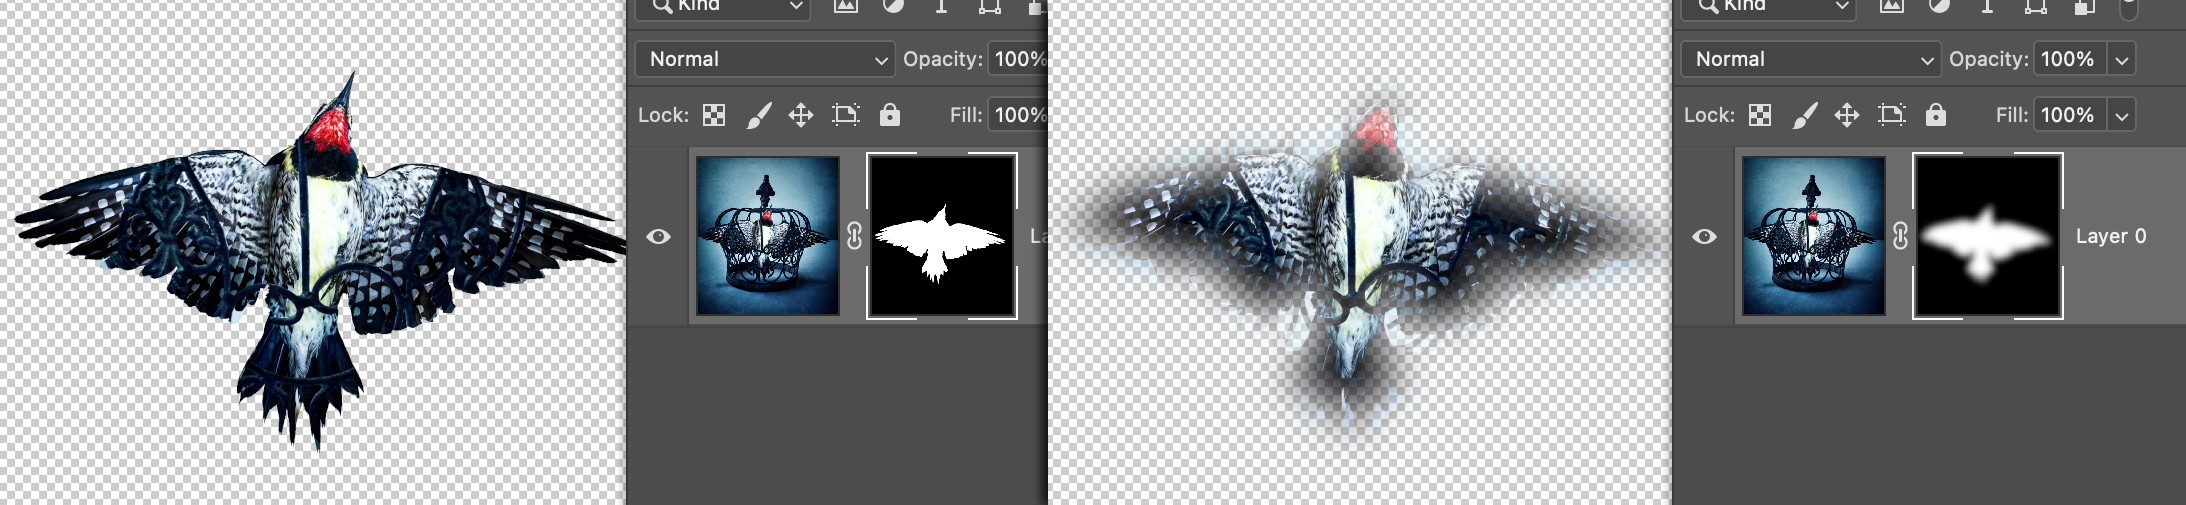
In another example I created a series of circles with hard edges and saved them as an Alpha Channel. When the selection was loaded into the image, only the circles that had an opacity brighter than 50% gray show as marching ants despite our ability to clearly see the circles. Even though the marching ants are not visible for the two circles on the right, they are still part of the selection because Ps does not show marching ants for tones greater than 50% gray.


Using the loaded selection to add a Pixel Layer Mask allows us to see how the various gray tones affect the opacity of the mask, in addition to the last two circles being included as part of the selection. Notice that the white circle on the left is 100% opaque, but the transparency diminishes as the circles become darker.
Having an understanding of how these tones affect your ability to blend images together and with the use of Adjustment Layers, will play a big part in how you edit your photos.
How-To: Contrast Masking
A great way to increase the contrast in a photograph using the information that is currently available while applying a local tonal adjustment, is to add a Contrast Mask. The idea to a contrast mask is to use one of the Color Channels in your document as the Layer Mask with a tonal Adjustment Layer such as Curves. Any tonal adjustment will work but I prefer the control of a Curve.
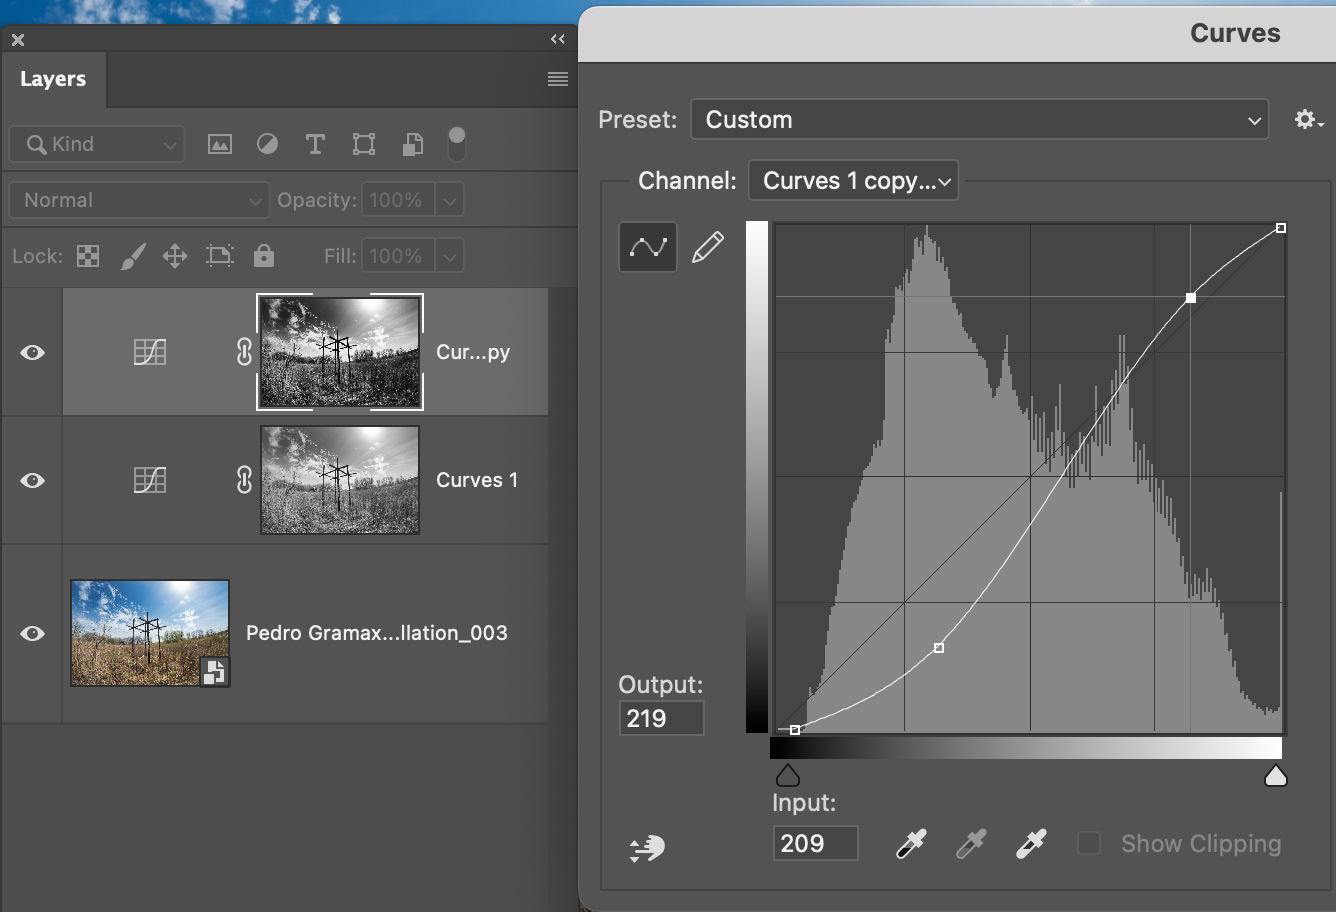
Step 1: Load Channel as Selection. The first step is to evaluate each of the Red, Green and Blue color channels individually while keeping in mind that the white areas in a channel are the selection, and the black areas are masked. This mask will challenge you because of the various tones that will be found in it, as not all tones will be just black or white as with simple masks. See the section below on working with tones in channels to better assist you. You are looking for the channel that has the most detail between the dark and light tones. In the example shown in Figure 3.21 I have chosen the Red channel to use as my contrast mask, and used the keyboard shortcut of CMD / CTRL + clicking on the channel to load it as a selection.
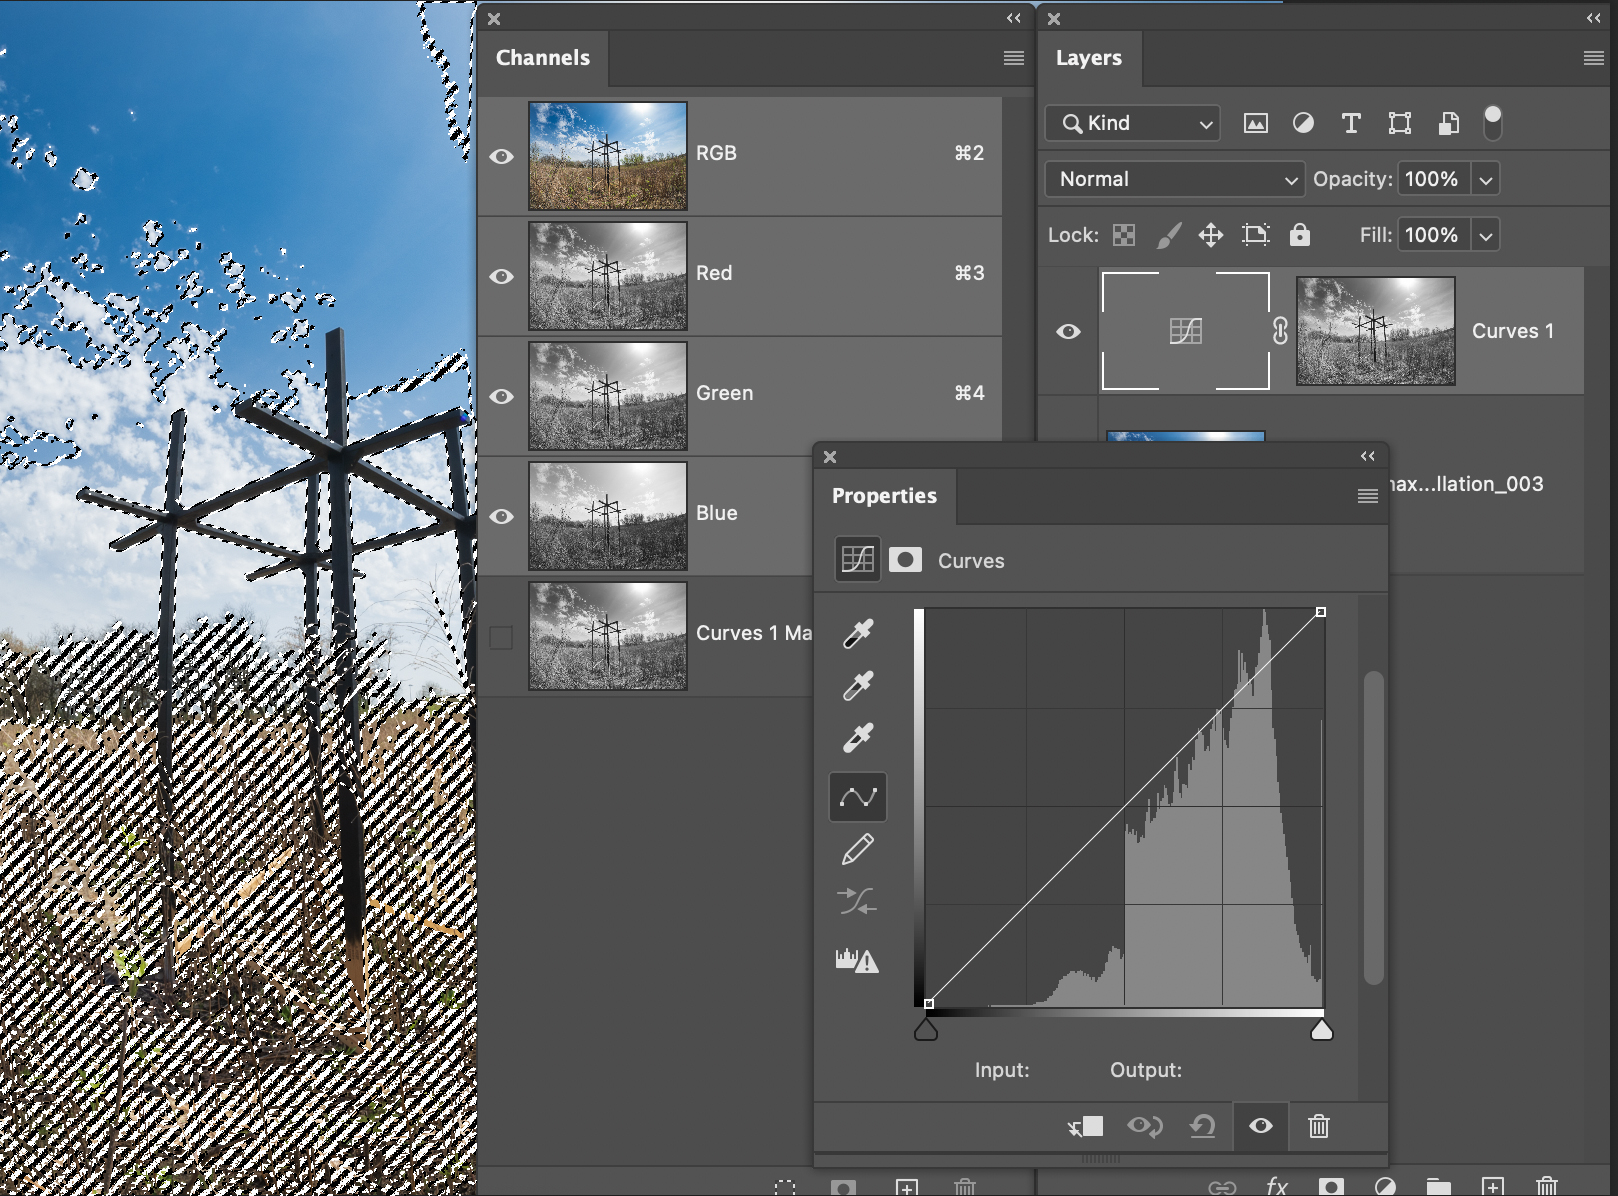
Step 2: Add an Adjustment Layer. With the selection loaded you can add any tonal Adjustment Layer and the selection will be applied to the Layer Mask. As noted in Figure 3.17 above, you may notice that the layer mask is a duplicate of the channel that was used to create the selection for this step.
Step 3: Make Adjustments. With the adjustment layer and layer mask in place you can now make adjustments in the Properties panel. If you were to create an adjustment layer with no selection the entire mask would be white indicating that the adjustment would apply to the entire image. However, with a Contrast Mask, by using a channel to make a selection to start some areas will be black or darker gray tones preventing the adjustment from applying to the whole image, so the adjustments are targeted. Remember that white reveals, so any areas that are white will allow the full effect of the adjustment to show on the image, the black areas will be masked, and any gray tones in between will vary based on their tonality.
White reveals, black conceals, but a 50% gray tone will only reveal [or conceal] 50% of the adjustment, so the full adjustment will not apply to these areas. As the grays get darker leading towards black, the tonal changes will become fainter as the tones become denser. On the flip side, as the tones get lighter you will see more of the tonal changes as the tones move towards white.
The use of a contrast mask does not have to end here, because you can select the layer mask thumbnail and apply tonal adjustments directly to the tones of the mask by using the menu Image > Adjustments > Brightness/Contrast, Levels [L], Curves [M] or Exposure tonal adjustments. These adjustments will apply to the mask only allowing you to alter the overall tones in the mask which will affect how the Adjustment Layer is being applied to the image; see Figure 3.18. You can even paint directly on the mask if you prefer to make additional adjustments.
In the previous section I mentioned an alpha channel can be added to, or subtracted from, by painting or filling in with white to black tones directly on the Channel, similar to the way you can edit a layer mask. This is a great way to fine tune a mask or channel after it has been initially created. To edit an alpha channel you must first create and save a selection, target the channel by selecting it, and then you can use any tool that allows you to paint or create selections to fill various areas in.
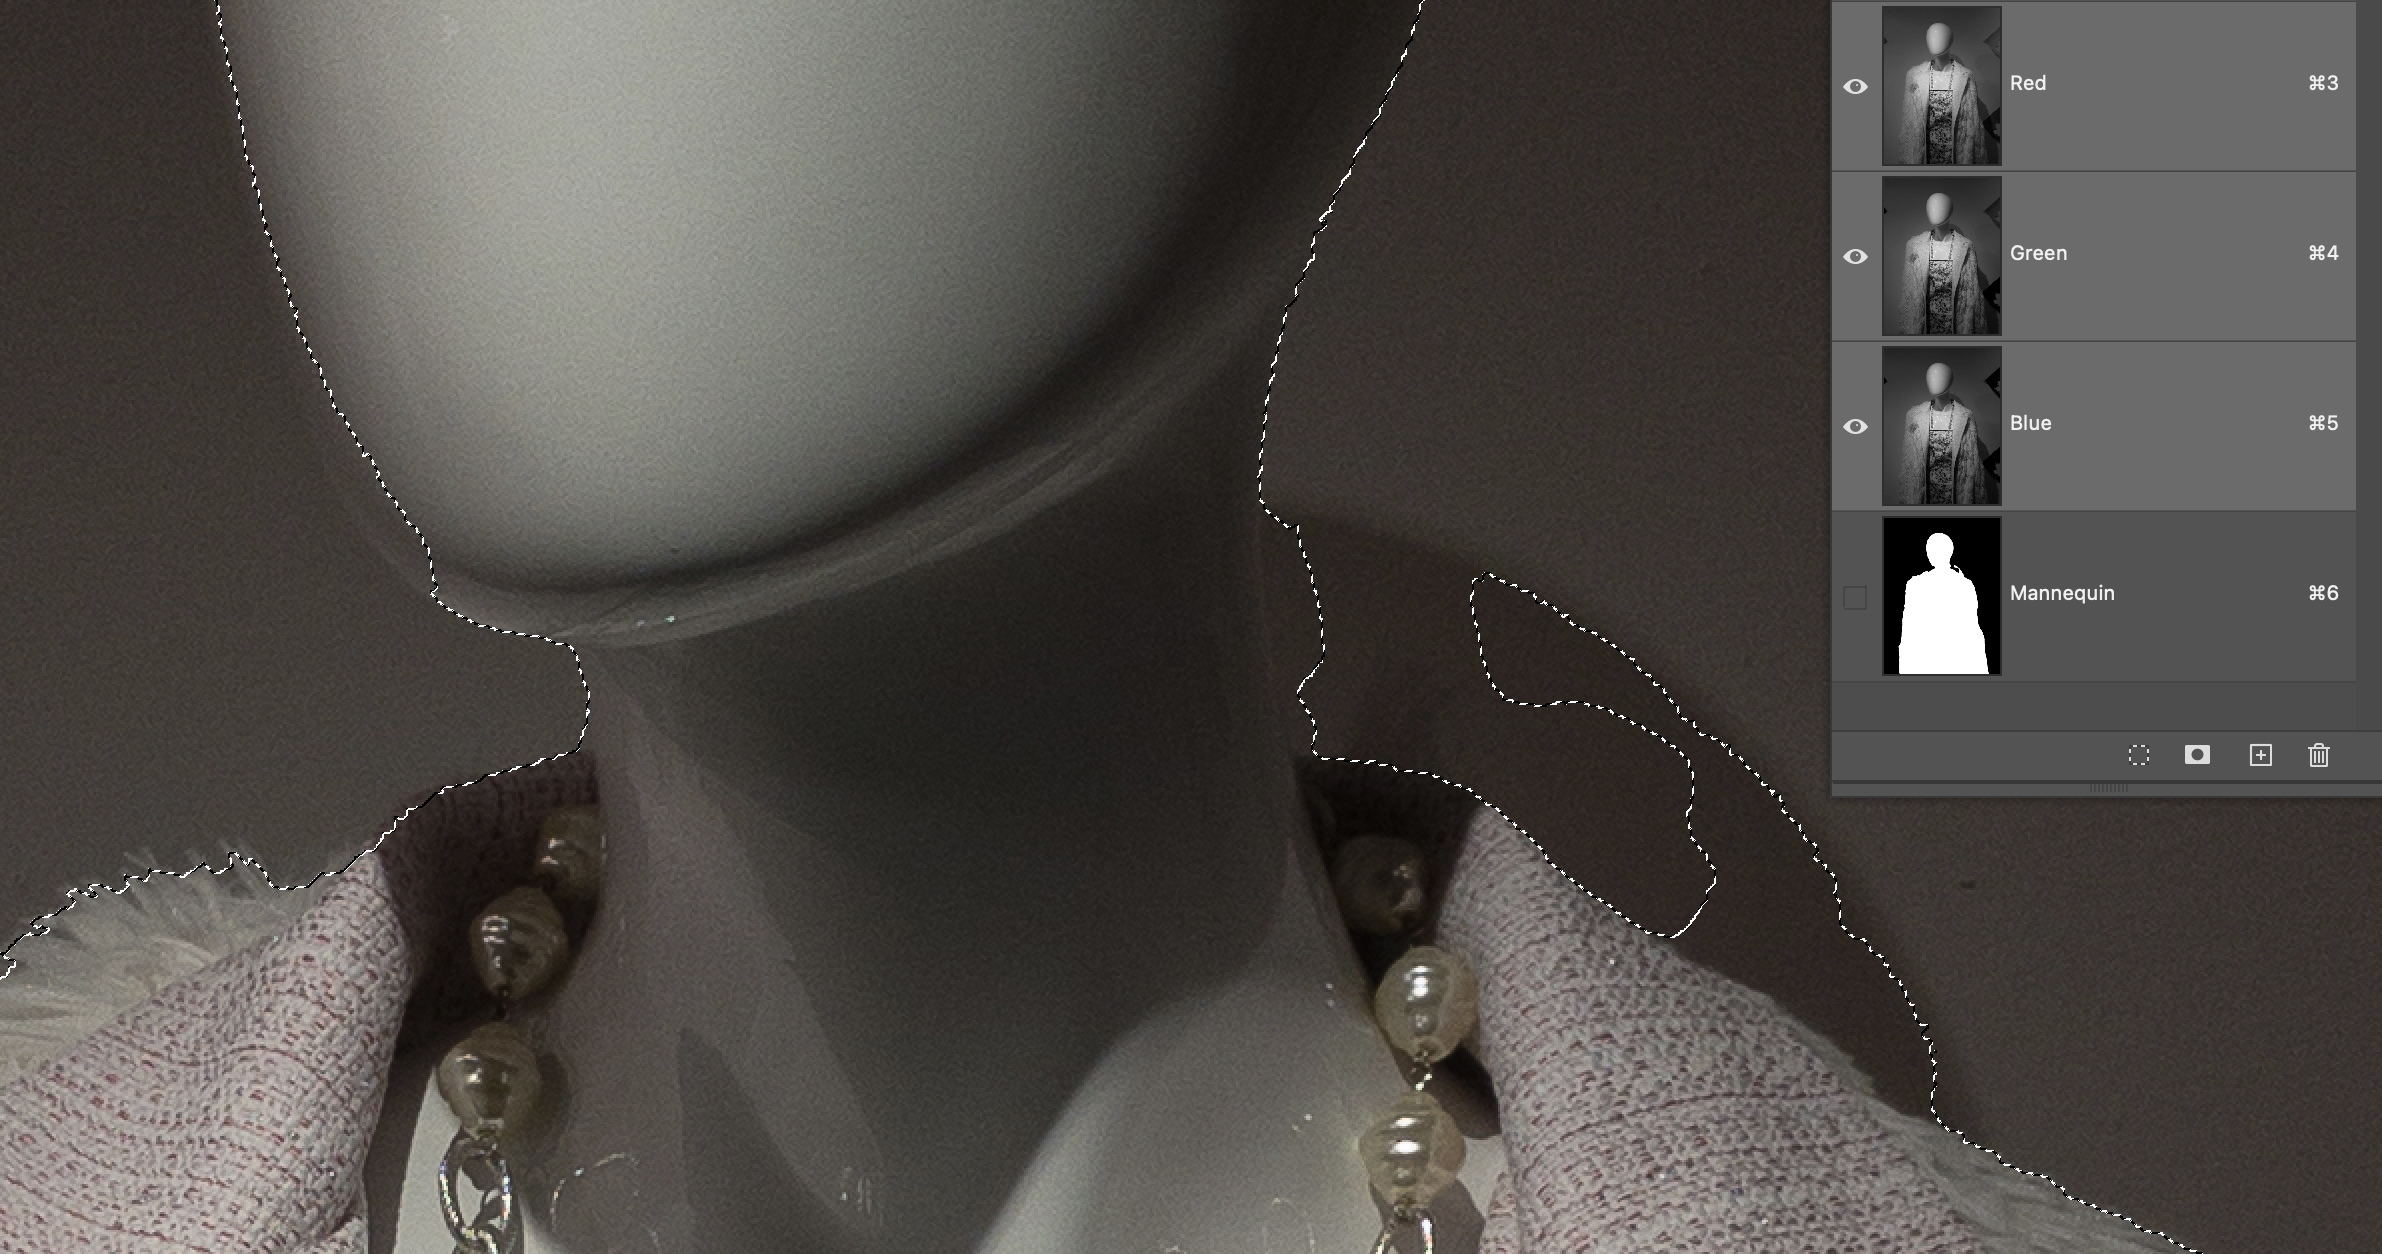
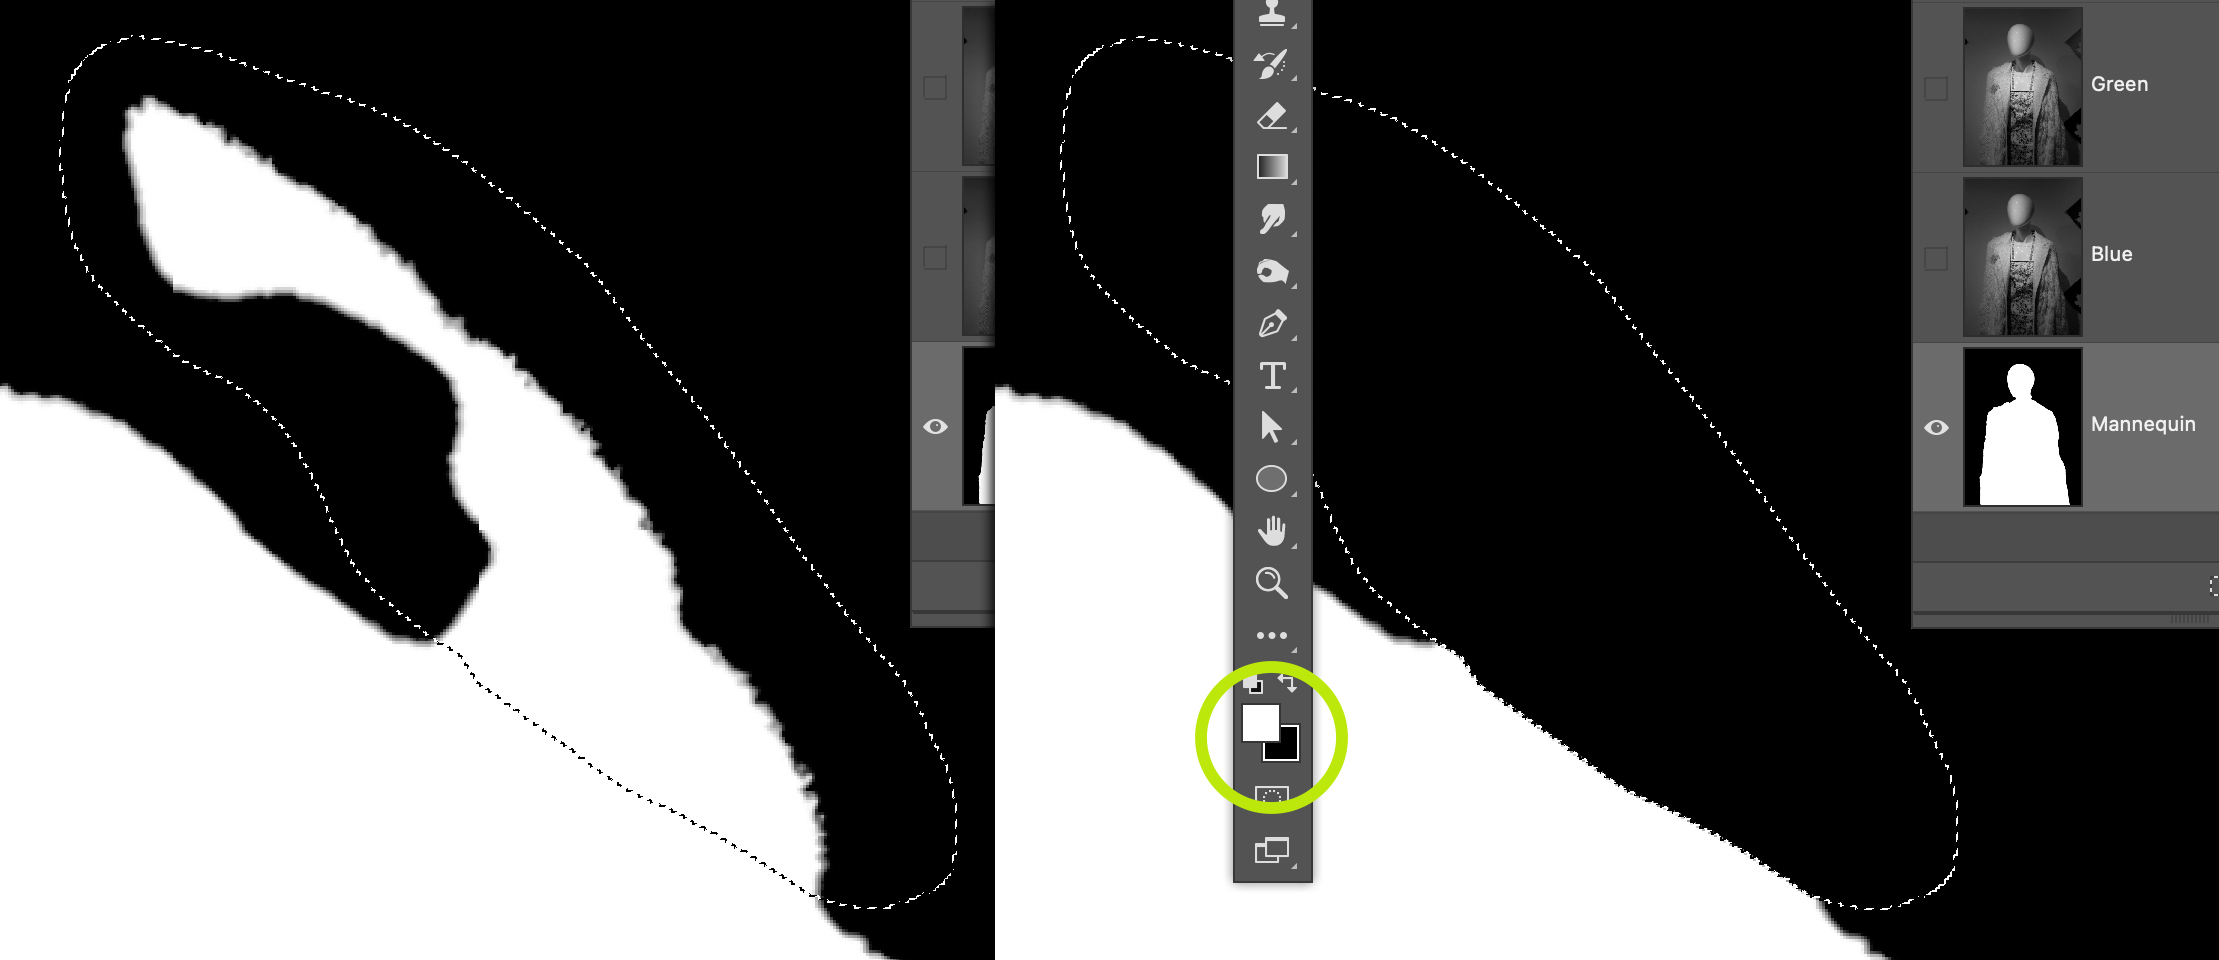
A selection was created for this image of a mannequin in Figure 3.23 by using the Select > Subject menu option and then saving it as an alpha channel. As good as Photoshops auto selection tools are, they are often not perfect because they rely on contrast to create their selections. By zooming in to 100% magnification we can easily see that the selection that was created is not picking up parts of the mannequin on the left, and selecting some of the background shadow on the right. Despite the selection not being perfect, we can still fine tune it by adding to the areas that were not picked up, and removing the areas that were picked up by the selection that we do not need or want. Also, keep in mind that we can make these corrections on a layer mask or an alpha channel.
With the alpha channel selected in the Channels panel, we can now use any painting tool or selection tool to add black or white to the image as shown in the samples below. Keep in mind that white is the selected area and black is masked, so to add to the selection I used the Paintbrush Tool and painted with white as shown in Figure 3.24.
To subtract the background shadow pixels from the alpha channel, I started with a freehand selection created with the Lasso Tool and then filled the selection in with the Background Color of black as seen in Figure 2.25. There are various ways to fill this selection but I find the quickest method is to use the Fill shortcuts of OPT / ALT + Delete to fill with the Foreground Color, or CMD / CTRL + Delete to fill with the Background Color.
These two concepts are probably easy to grasp, and there is a chance that you have already used them with layer masks, but what makes this technique challenging is that we can not see the image, so how would I know where to paint or make selections? The answer is very simple, all we need to do is click on the Channel Visibility Icon [eyeball] of the RGB channel. This will make the image visible in the channel for the white / selected areas, and will fill the black / masked areas with a semi-transparent red mask.
![A red overlay is displayed on the masked areas when the visibility [eye] of the RGB channel is selected.](https://cod.pressbooks.pub/app/uploads/sites/140/2023/01/finetune4-1.jpg)
To disable this mode to go back to normal you will need to select the RGB channel, and then turn off the visibility [eye] of the alpha channel. This technique may seem a bit cumbersome and may not be your first choice to make selections, but this is only one way of making selections but you may find something that is useful from all of these techniques covered in this chapter. The red mask that is shown here is similar to the Quick Mask mode that I will describe in the next section below.
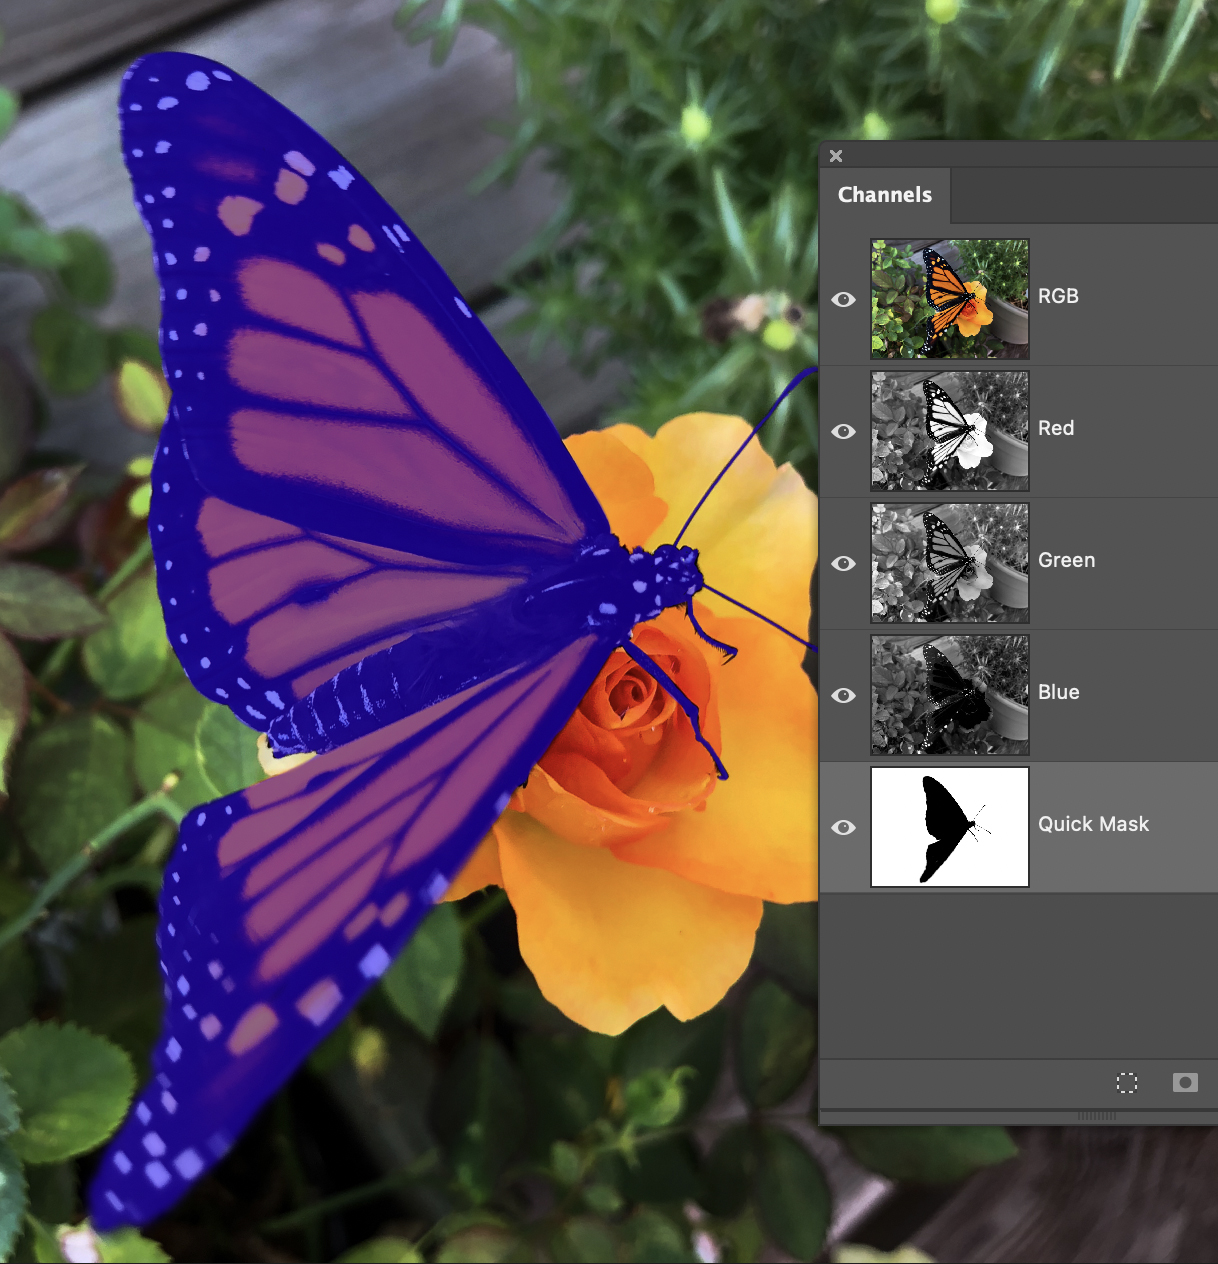
How-to: Using the Quick Mask Mode
A Quick Mask is an alternate method of making selections in Photoshop. When chosen, a quick mask will generate a red overlay, similar to a rubylith mask, that can show a Masked or Selected area of the selection being created.
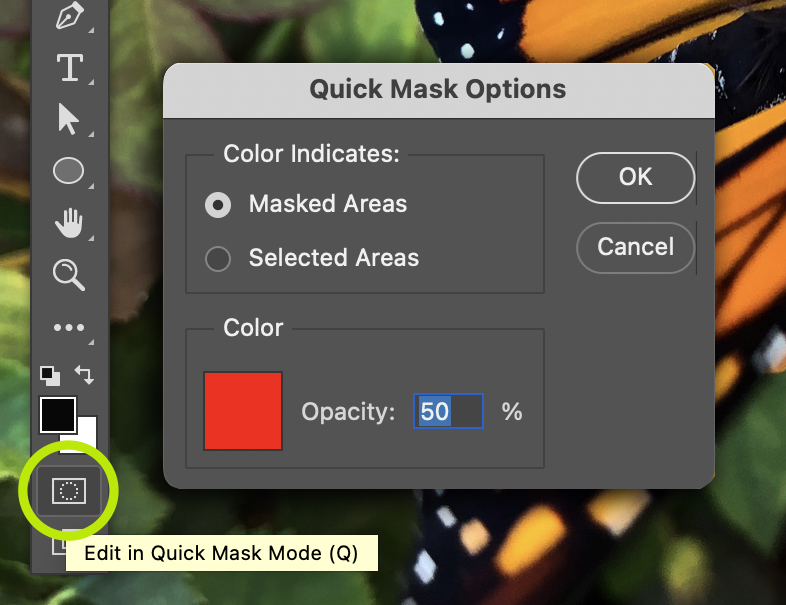
- Set Quick Mask Options: Before starting you may want to edit the quick mask options. You do this by double-clicking on the Edit in Quick Mask Mode Toolbar button, which will open the Quick Mask Option dialog box. Color Indicates: This section allows you to choose where you prefer the red overlay to be shown; the Masked Areas [default] or the Selected Areas. I prefer to use the Selected Areas, because when I use this mode I am usually painting the area that I want to have selected. Honestly, either option doesn’t matter, because quick masks are like layer masks or alpha channels, so you can Invert any of them at any time whether that be during the creation of the mask, after the marching ants are displayed, or saved as an alpha channel. Color: The default color is the red overlay that we had seen in the channels section above, with an opacity of 50%, which allows us to be able to see the image below to assist in perfecting the mask. You can change the color by clicking on the red square which will open the Color Picker dialog box where you can choose a new color. The only time you really need to change the color is to use one that allows contrast of the image and the mask color. You will not find the red color useful if you are masking a red object, as it will be difficult to see.
- Edit in Quick mask Mode: To get started physically making the mask choose the Edit in Quick Mask Mode button on the Toolbar or use the shortcut key Q. Similar to Layer Masks you can begin with a selection, or you can use any tools that allows you to paint or fill with the Foreground and/or Background colors to generate a quick mask.
- Paint or FIll the Mask: The beauty to working with any mask is that you can control the tools that are used to work on them. In the example below [Figure 2.28] I used a combination of a paintbrush at various sizes and hardness values to account for the areas that are blurred versus the harder and smaller edges, and the Lasso Tool. The Color was changed to blue from red, because it was difficult to see the red against the warm colors of the butterfly. When using the Paint Brush you will paint with black as the Foreground Color to add the overlay color, but you can switch the colors to use white to erase the color overlay that was added, and you can use the Opacity for finer adjustments. You can also use a selection tool with the fill shortcuts; OPT / ALT + Delete to fill with the Foreground Color or the CMD / CTRL + Delete to fill with the Background Color.
- Load the Selection: To apply the mask and load the selection you just need to click back on the Edit in Quick Mask Mode button or press the Q shortcut. The Marching Ants will now appear on the image, but based on the option chosen for whether the Color Indicates: Masked Areas or Selected Areas. they will either be on the subject or the background so pay attention to where they are, and keep in mind that you can always invert the selection if necessary [Select > Inverse].