
5 Selections
This chapter will review some of the various selection tools and additional options to make selections found in Photoshop that were not covered in the previous chapters. There are many ways to make selections and some were covered in the previous chapters on Masking, where you will also find how to Save and Load Selections, and Generative AI with advanced machine learning to make selections quickly.
A selection is the area of an image that you define for manipulation of any kind that allows you to isolate one or more parts of an image. By selecting specific areas, you can edit and apply effects and filters to portions of your image while leaving the unselected areas untouched or masked.
You can make a selection with various selection tools, commands, and the Select and Mask workspace in Photoshop. When you make a selection, marching ants appear around the selection area, but you can’t touch areas outside the selection border until you deselect the selection CMD / CTRL + D.
Basic Selection Tools
These tools are found in the Toolbar and are used to directly make shape or freehand selections in an image. The shortcut letter is listed to the right of each tool, and by default, require the Shift key with the shortcut key to toggle between the tools. You can disable the required Shift key in the Preferences [Photoshop (Mac) / Edit (PC) > Preferences > Use Shift Key for Tool Switch] by removing the checkmark.
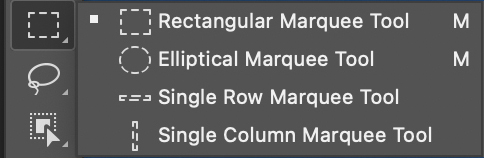
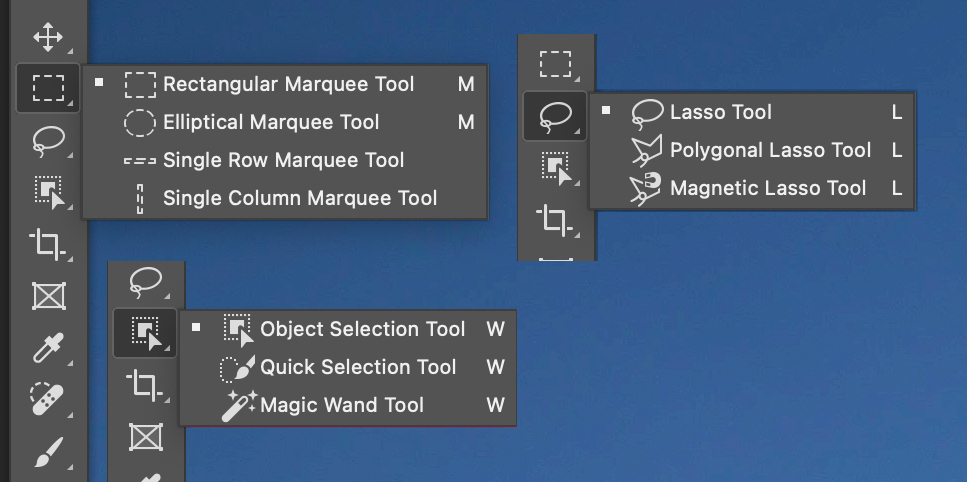
Marquee Tools [M]: The Rectangular, Elliptical, Single Row and Single Column Marquee Tools are used to make basic rectangular or elliptical shaped selections. You must click + drag to use the Rectangle and Elliptical tools, but only need a single-click to add a Single Row or Single Column selection.
Marquee Tool Shortcuts:
Shift + drag: Constrain all sides to create a perfect circle or square.
OPT / ALT + drag: Creates a rectangle or ellipse from the center out.
OPT / ALT + Shift + drag: Creates a perfect circle or square from the center out.
Shift: Adds to current selection.
OPT / ALT: Subtracts from current selection.
Shift + OPT / ALT: Intersect with Selection.
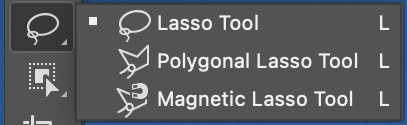
Lasso Tools [L]:
The Lasso Tool allows for freehand selections.
The Polygonal Lasso Tool makes selections of straight lines.
The Magnetic Lasso Tool snaps the selection border to the edges of the defined areas in the image. The Magnetic Lasso tool is not available for 32‑bits-per-channel images.
Lasso Tool Shortcuts:
OPT / ALT: Temporarily changes the Lasso Tool to the Polygonal Lasso or the Polygonal to the Lasso Tool. Release the shortcut key to return to the original selection tool
Shift: Adds to current selection.
OPT / ALT: Subtracts from current selection.
Shift + OPT / ALT: Intersect with Selection.
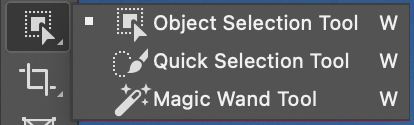
Object / Quick Selection and Magic Wand Tools:
The Object Selection Tool simplifies making object or region selections such as people, animals, buildings, skies, etc. You can use the tool to draw a rectangle around an object or let the Object Selection tool automatically detect and select an object or region within the image with a single click. Selections made with the Object Selection tool are now more precise and preserve details on the edges of the selection.
The Quick Selection Tool quickly “paints” a selection using an adjustable brush. As you drag, the selection expands outward and automatically finds and follows defined edges in the image. The default option is set to Add To the selection, so as you continue to paint the selection will expand. Use the OPT / ALT key If you want to subtract from the selection. The selection will continue to improve with each new brush stroke.
The Magic Wand Tool lets you select a consistently colored area [for example, a red dress] without having to trace its outline. You specify the selected color range known as a Tolerance, relative to the original color you click. The tolerance value will select fewer pixels with a low value, or a larger color range with a higher value.
Shortcuts:
OPT / ALT: Subtracts from current selection.
Shift + OPT / ALT: Intersect with Selection.
Selection Tools Option Bar
There are various options available for all of the tools in the Tools bar that are located in the Options bar at the top of the application. Both the Tools and the Options can be toggled on or off in the Windows menu. It is recommended that you become familiar with the Options for each of the tools that you use when editing your photos, and check them if the tool does not seem to be working properly as the first step of troubleshooting.
In this section I will review options for some of the Selection tools.
The Marquee Tool Options [L-R]
- Home: This button will bring you back to the Home screen.
- Presets: Use this option to save Presets specific to the tool being used.
- New/Add/Subtract/Intersect: These buttons allow you to make new selections, add to, subtract from, or intersect with existing selections.
- Feather [Rectangle / Ellipse]: Use this field to add a feather to a selection before you create it.
- Anti-alias [Ellipse]: Toggle this options to adjust the edge of an ellipse. When checked the edge will blend smoothly with the background, and when unchecked the edge will be pixelated. It is recommended to leave this box checked.
- Style: Choose between freeform selections or fixed sizes. The Width and Height fields are available with Fixed styles.
- Select and Mask…: Click this option to enter the Select and Mask Workspace.

The Magnetic Lasso Tool Options
- Width: Enter a value in this field to specify a detection width for the Magnetic Lasso tool to detect edges within the specified distance from the pointer.
- Contrast: Enter a value between 1% and 100% for contrast in this field to specify the lasso’s sensitivity to edges in the image. A higher value detects only edges that contrast sharply with their surroundings; a lower value detects lower-contrast edges.
- Frequency: Enter a value between 0 and 100 to specify the rate at which the lasso sets fastening points. A higher value anchors the selection border in place more quickly.
- Stylus Pressure: Click this button if you are working with a stylus tablet to select or deselect the Stylus Pressure option. When selected, an increase in stylus pressure decreases the edge width.

The Object Select Options
- Object Finder: This option provides a live magenta [default] overlay on the image for objects that it automatically detects.
- Show All Objects: Choosing this option shows an overlay for all objects automatically detected.
- Additional Options [gear]: Allows you to make changes to various tool settings.
- Mode: Toggle between a Rectangle or Lasso to drag over objects to make selections.
- Sample All Layers: Checking this option creates a selection based on all layers instead of just the currently selected layer.
- Hard Edges: Enables hard edges on the selection.
- Feedback: Use this button to provide feedback to the Photoshop team to help improve this tool.
- Select Subject: Use this button to make single-click selections, and toggle between Device [Quicker Results or Cloud [Detailed Results].
 The Quick Selection Tool Options
- Brush Options: Use this option to change brush settings of Size, Hardness, Spacing, Angle, Roundness and Pen control.
- Angle: Use this option to adjust the angle of a brush.
- Enhance Edge: Checking this option will reduce roughness and blockiness in the selection area. Enhance Edge automatically flows the selection further toward image edges and applies some of the edge refinement you can apply manually in the Select and Mask workspace.

The Magic Wand Options
- Sample Size: Toggle between Point Sample [default] and 6-pixel average options. A pixel average takes the selected square pixel value and averages the color to produce a selection based on the Tolerance value entered.
- Tolerance: Determines the color range of selected pixels. Enter a value in pixels from 0 to 255. A low value selects the few colors very similar to the pixel you click. A higher value selects a broader range of colors.
- Contiguous: Selects only areas using the same colors that are connected to the original selection.
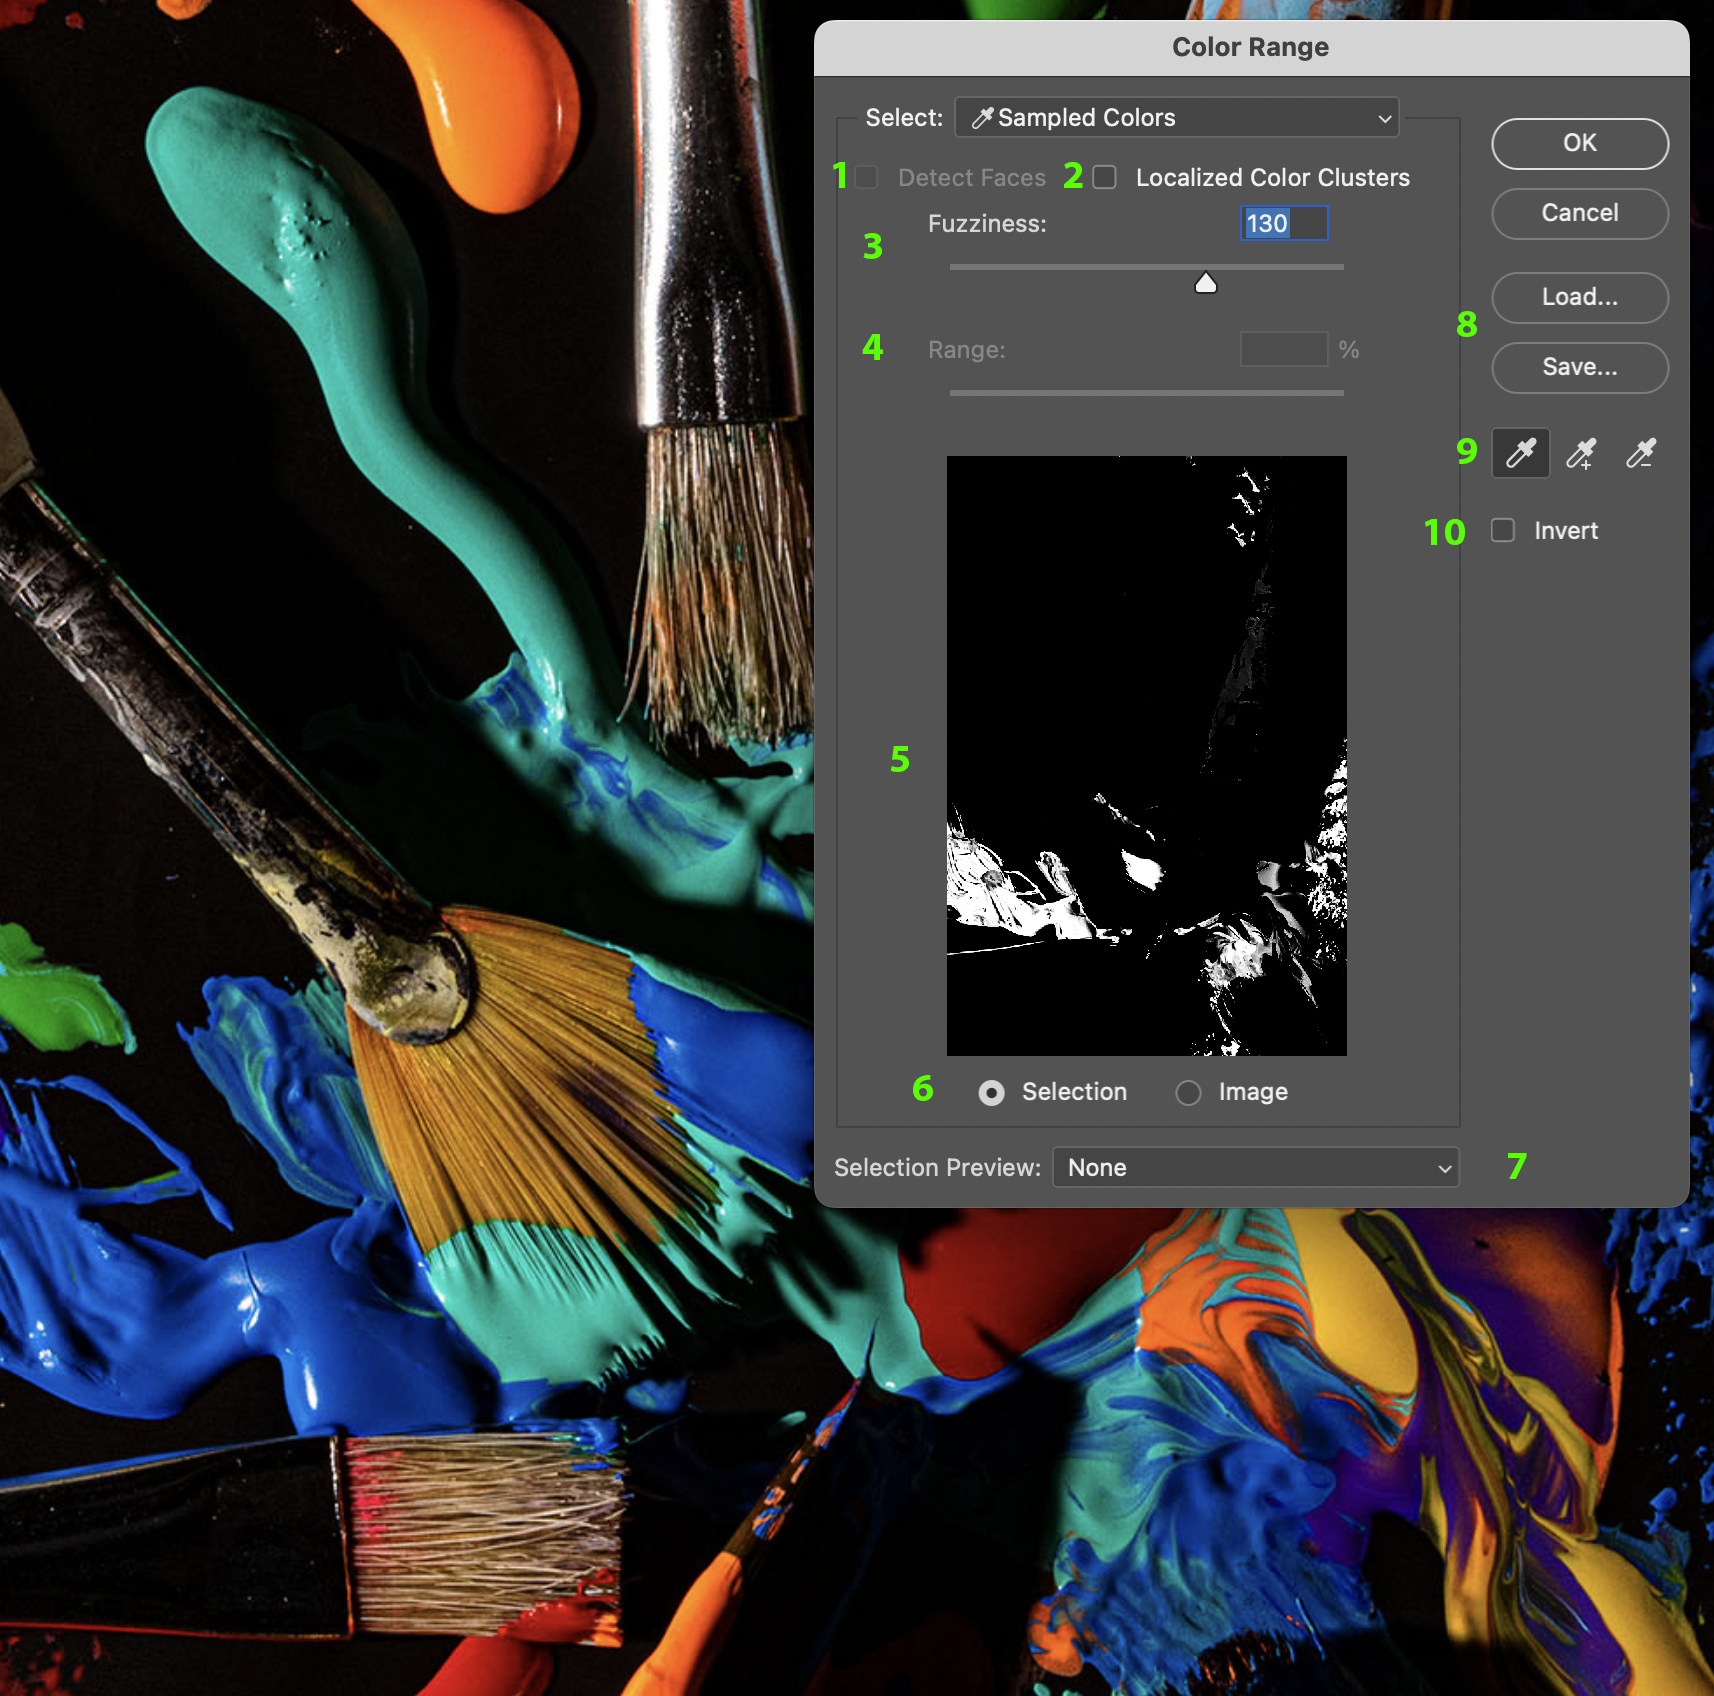
Color Range
The Color Range command selects a specified color or color range within an existing selection or an entire image. You can also select skin tones and automatically detect faces to select them. You can choose which type of colors that you want to isolate from the Select menu. The default is Sampled Colors which uses an eyedropper to select colors much like the Magic Wand tool with Add-to and Subtract-from eyedroppers in the Color Range dialog box. You can also use the shortcuts of Shift [add] or OPT / ALT [subtract] to do the same. You can also make selections of the 6-primaries, grayscale tones, Skin Tones, or Out of Gamut Colors.
The Color Range command is not available for 32‑bits-per-channel images.
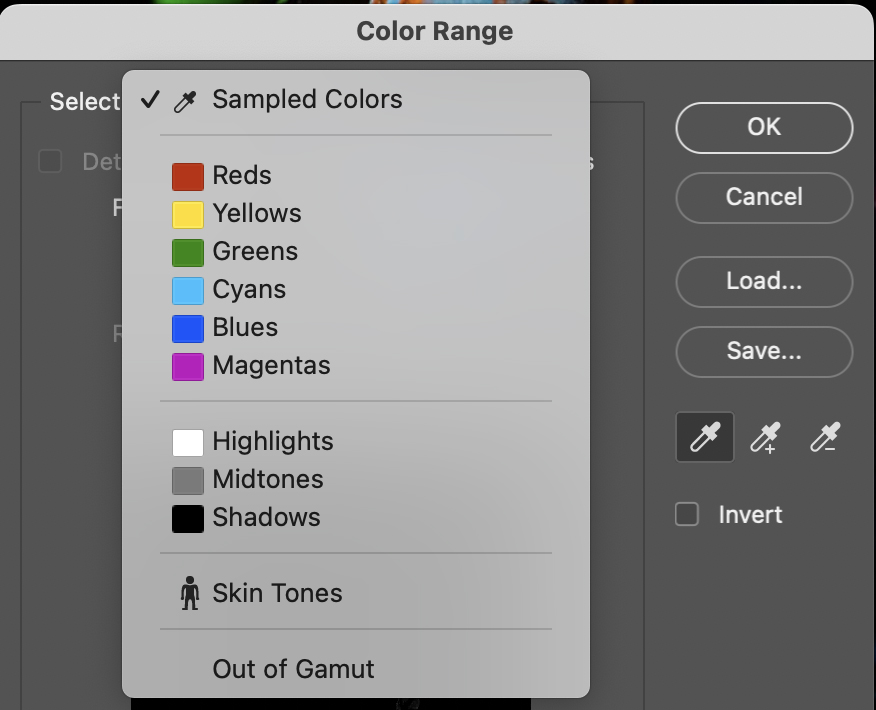
The Color Range options:
- Detect Faces: Use this option with Skin Tones from the Select menu for more accurate skin tone selections.
- Localized Color Clusters: Use this option with Sampled Colors chosen from the Select menu if you are selecting multiple color ranges in the image to build a more accurate selection.
- Fuzziness: This option controls how wide a range of colors is in the selection, and increases or decreases the amount of partially selected pixels. Use a low value to restrict the color range, or a higher value to increase the range.
- Range: If you selected Localized Color Clusters, use this slider to control how far or near a color must be from the sample points to be included in the selection.
- Preview: This image window previews the selection based on the Display Options and the Selection Preview.
- Display Options: Choose between Selection which previews the selection that will result from the sampled colors in black and white, or Image which previews the entire image.
- Selection Preview: Choose an option [None, Grayscale, Black Matte, White Matte or Quick Mask] to preview the selection in the image window.
- Load…/Save…: You can Save and Load Skin Tones, Detect Faces, and Fuzziness choices when you select Skin Tones or Sampled Colors.
- Eyedroppers: These tools allow you Select colors in an image and add to or subtract from the selection. You can also use the Shift key [add] or OPT / ALT [subtract] shortcut keys with the Eyedropper tool.
- Invert: Checking this option will invert the selection.
Focus Area
The Focus Area selection option lets you make selections based on the areas of an image that are in focus. You get started by choosing Select / Focus Area from the menu bar, that will make an automatic selection for you which you can change using the options available in the dialog box as described below.
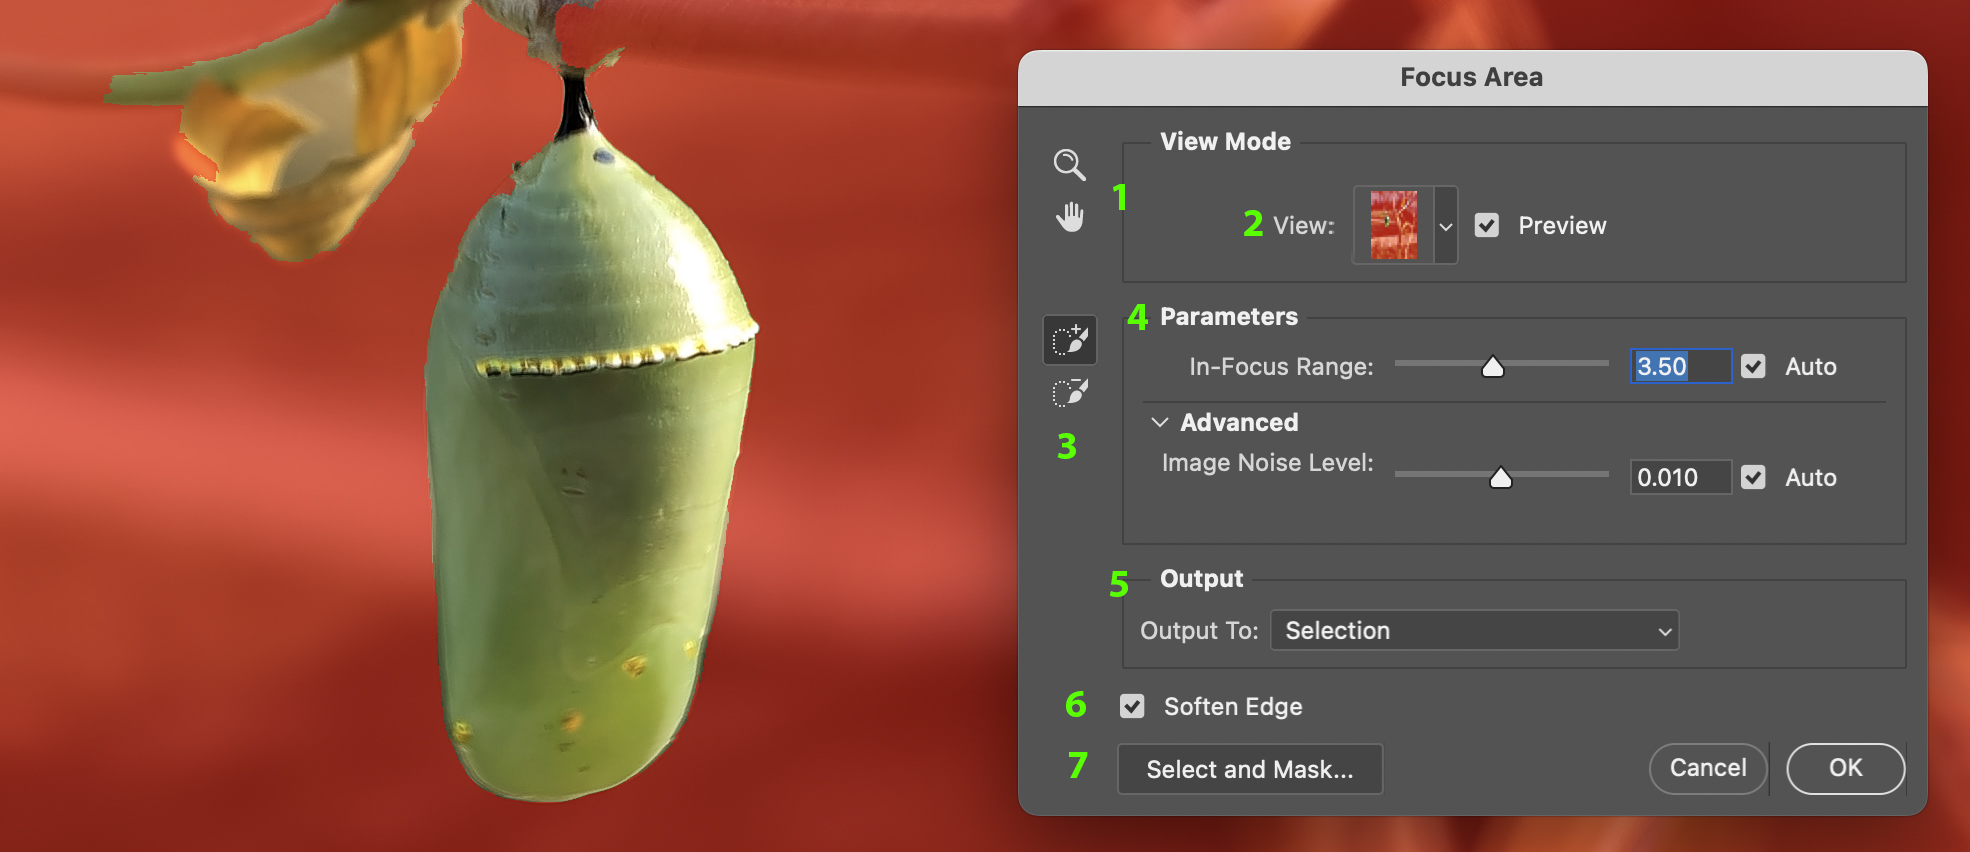
The Focus Area Options
- Tools: Magnifier and Hand tools to zoom in/out and move around the image.
- View: Use this option to choose the preview of the generated selection. F – cycles through the views and X – temporarily disables the views.
- Focus Area Tools: Use the Focus Area Add Tool [E] to add to the selection, or the Subtract Tool [E] to subtract from the selection.
- Parameters: Adjust the In-Focus Range parameter to broaden or narrow down the selection. Moving the slider to the left [0] will select the entire image while moving it to the right will only select the parts of the image in clearest focus remain selected. Use the Advanced > Image Noise Level option to control noise in the image. You can also allow Photoshop to make the adjustments for you by checking the Auto box[es].
- Output: Use this menu to select how you want to use the selection once you press OK,
- Soften Edge: Select Soften Edge to feather the edges of the selection.
- Select and Mask: Click this button if you want to fine-tune the selection edges.
Select and Mask
The Select and Mask workspace helps you make precise selections and masks quickly and easily, and replaces the Refine Edge dialog from earlier versions of Photoshop, while offering the same functionality in a streamlined workspace. This workspace takes into account hard and soft edges of the subject and provides various tools to refine the edges of a selection as seen in Figure 5.13 and described below.
You can launch Select and Mask from the menu bar [Select > Select and Mask], by using shortcuts CMD/CTRL + OPT/ALT + R, or accessing the button from the Options bar when using selection tools. A selection is not required to enter the Select and Mask workspace, because a selection can be generated within the workspace using such options as Select Subject and Refine Hair as described in the Refine Edges section in the previous chapter.
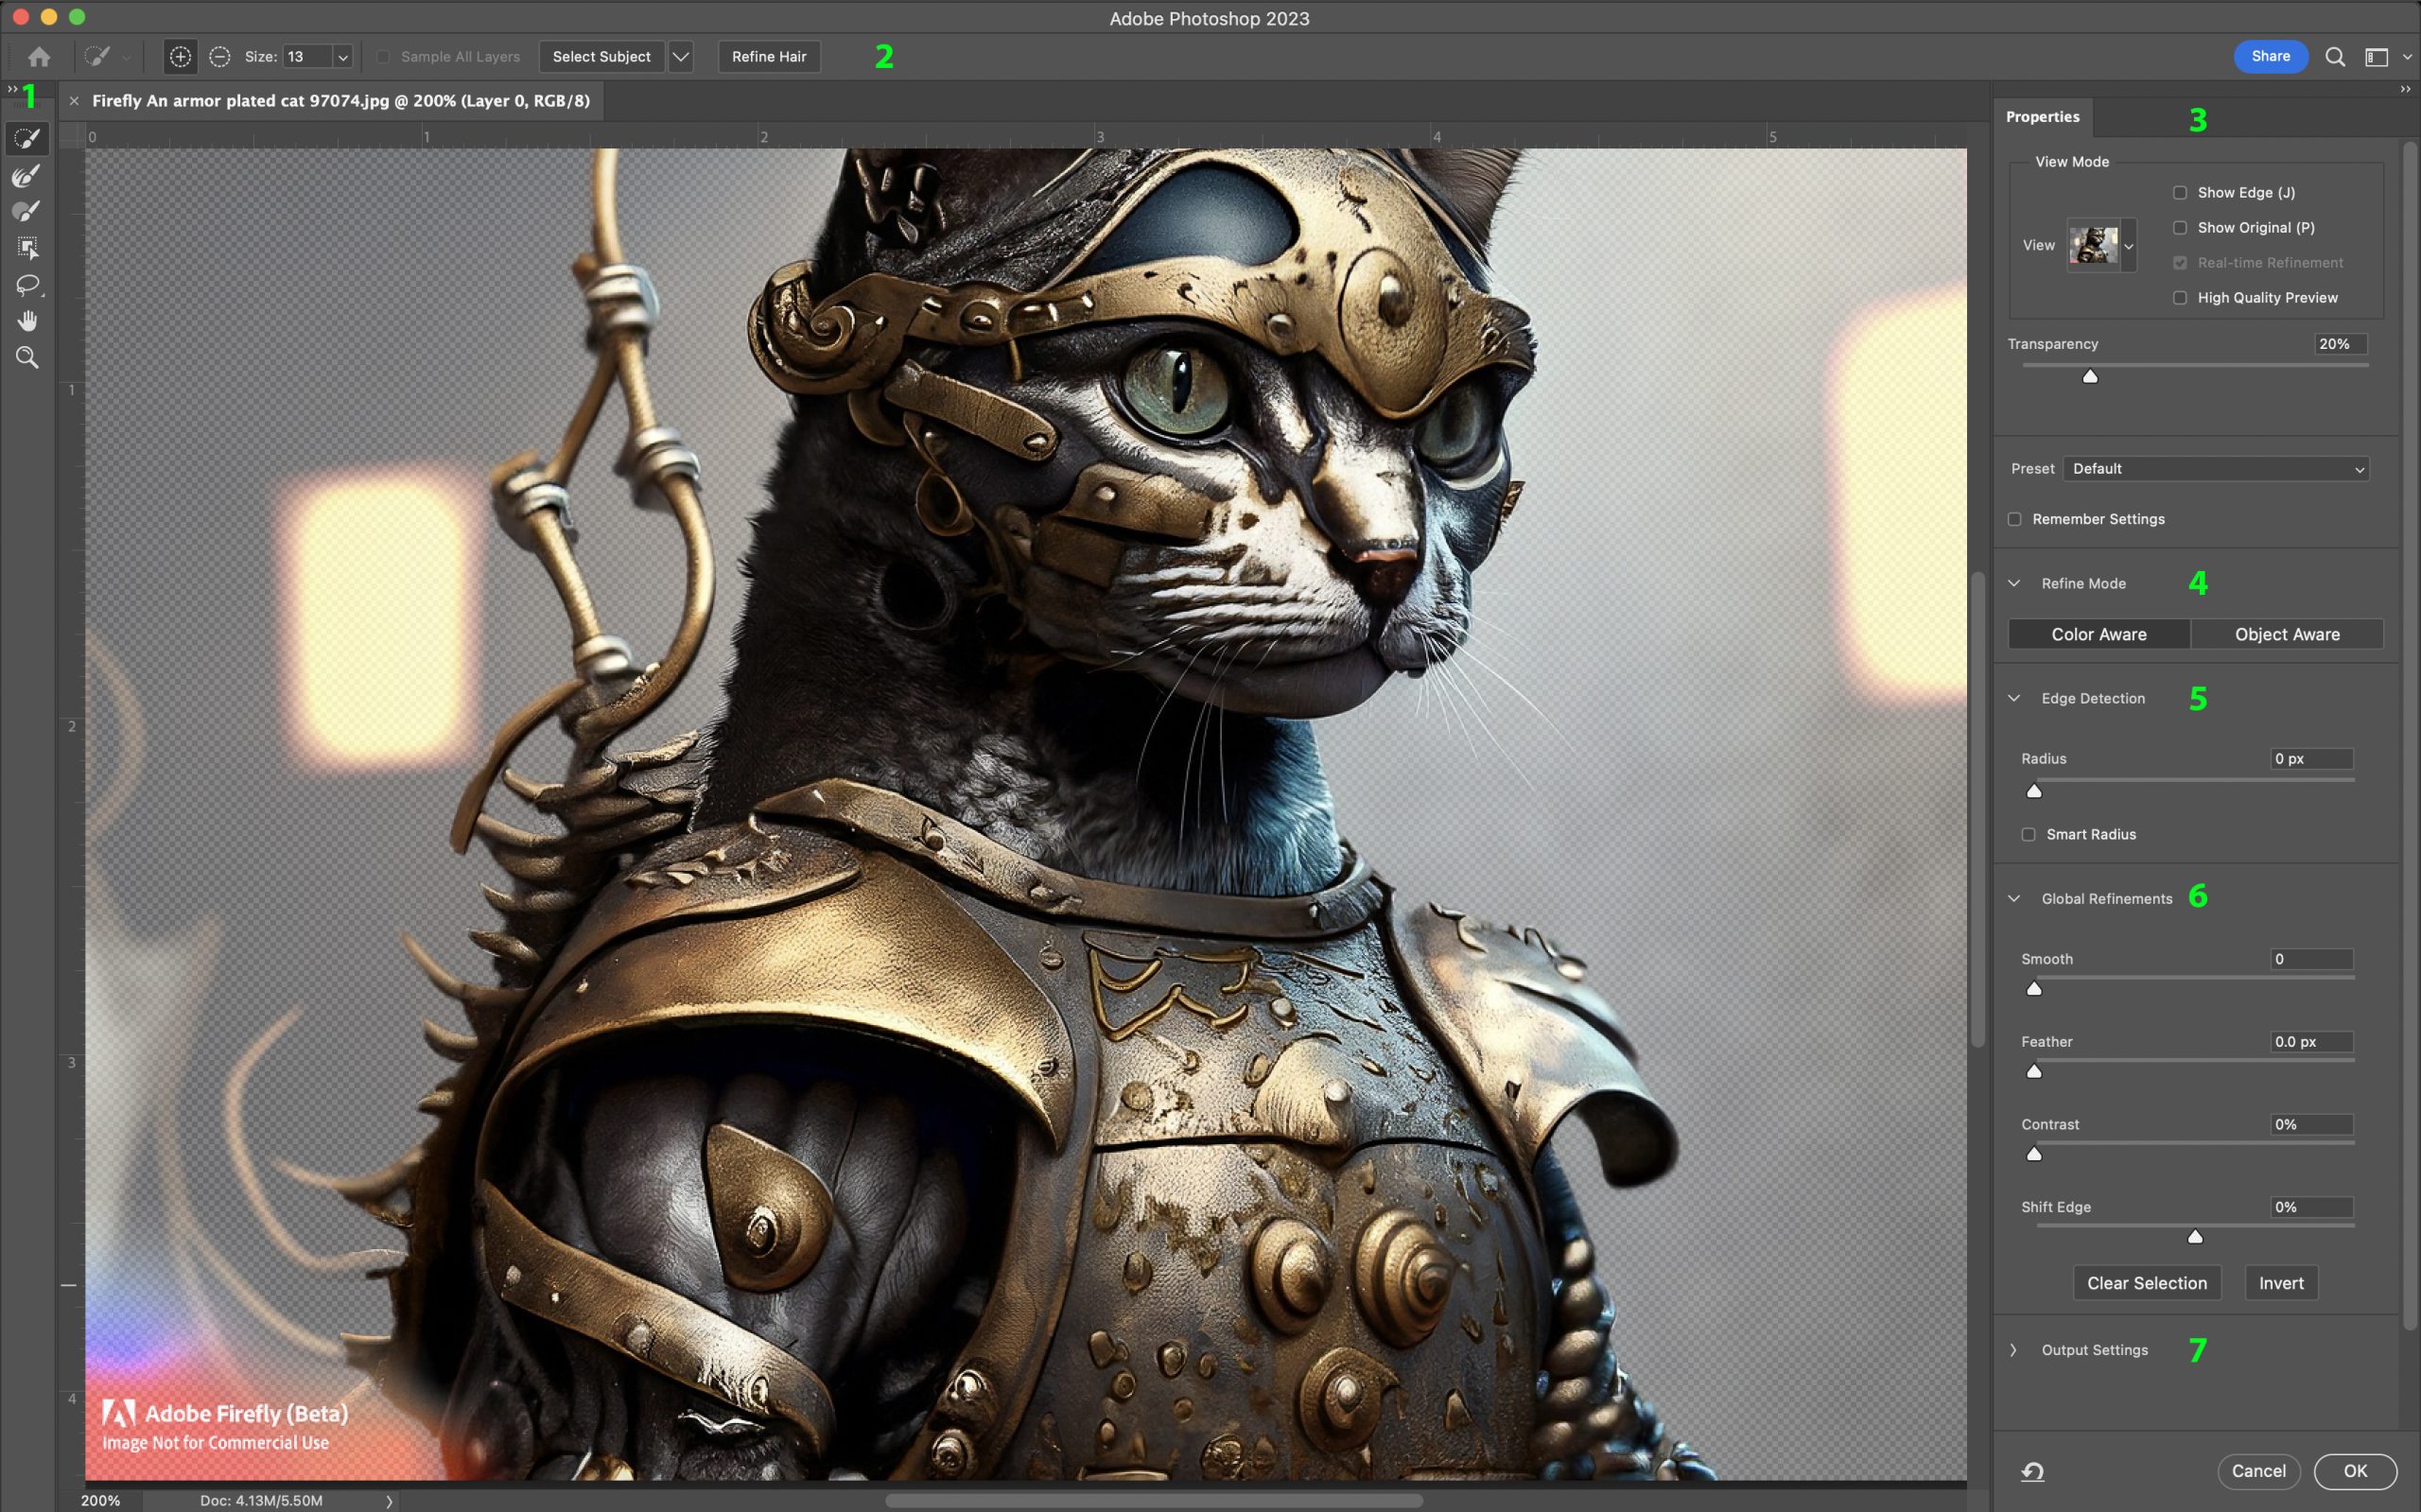
| The Select and Mask Tools | |
 |
Quick Selection Tool [W]: This tool allows you to make quick selections based on color and texture when you click or click-drag the area you want to select. The selection you make doesn’t need to be precise, because the tool automatically creates a border.
Refine Edge Brush Tool [R]: Use this tool to precisely adjust the border area where edge refinement occurs. For example, brush over soft areas such as hair or fur to add fine details to the selection. You can use the bracket keys to change the brush size. Brush Tool [B]: Use this tool to finalize or clean up details after creating a selection with any of the selection tools and refining the selection with the Refine Edge Brush. Use the Brush tool to fine-tune selections by painting over the area you want to select in the Add mode, or paint over areas you don’t want to select in the Subtract mode. Object Selection Tool: Use this tool to draw a rectangular region or a lasso around an object and it will automatically select the object inside the defined region. Lasso Tool: Draw freehand selection borders. Using this tool, you can make precise selections. Check out Select with the Lasso tool to learn more. Polygonal Lasso Tool: Draw straight-edged segments of a selection border. Using this tool, you can make straight or freehand selections. You can select this tool from the options when you right-click Lasso Tool. |
| The Options Bar |
 |
| Add / Subtract: Use these buttons to Add or Subtract [OPT / ALT] from the refinement area. Adjust the brush size if necessary [Left / Right Bracket keys or right-click].
Sample All Layers: Creates a selection based on all layers rather than only the currently selected layer. Select Subject: Click on this button to select the main subject[s] in a photo in a single click. Refine Hair: Easily find and refine difficult hair selections in a single click. Use this with the Object Aware mode for best results. |
| The Properties Panel Options | |
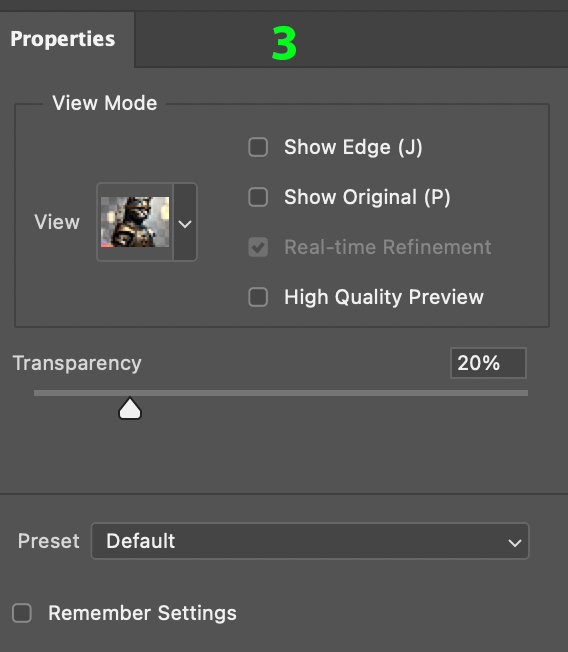 |
View Mode: You can choose one of the following view modes for your selection from the View pop-up menu:
Press F to cycle through the modes and X to temporarily disable all modes. Show Edge: Shows the area of refinement. Show Original: Shows the original selection. High Quality Preview: Renders an accurate preview of the changes that are being made. Holding down the left mouse button when this option is checked will show a higher-resolution preview. When this option is unchecked, a lower-resolution preview is displayed even on mouse down. This option may affect performance. Transparency/Opacity: You can use this option to set the transparency/opacity for the View Mode. Preset: You can use this dropdown menu to Save and Load settings. Remember Settings: This option will allow you to use the previously selected settings the next time you use the Select and Mask workspace. |
| The Refine Mode Options |
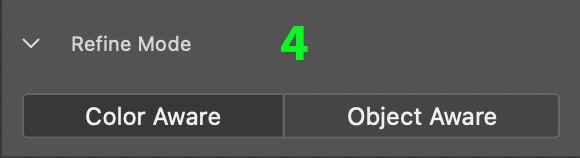 |
| Color Aware: Choose this mode for simple or contrasting backgrounds.
Object Aware: Choose this mode for hair or fur on complex backgrounds. Use this option in combination with the Refine Hair button to generate the most accurate selections. |
| The Edge Detection Options |
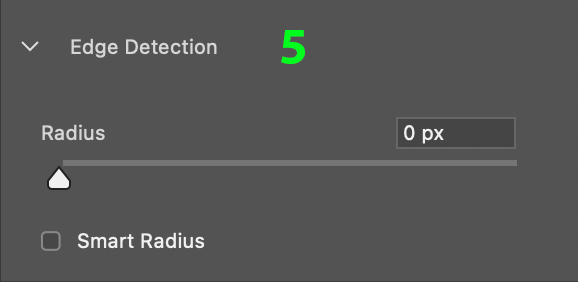 |
| Radius: Determines the size of the selection border in which edge refinement occurs. Use a small radius for sharp edges, and a large one for softer edges.
Smart Radius: Allows for a variable width refinement area around the edge of your selection. This option is helpful if your selection is a portrait that includes both hair and shoulders. In such portraits, the hair might require a larger refinement area than the shoulders, where the edge is more consistent. |
| The Global Refinements Options | |
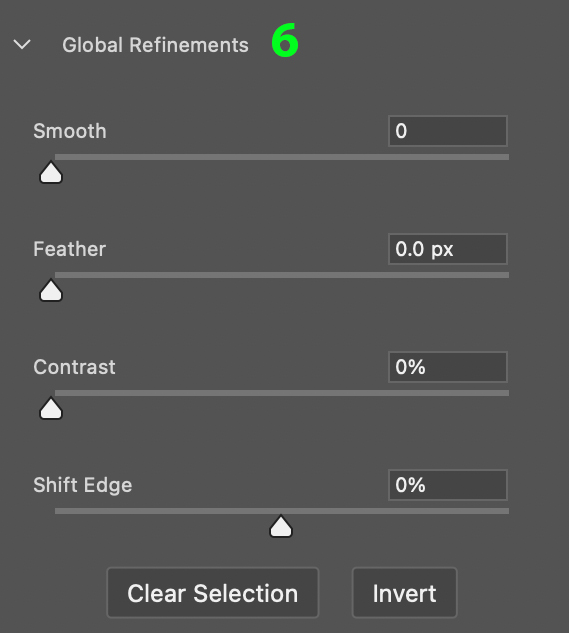 |
Smooth: Reduces irregular areas in the selection border to create a smoother outline. This option works great on selections created with a Polygonal Lasso to round off subtle corners.
Feather: Blurs the transition between the selection and the surrounding pixels Contrast: Use this option to increase or decrease the soft-edged transitions along the selection border. Shift Edge: Moves soft-edged borders inward with negative values or outward with positive ones. Shifting these borders inward can help to remove unwanted background colors from selection edges [Defringe]. |
| Output Settings |
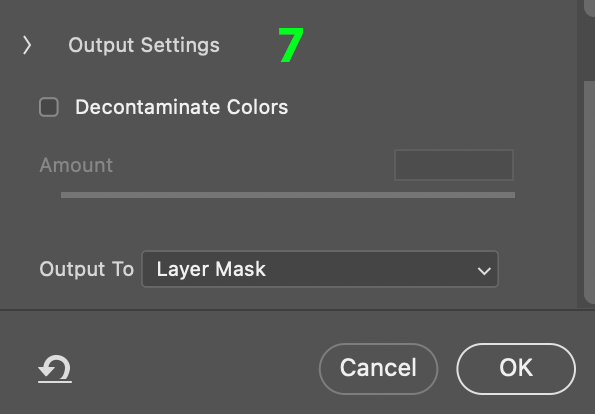 |
| Decontaminate Colors: Use this option to replace color fringing with the color of fully selected pixels nearby. The strength of color replacement is proportionate to the softness of selection edges with 100% [maximum] as the default value. Because this option changes pixel color, it requires output to a new layer or document. Retain the original layer so you can revert to it if needed.
Output To: Choose the desired option from the drop down menu to determine whether the refined selection becomes a selection, a mask, or produces a new layer or document. |
Modify Selections
Similar to the option found in the Global Refinements section of Select and Mask shown in Figure 5.19, you can modify selections in Photoshop using one of the options found in the Select > Modify menu option. You will be able to key in a pixel value for each option but will not be able to see a preview until you apply the modification, so you are just guessing.
Tip: The Contract option is a great way to assist in removing fringing in an image.
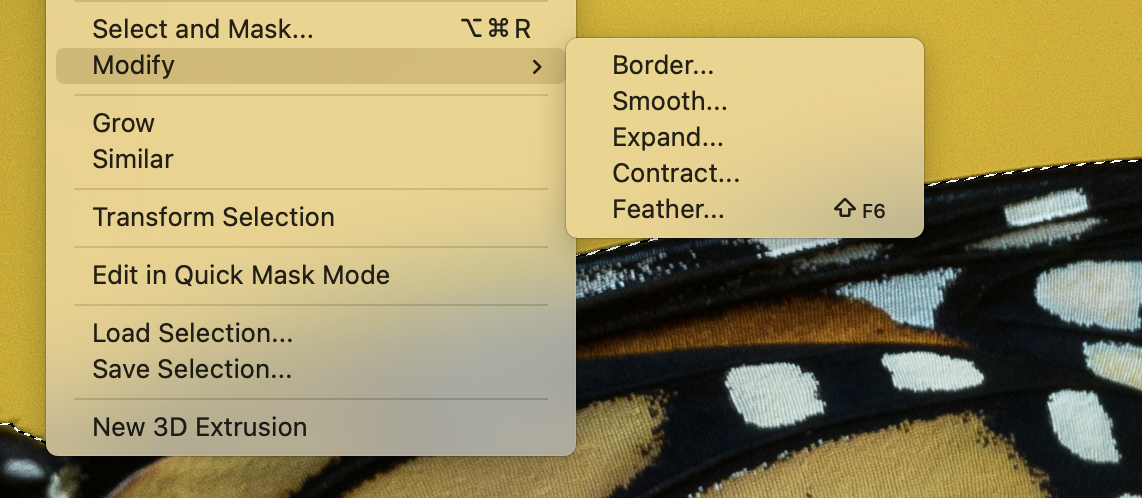
Transform Selection: This option allows you to transform a selection only but does not affect the pixels versus using Edit > Free Transform or Edit > Tranform . . . which will transform the pixels within a selected area.
