2 Resolution
 |
In this section I will discuss resolution and how to work with it in Photoshop and Lightroom. Recently, I have observed that fewer people who work with images in Photoshop fully understand what resolution is and how to work with it. This has nothing to do with them personally, but rather that resolution is not discussed much these days now that some of our workflows have changed with an emphasis on social media or screen viewing versus print.
There was a time when photographers needed to know exactly what their image size was in order to dictate the size of a print, but now we can drag-and-drop photos into templates from print providers that automatically do the work for us. I still feel that resolution is very important for us to understand especially when creating composite images because often some images are collected from the internet and their resolutions may not match those of the cameras or scanners that we are using for our personal images. This is even more true with the arrival of Artificial Intelligence [AI] for image creation, because most of the current output is not set very high.
At the time of this writing one of the more popular AI generators is Midjourney that generates images with a max upscale resolution of 1024 x 1024 which is suitable for sharing images on-screen, but would only produce a relatively small prints based on the calculations described in this section. Images can be upscaled in Photoshop or third-party apps/plug-ins like Gigapixel AI from Topaz Labs or Resize AI from On 1.
Adobe has also entered AI image creation with their newly released web app Firefly. As with Midjourney and other AI options the resolutions for newly created images still have relatively low values, the exception with Firefly is that you can start with an image of your own and add AI pixels or make modifications using Generative FIll. This technology has recently been added to the current public Beta version of Photoshop [May 2023], so this amazing AI art generator can be applied directly within Photoshop to add pixels information to existing areas of an image, or can be used to increase the canvas..
Note: There will be parts of this section where the numbers referenced may become confusing, but you will have a much better understanding of how resolution works in our applications after reading it and will be able to make educated decisions on your own images.
What is Image Resolution?
Image Resolution is measured in pixels per inch [PPI] and refers to the number of pixels that are displayed per inch of an image. This measurement only applies to raster-based images, or images that are made up of pixels such as photographs.
The more pixels an image has per inch the greater its resolution will be which in turn results in a high-quality image. A high-resolution image will produce a higher quality printed image in terms of detail, and will simultaneously be allowed to be printed at larger sizes.
To assist in resolution comprehension, let’s break it down to the capture of a photo taken with a specific camera sensor. For this example, I will reference the full-frame sensor of the Canon EOS R5 Mirrorless that can capture close to a 45 Megapixel image at its maximum image resolution of 8192 x 5464 pixels on a full-frame sensor. If we multiply these two values together we will end up with an overall pixel count of 44,761,088 pixels, If we then divide this resulting value by 1 million we will end up with a Megapixel value of 44.8 MP. The higher the effective pixel value of an image, the larger sized prints we can make with inkjet and commercial printing.
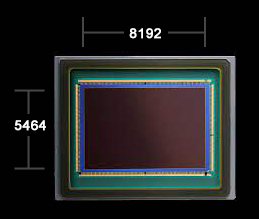 |
| 8192 x 5464 = 44,761,088 ÷ 1 million = 44.8 megapixels |
 |
 |
Output Resolution: PPI vs DPI
Resolution provides us with the details we need to determine how large we can print. Using the known values from the Canon R5 let’s determine how large of a print that we can make with actual image pixels without interpolation, which is the addition of pixels to increase the size of an image.
We already know our height and width pixel dimensions [8192 x 5464] but we need to know the output resolution that we want our image to be in order to determine our print size. Output Resolution refers to our output device and the resolution needed for the highest quality output for that device. This is where resolution becomes confusing because a raster image that we are working on in Photoshop is measured in PPI, but we measure printer output in dots per inch or DPI. The two values have different meanings, but at the same time the terminology is interchangeable; meaning that it is usually understood if you say that you have an image with a resolution of 300 dpi or 300 ppi as being the same value. However, the reality is that dots per inch do not translate the same as pixels per inch.
For example, many Epson desktop photo printers use a standard print resolution of 1440 x 720 dpi but what does this mean, and how is this value used to determine image resolution or image size? I imagine that none of your photo instructors or clients has ever asked you to provide them with a photo at 1440 ppi or even 720 ppi/dpi, and our popular editing software do not have these values as default output options either, so to help you better understand what resolutions to use for your images let’s take a closer look at current Epson desktop resolutions and break them down. For this example I will refer to the SureColor P900 which at the time of this writing, is the latest 17″ wide desktop printer for professional photographers, and the size that is popular in school digital photography labs. This printer has a max resolution of 5760 x 1440 dpi with these resolutions also being found on some of Epson’s current 24″ printers that you may also currently find in your classrooms or labs.
When we print from the Epson driver, we will have a couple of options to choose from for Output Resolution; SuperFine 1440 or SuperPhoto 2880 / 5760 [values will vary depending on printer models]. Optically, SuperFine 1440 is going to be more than sufficient for most photographs and it also conserves the use of the inks which can be quite expensive. Instead of debating if this is a correct statement, I always encourage students to do their own testing by making a print with the same image using both Output Resolution settings, and then comparing the two prints side-by-side. You may find it very difficult to see any difference between the two, especially with a letter-sized print, but I encourage you to also test larger prints especially if you print larger for exhibitions.
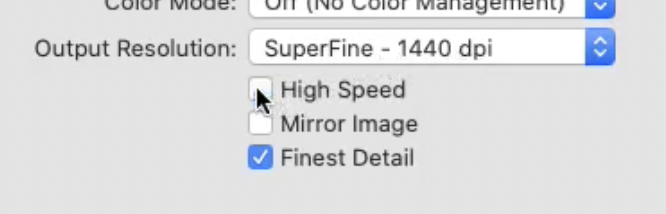 |
| SuperFine – 1440 [1440 x 720 dpi] |
| SuperPhoto – 2880 [2880 x 1440 dpi] |
| SuperPhoto – 5760 [5760 x 1440 dpi] |
You will notice in the figure above that all Epson printer resolutions are doubled from 720 dpi through 5760 dpi, but what you still do not notice in these values are the resolutions of 240 and 300 ppi that we are often requested to save our files in, and are used by our editing software. When using Adobe Lightroom to Export or Print photos you may notice that it defaults to an output resolution of 240 ppi, while at the same time if you start with Photoshop’s Camera RAW app to edit a RAW file; it uses a default resolution of 300 ppi, but why the difference?
The 300 ppi value is a lot easier to explain and I’ll get back to that, but the 240 ppi value is a bit more technical and has to do with screen resolutions. To make this explanation a little easier without adding the variables of monitor resolutions and sizes to what may already be an overwhelming amount of numbers, a good friend with this technical knowledge explained it this way; if we take the base Epson resolution of 720 dpi and divide it by the magic number of 3 [based on screen values], we get a resolution for printing of 240 ppi. The 240 ppi value is also larger than the display capabilities of most modern monitors, and it is useful in making larger prints without interpolation. Therefore, the Lightroom output resolution setting of 240 ppi is sufficient for printing to Epson printers.
This explanation may have been long and winded, but the more you understand about resolutions the more control you will have over your images and be able to best determine how large you can print with the most amount of detail.
Can you print with a higher resolution? Absolutely, and you most likely are as the print driver handles resolution calculations for you in the background based on your image-to-print size; more on this later. It is recommended that you resize your image to the exact size and resolution for your desired output instead of allowing the print driver to do this for you. For this reason it is important for you to understand resolution and how it affects your photos, so let’s take a look at how both Lightroom and Photoshop allow us to change our resolution settings before I address how the print driver changes it for you.
Lightroom Output Resolution
In the Lightroom application there are three sections where you can view or edit resolution with the default setting of 240 ppi for all three. As mentioned above this resolution is set for most inkjet printing assuming you are printing to an Epson printer. The first is found under the External Editing tab in Preferences which is used when you open files directly into Photoshop from Lightroom using the Edit In [CMD/CTRL + E] option found under the Photo menu. The second is found in the Export dialog box in the Image Sizing section where you can resize a document by checking the box on the left for height and/or width changes, with a resolution option available whether you check the box or not. When the resolution is changed this change only affects the physical dimensions when the exported file is opened in another application, such as Photoshop. The last section is in the Print Module and can be found in the Print Job on the lower right panel. This resolution is used to also determine print size whether printing directly from the application or “printing” to a JPG file.
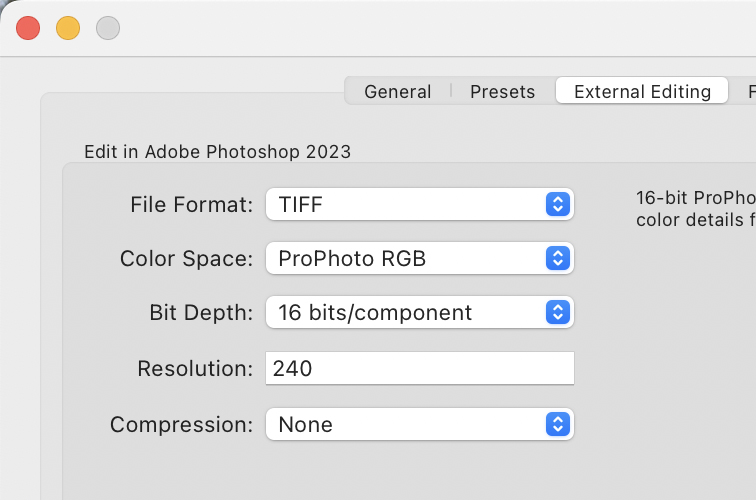 |
| Figure 2.3: Preferences > External Editing > Resolution [240] is used to determine the resolution used when opening a photo directly from Lightroom into Photoshop with the Image > Edit In option. |
 |
| Figure 2.4: The Export dialog’s Image Sizing section is used to set the resolution when Exporting files. |
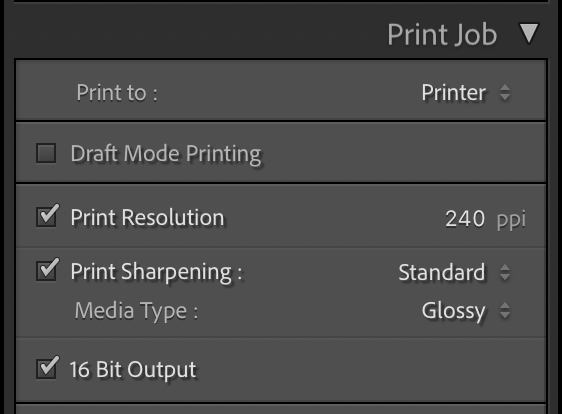 |
| Figure 2.5: The Print module’s Print Job panel is used to determine the resolution when printing directly from Lightroom. |
You can change these values at any time and what they change is the image’s physical dimensions [print size] based on the total number of pixels inherent in an image, but what they do not change are the image’s pixel dimensions. These changes are performed by dividing the image resolution by the resolution that you would like your image to be, which is 240 ppi in this example, to determine the maximum print size without interpolation. Use your image pixel resolution and divide them by 240 pixels used in Lightroom to determine the print size of your images.
| 8192 pixels ÷ 240 ppi = 34.13″ print/image size |
| 5464 pixels ÷ 240 ppi = 22.77″ print/image size |
Resolution in Photoshop
Photoshop uses a default resolution of 300 ppi for RAW photos when they are opened through the Adobe Camera RAW app. As with Lightroom, this value can be changed in the Camera RAW Preferences before the photo is opened into Photoshop, but it can also be changed after being opened in Photoshop. The 300 ppi resolution has been a common one that originates in commercial printing, but easily translates to inkjet printing as well because desktop printers from Canon use a base resolution of 300 dpi, however, most people can not specifically tell you why they use this resolution.
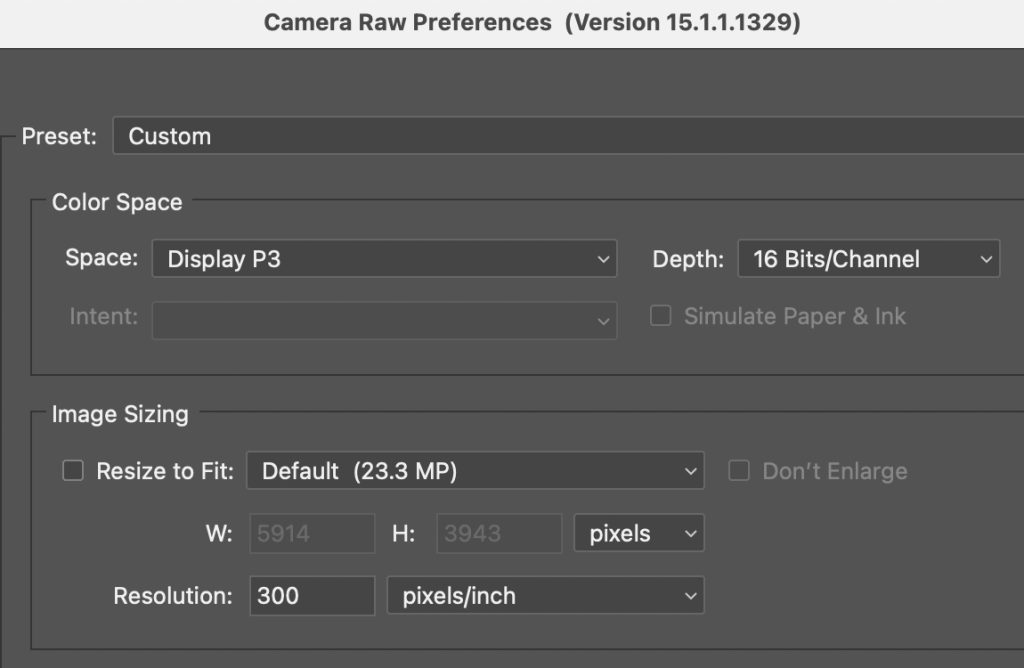 |
| Note: The Resolution can be changed prior to opening an image in Photoshop. |
To size images for commercial offset printing, such as books and magazines; these types of printers print dots at specific angles to form a dot pattern known as a rosette [see Figure 2.7] unlike the randomly sprayed dots of an inkjet printer, and they use a line screen measured in lines per inch or LPI. A typical line screen measurement is 150 lpi but can vary depending on the type of output. The rule to determine resolution for line screen is 1.5x – 2x the line screen. Therefore, 150 lpi x 2x = 300 ppi, although the resolution can be lower if the smaller 1.5x value were to be used in the calculation, but we use the 2x value to produce a higher quality image. Museum quality books use a higher line screen, so always contact a printer or ask a client how they prefer to have an image delivered, do not make assumptions about resolutions when working for others.
To determine the image/print size for the 300 ppi resolution in Photoshop we use the same calculation as used for Lightroom as depicted above, but we replace the 240 ppi value with 300 ppi.
| 8192 pixels ÷ 300 ppi = 27.31 |
| 5464 pixels ÷ 300 ppi = 18.21 |
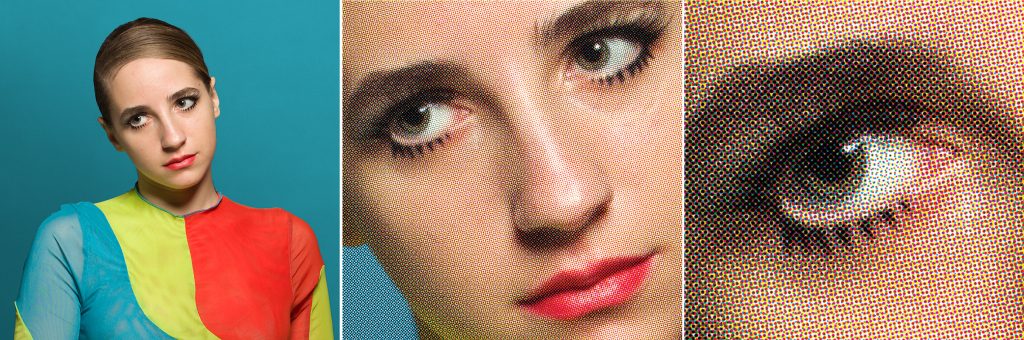 |
| This rosette pattern example is shown to help understand where the 300 ppi default resolution in Photoshop originates. Printers have evolved with some that use lasers and reusable materials that do not require screens to produce prints, such as the HP Indigo printer commonly found in photo labs to produce “press-printed” output. |
These calculations are already done for you and do not need much intervention, however, understanding what you can do with resolution and how to size images can be very helpful; especially when creating composites with various sized images from various sources. Keep in mind that you can always change your Output resolution in the Camera RAW app prior to opening a photo in Photoshop, however, you can also change the resolution or size of your image when in the application using the Canvas Size, Image Size or Print settings in Photoshop as described below.
Canvas Size
The Canvas Size settings allow you to add canvas to the overall image, essentially making the image size larger [or smaller] so you can extend your image with original pixels, AI pixels using Generative Fill, other images, solid colors, or text. This method only adds extra space to your current image, but it does not resize the image[s] that are already in the Layers panel.
To open the Canvas Size dialog box, choose Image > Image Size; shortcuts OPT + CMD + C [Mac] or ALT + CTRL + C [PC].
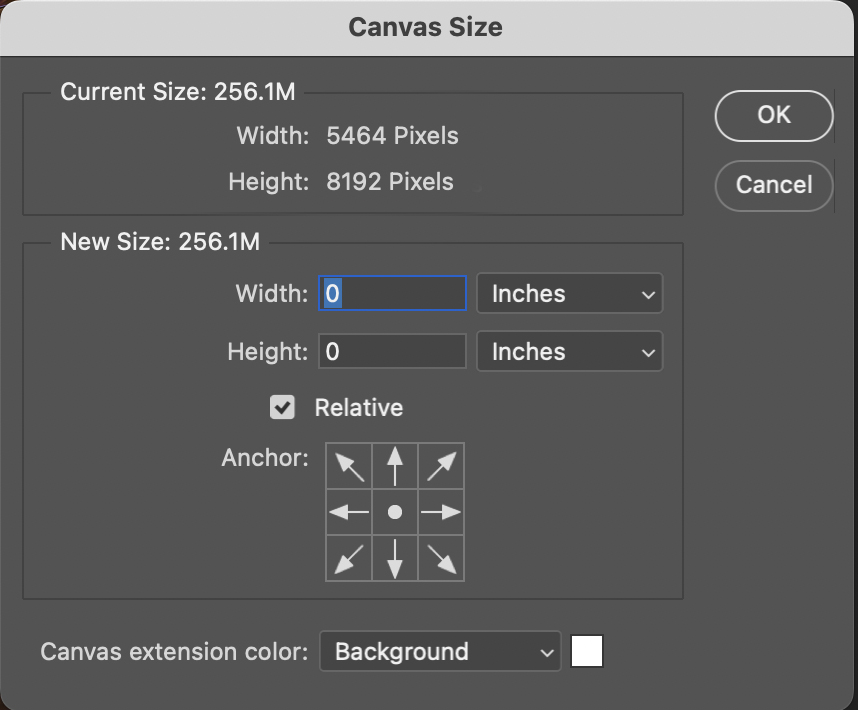 |
Current Size: This section shows the flattened file size and the current width and height pixel dimensions of the canvas.
New Size: When the Relative option is not checked the width and height values will be shown with the same size values as the Current Size section, but you can add to these dimensions to increase the overall size of the canvas. These values can be adjusted in Pixels, Inches, Percent, etc from the drop down menu to the right. Using this method, you would add the amount that you would like to increase the canvas by to the existing value to determine the new size of your image. If you prefer to simplify this process and simply key in how much you would like to increase the image by; check the Relative box and this will zero-out both width and height fields so whatever value you enter into one of these fields will be the amount that you will increase your canvas by.
Anchor: The anchor holds the current image in place and adds canvas to one, and up to four sides of the active image. There are 9-squares used to indicate the position of the current image with the default anchor position being a circle in the center square. If you were to add 4” to both the width and height fields, the canvas would increase by 2” for each of the four sides. If you were to move the anchor to any one of the three bottom squares and add 4” to the height, all 4” will be added to the top because no width values were added. Pay attention to the arrows when using this setting. The increases are split evenly so Photoshop will always divide the value you enter by 2 if adding canvas to both sides which is performed by making one of the middle or center squares the anchor.
Canvas Extension Color: If you have a flattened image, or locked Background layer; Photoshop will fill any new canvas with an extension color. The default color is Background Color which is usually white, but you can choose Foreground Color, Black, Gray or any other color. If you do not have a flattened image, this option will not be available and the extension will be represented by transparency.
Image Size
The Image Size settings allow you to resize, or resample an image by physically making it larger [upsampling] or smaller [downsampling]. Making an image larger [adding data/pixels] or smaller [remove data/pixels] degrades the image quality to some extent, although easier and more desirable to make an image smaller the process becomes a bit more complex when enlarging an image as the original pixels are spread out and Photoshop has to guess where to add the new pixels via interpolation. Photoshop does a great job with both, but it is still important to have an understanding of what is happening to your pixels during this process, which also helps to make decisions on which options to select within the dialog box. Please keep in mind that the original pixels are spread out during enlarging, new pixels are created between the original ones to fill in the gaps, and as a result the image becomes softer. How much softer depends on how large you make your image from the original, but fortunately Photoshop does an excellent job at making enlargements so this process can be painless, especially if you are working with original photographs, versus low resolution images obtained from a website. This section will break down the Image Size dialog box to help you better work with its options to control the resampling of your images.
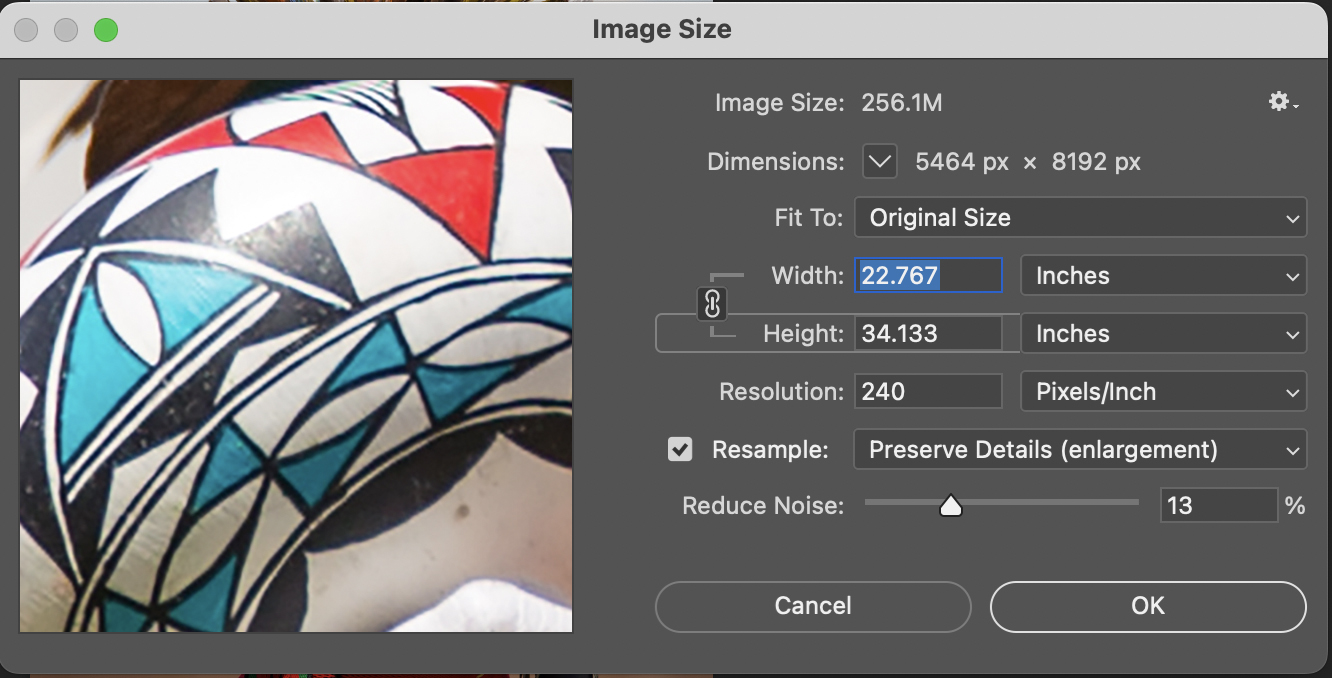
Image Size: Shows the current flattened file size in megabytes, but can change to show a before and after of the new size depending on the adjustments made
Dimensions: This section shows the original image size in pixels [default] but these values can be changed in the Fit To: drop down menu. The Width and Height can be shown in Pixels, Inches, Percent, etc; and will automatically calculate the print size based on the Resolution option below them. Most important to note in this section are the brackets on the left side connected by the chain link icon. The chain link indicates that the aspect ratio is constrained, so when you change the width or height the opposite value will change to maintain the current aspect ratio regardless of the size change. Clicking on the chain link will disable the aspect ratio and make the width and height independent of each other, so when you change one of the values only that dimension will change. Be careful if you disable the aspect ratio as it can easily distort your image.
Resolution: This field represents the output resolution that you would like your image to use when printing and is measured in Pixels per Inch by default, but can also be changed to Pixels per Centimeter. As stated earlier in this section the higher the resolution the smaller the image print size, the lower the resolution the larger the image print size. Please see Figure 2.10 for an example of various resolutions and how they affect the image size based on the calculations of the resolution multiplied by the pixel dimensions.
Resample: This section affects how changes are made to the resampling of your image and can be turned on or disabled.
- When the Resample box is turned on you can change the Width and Height to affect the physical size of the image without affecting the Resolution; while the drop down menu allows you to choose how your image will be resampled. Please see the Resampling Options below for descriptions of what each of these settings does.
- When the Resample box is turned off you can change the image size but it will not change the actual image data, or pixel count. Please note the Image Size dimensions if you turn this option off as size does not change because no data/pixels are being added or removed.
Resampling options:
Automatic: Photoshop chooses the resampling method based on whether the image is resampled up or down using one of the settings below. This may be the best option if you are not sure which setting to use.
Preserve Details [enlargement]: The Reduce Noise slider becomes available for smoothing out noise as the image is scaled up to compensate for possible oversharpening of an image.
Preserve Details 2.0: This option uses advanced learning artificial intelligence to detect and maintain important image details without oversharpening.
Bicubic Smoother [enlargement]: This option is designed to produce good results for enlargements based on Bicubic interpolation to produce smoother results in comparison to bilinear interpolation, or how the newly added pixels are constructed.
Bicubic Sharper [reduction]: This option is good for making photos smaller by using bicubic interpolation with enhanced sharpening to maintain image detail.
Bicubic [smooth gradients]: This option is slower but a more precise option as if examines the values of surrounding pixels to perform the complex calculations used to produce smoother tonal gradations.
Nearest Neighbor [hard edges]: This option makes faster, yet less precise changes but focuses on harder
Bilinear: This option adds pixels by averaging the color values of the surrounding pixels and produces medium-quality results
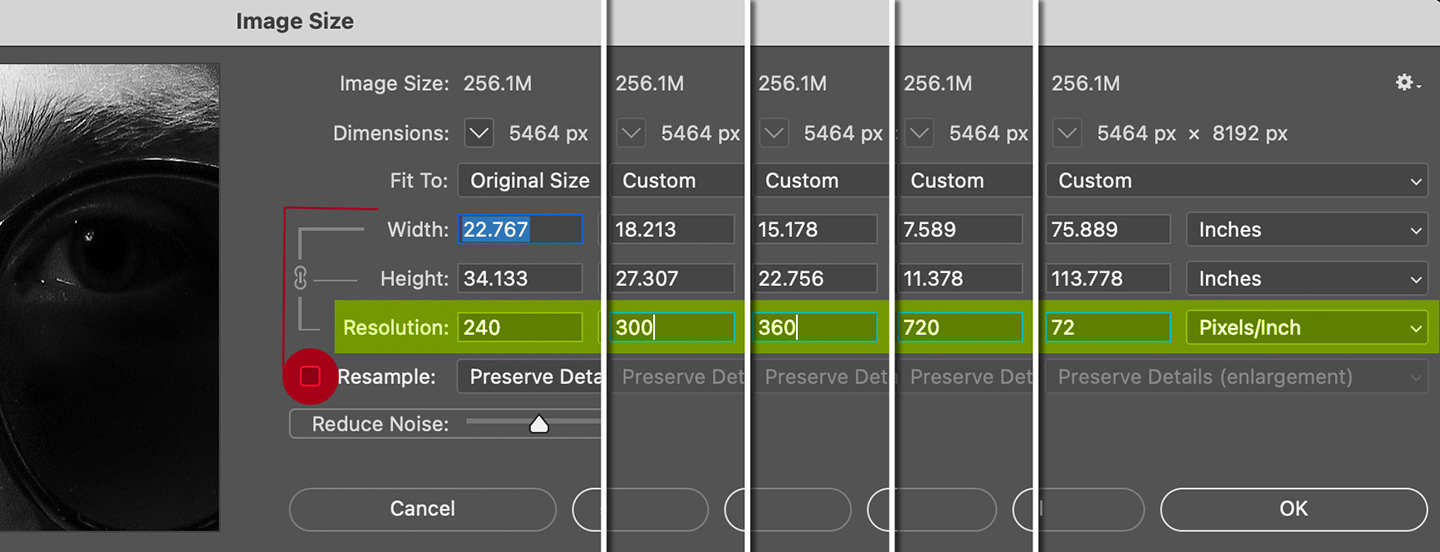 |
We determine image size by dividing the image resolution by the output resolution as described earlier in this section, so in the example of the R5 in Figure 2.8 please note the resolution values highlighted in green which are the values we are using to calculate for the print size, so each value [240, 300, 360, 720, 72] is multiplied by the image size value shown in the Dimensions section to produce the max print size for the width and height. For example, if we use the resolution of 240 x 8192 we get a max print size of 34.133″, and so on.
The resolutions shown in Figure 2.8 are not random. I have already discussed 240 ppi and 300 ppi as they apply in Lightroom and Photoshop, while 360 and 720 ppi are based on the notion that if you want a direct “dot-to-dot” print from an Epson printer then you must use an image resolution based on its print resolution. The smallest Epson printer resolution is 720 dpi, which translates to the 720 ppi image resolution, while 360 ppi is half of that value. Please note the print sizes if and when you use these values in comparison to the defaults of 240/300 for Lightroom and Photoshop. I only add these resolutions in case you come across them in writing or conversation.
The resolution you use is completely up to you and I believe that it is more important to understand how to choose the proper resolution than blindly follow someone telling you their opinion. My best advice is to always test for yourself to see which one works best for you, and to always know your output. Also keep in mind the higher the image resolution, the smaller the print. The 72 ppi resolution has historically been used as a screen resolution for social media, websites and video, however, screens resolutions have changed with 4 – 5k monitors, but it is still often used when determining screen use. Therefore, lower resolutions produce larger image sizes, which is why you only see a small portion of your image when you zoom in to 100% because Photoshop or Lightroom are using the actual monitor resolution to depict the pixels in the image. You may need to review your monitor documentation or OS Monitor Preferences to know what resolution is being used.
I warned you these numbers might be confusing, and keeping the Calculator app in your dock might be useful to calculate for print sizes.
As mentioned above, a lot of these calculations are done for us in a couple of different ways; one is through the Image Size dialog box and the other is in the Print dialog box when we are actually sending a file to a connected printer. Let’s start with the Image Size dialog box and reference Figure 2.8 to break it down. The image used in this example was a photo taken in portrait mode so the larger dimension will be the height.
Printing in Photoshop
Photoshop’s Print Settings dialog box will automatically adjust your image size without your knowledge. It factors in the overall image dimensions and resolution to print your image on the paper size of your choosing. Many students find themselves printing on letter-sized paper, especially when first learning as printing papers can be very expensive. It is also Photoshop’s default paper size, so when a user enters this dialog box they will immediately notice that they are only seeing a small portion of their photo in the print preview area for the letter-sized paper. This is a direct result of the image size and resolution because Photoshop intendeds to print the image at 100% of the actual size as noted in the Scaled Print Size section of the Position and Size panel of the Print Settings shown in Figure 2.11.
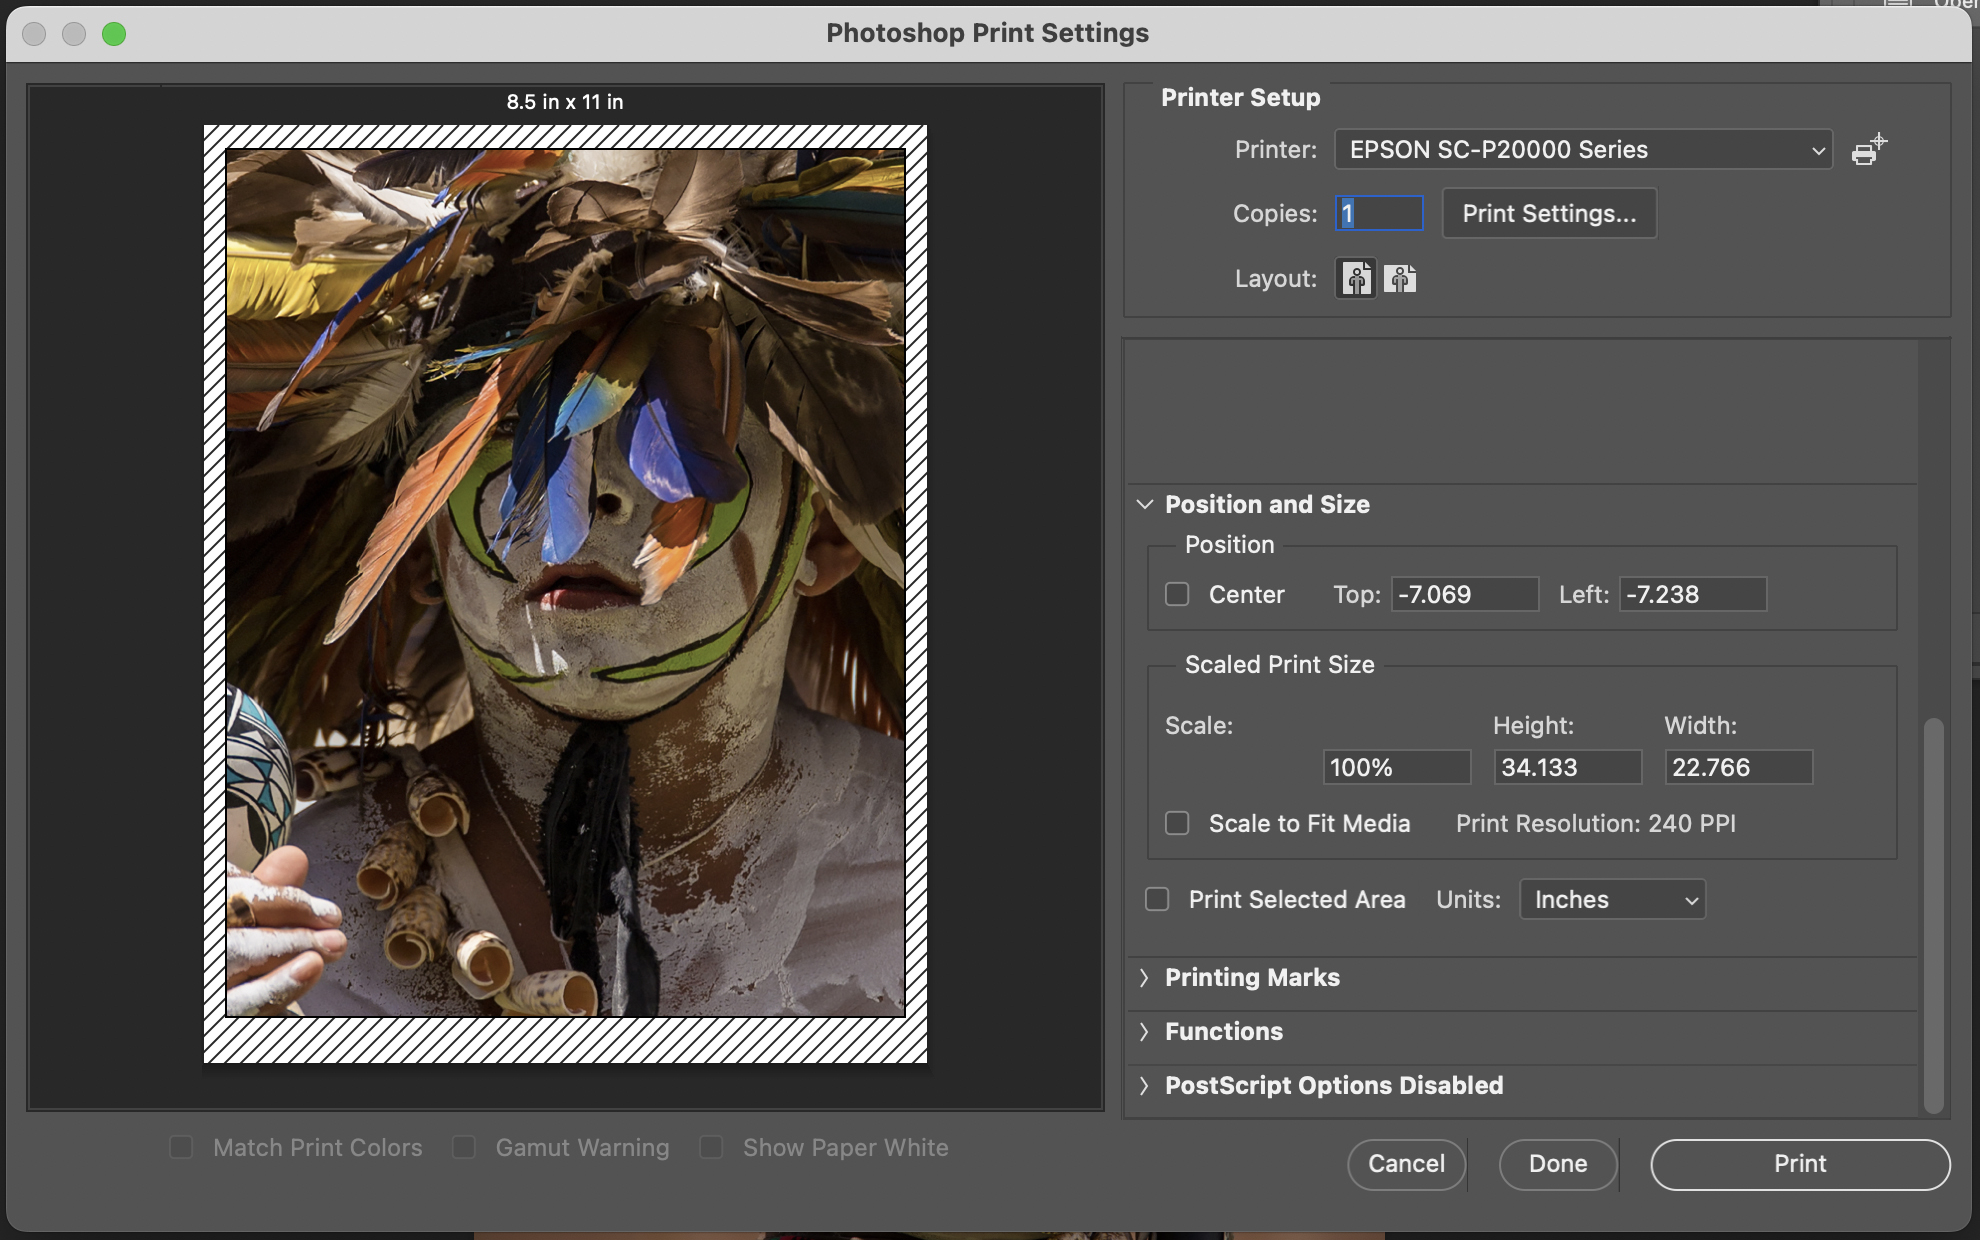
Note: The Scale is set to 100% of an actual size of 34.133″ x 22.768″ with a Print Resolution of 240 ppi.
In order to print the entire image within the print area for a letter-sized piece of paper the user must first scroll down to the Scaled Print Size section and check the box for the Scale to Fit Media option, which will then adjust the Height, Width, and Resolution accordingly as seen in Figure 2.12 below. When activated; the image in this example is resized to 30.02% of the original size producing a height of 10.25″, a width of 6.836″ and a resolution of 799 ppi, based on calculations that we had discussed above.
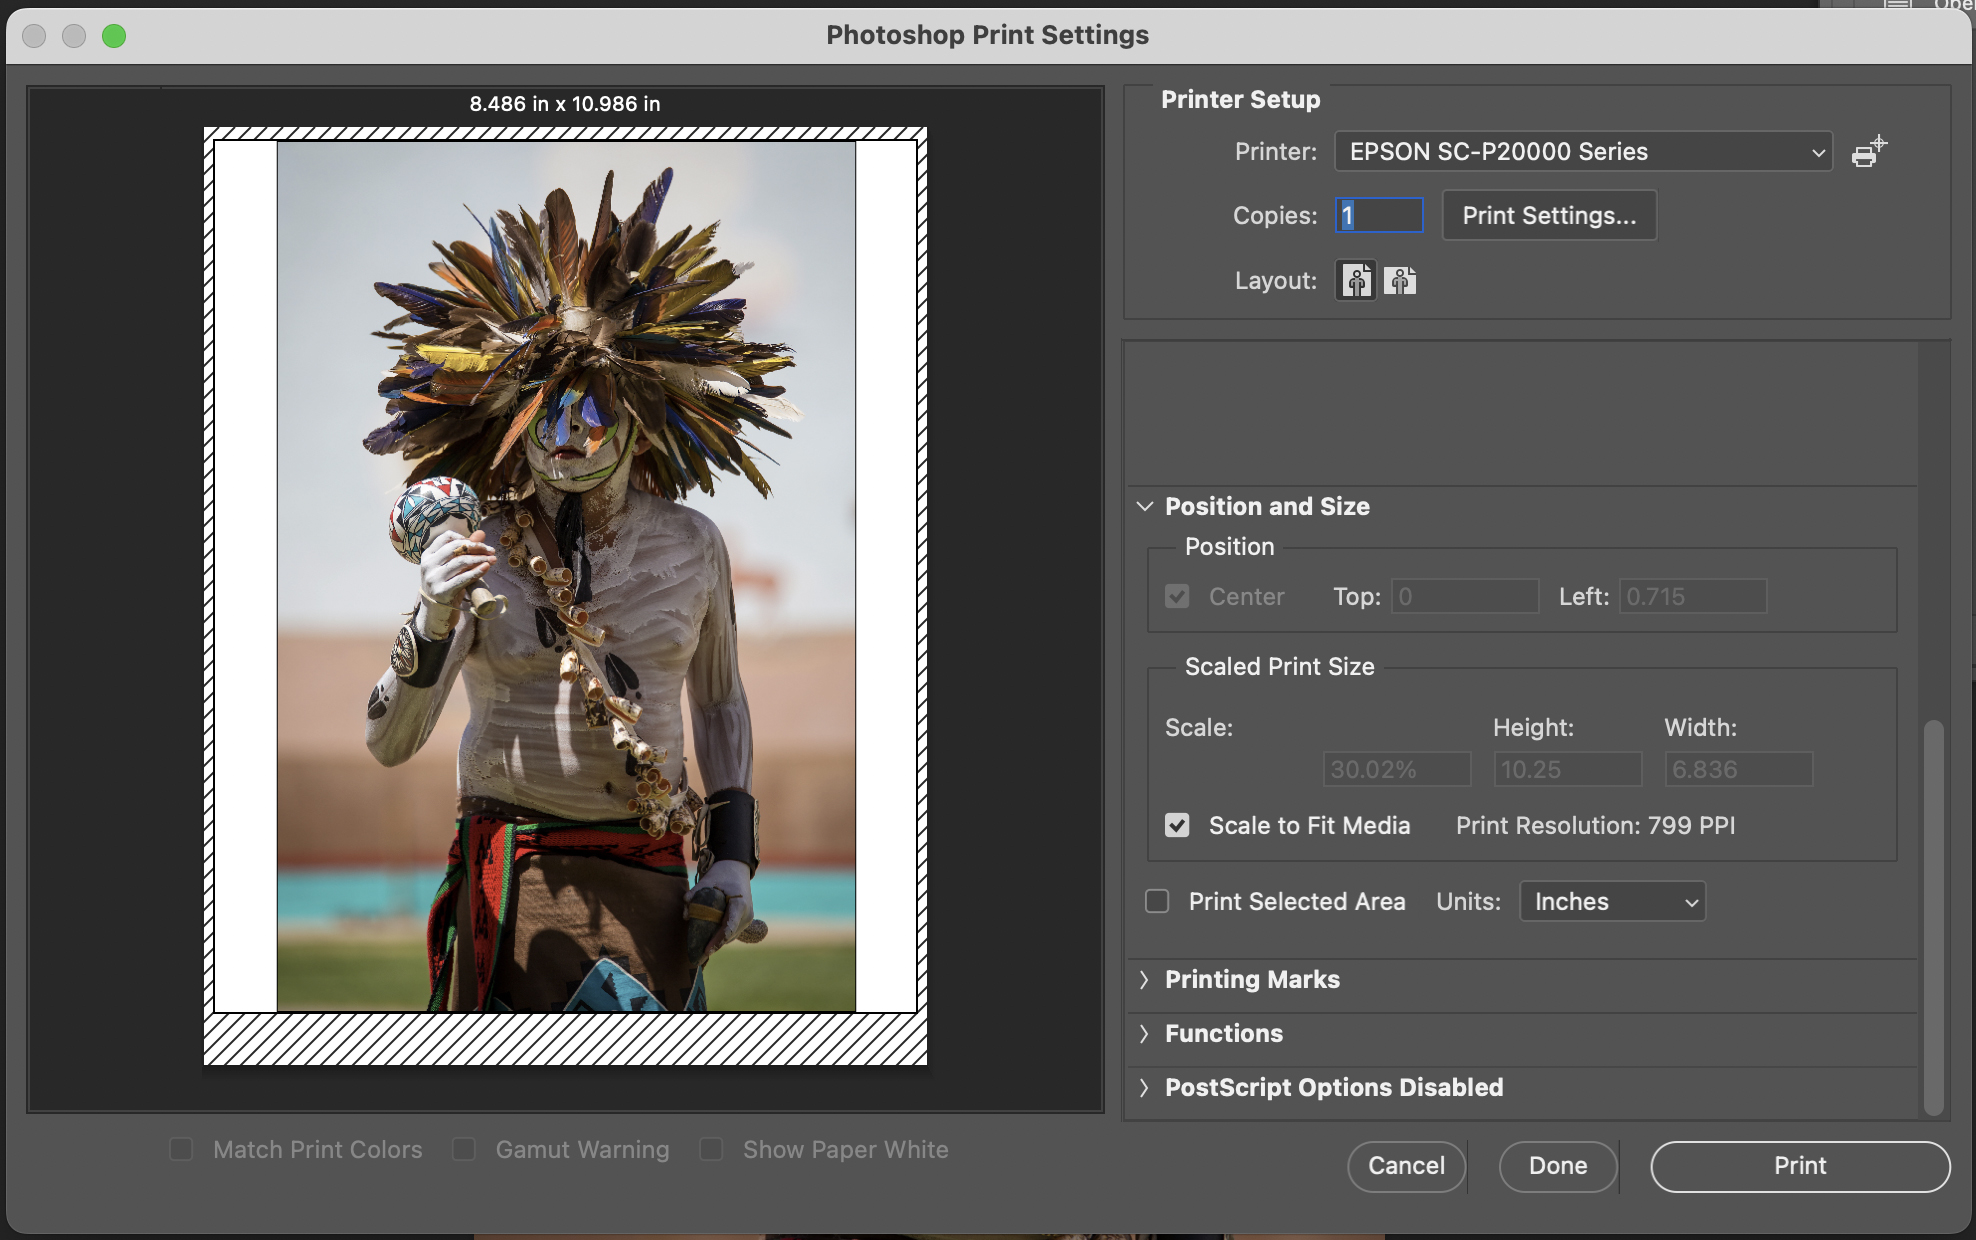
Many professional photographers prefer not to let Photoshop’s print driver make these image sizing calculations for them because they may produce odd values, such as the random 799 ppi resolution. These same photographers may choose to resample their image in the Image Size dialog box at a specific resolution for their output device. As mentioned earlier, please take time to experiment and learn what works best for you and your workflow.
| The key to setting up your files for output is to always know what your output will be so you can correctly set up your work and have the correct resolution, color space, bit depth and file type. It is most helpful if you know this information before you even make the photos to ensure that you have the appropriate orientation and space around the subject. Contact your print provider or client for specifics if you are unsure. |
